
Dining Room Transformation: The Secret to a Stunning China Cabinet Makeover
There’s an undeniable satisfaction that comes with completing a major home project, especially when it involves transforming a central space like your dining room. For months, our dining room, while charming, felt like it was missing that final, defining touch. But now, it’s official: our dining room is finally and truly done! The last item on my extensive to-do list—lining the back of our built-in china cabinet—has been triumphantly crossed off, marking the culmination of a journey in design and DIY.
The China Cabinet Conundrum: From Bland to Brilliant
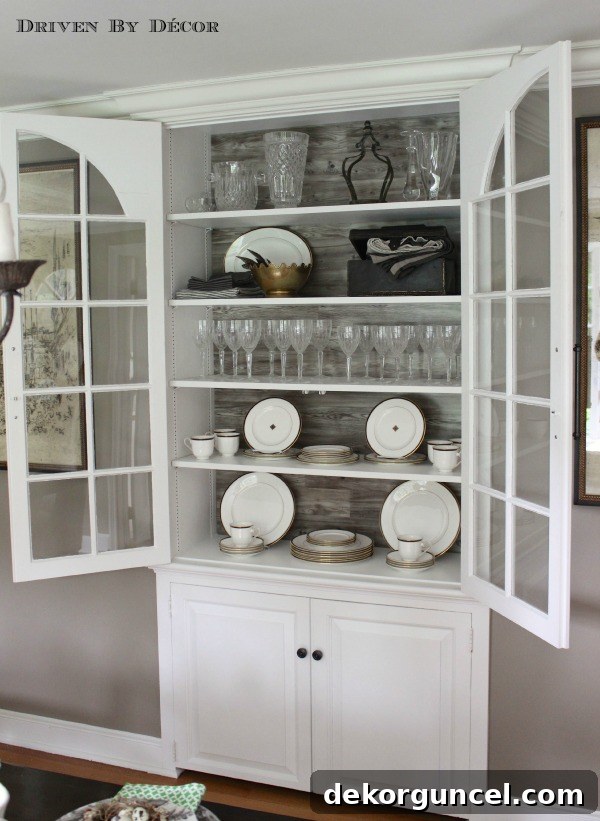
Our built-in china cabinet, with its classic New England charm, was undeniably a beautiful feature in our dining room. However, despite its inherent appeal, it presented a common design dilemma: a lack of contrast. As you can see from the “before” image, the cabinet’s interior was a simple, stark white. While clean and crisp, this minimalist backdrop meant that our cherished collection of crystal and delicate white china simply faded into obscurity. Instead of being showcased, these elegant pieces seemed to disappear against the identical white background, losing their sparkle and individual character.
My vision for this space was clear: I wanted to create a backdrop that would allow our treasured items to truly shine, to “pop” against a contrasting surface. Beyond mere visibility, I aimed to infuse the room with an additional layer of warmth, depth, and decorative interest. The goal was not just to make the contents stand out but to elevate the entire aesthetic of the dining room, making it feel more curated, inviting, and complete. A thoughtfully chosen backdrop, I knew, could be the key to achieving this transformative effect, adding personality and a touch of unexpected elegance to an otherwise understated piece.
Hunting for the Perfect Backdrop: A Design Quest
The journey to finding the ideal material for the china cabinet’s interior was an adventure in itself, filled with exciting discoveries, unexpected challenges, and a few budget-related detours. My initial, long-held plan was to use reclaimed barnwood. The rustic texture, natural imperfections, and inherent warmth of barnwood seemed like the perfect complement to our home’s aesthetic, promising to add character and a story to the cabinet.
The Barnwood Dream: A Rustic Vision Derailed by Cost
My excitement was palpable as I embarked on the quest for the perfect barnwood. I diligently researched and found a promising source, envisioning the authentic charm it would bring to our dining space. I spent over an hour meticulously sifting through countless pieces of wood, carefully selecting each plank to ensure it met my aesthetic standards. The anticipation built with every chosen piece, imagining the beautiful, textured backdrop it would create. However, that excitement was abruptly halted when the total cost was tallied: over $200. This price tag was significantly beyond what I had budgeted for this particular project, forcing me to leave empty-handed, my barnwood dream temporarily shattered. It was a stark reminder that sometimes, the most aesthetically pleasing option isn’t always the most practical or budget-friendly, a common reality for many DIY enthusiasts.
Exploring Creative Alternatives: When Plan A Fails, Innovate!
With barnwood out of the picture, I had to pivot, considering a range of other materials that might achieve a similar effect without breaking the bank. Each option presented its own set of pros and cons, and the selection process involved weighing aesthetics against cost, ease of installation, and long-term maintenance.
- Pallet Wood: This was a strong contender due to its incredible cost-effectiveness and rustic appeal, similar to barnwood. However, pallet wood often requires extensive cleaning, sanding, and sometimes even pest treatment, which can be time-consuming and labor-intensive. Its inconsistent nature can also make achieving a uniform look challenging, and splinters or rough edges were a concern for a cabinet where delicate items are stored.
- Wood Paneling: Options like beadboard or shiplap came to mind. These would offer a classic, textured look that could enhance the New England charm of the cabinet. Wood paneling is relatively easy to install and paint, offering a clean finish. However, I felt it might lean too traditional and might not provide the unique texture or depth I was seeking to truly make the crystal and china stand out dynamically.
- Grasscloth Wallpaper: For a more sophisticated, natural texture, grasscloth wallpaper was considered. It brings a beautiful organic warmth and subtle texture that can be incredibly elegant. The downsides included its delicate nature (prone to damage if not handled carefully), potential installation difficulties (especially ensuring seamless seams), and its sensitivity to moisture, which could be an issue in a dining room if spills occurred during entertaining.
Each alternative brought me closer to understanding exactly what I wanted: a material that was visually striking, offered warmth and texture, was budget-friendly, and relatively easy to install. The search for this perfect blend of attributes eventually led me down an entirely unexpected path.
The Unexpected Revelation: Laminate Flooring as a Design Solution
What drew me in was the incredible depth and variation in its tones. The Grey Yew offered a sophisticated blend of warm grays and subtle browns, mimicking the natural beauty of wood without the hefty price tag or the inherent challenges of real timber. It provided precisely the kind of rich, warm backdrop I had envisioned, one that would make our white china and gleaming crystal truly pop, creating a captivating contrast. The wood-like grain brought in that desired texture and organic feel, adding a layer of authenticity to the cabinet’s interior.
The practical benefits were equally compelling. A single case of Pergo, costing a mere $53, was more than enough to cover the entire back of my cabinet. This was a monumental saving compared to the barnwood option, proving that innovative thinking can lead to stunning results without compromising your budget. For those interested in this specific product, samples are readily available in Home Depot stores, allowing you to see and feel the quality for yourself, although the product itself is an online-only purchase found here. Choosing laminate flooring for a cabinet interior is an ingenious DIY hack that many homeowners can utilize to achieve a high-end look on a modest budget.
DIY Cabinet Back Installation: A Seamless Process
Preparation and Precision Cutting
Before beginning, it was crucial to ensure the cabinet back was clean and free of any debris. Accurate measurements were taken to determine the precise width needed for each Pergo board. We cut each Pergo board to fit the exact width of the cabinet, ensuring a snug, professional-looking fit. Using a miter saw or a circular saw with a fine-tooth blade will yield the cleanest cuts, minimizing any potential splintering and creating crisp edges that blend seamlessly.
Adhesion Options: Choosing the Right Hold
The method of adhesion was a key decision, primarily influenced by my desire for a solution that offered both security and flexibility. We opted for an approach that would minimize damage if I ever decided to update the cabinet again in the future.
- Double-Sided Duck Tape: Our chosen method involved applying four strategic strips of heavy-duty double-sided Duck Tape (purchased conveniently on Amazon here) to the back of each Pergo board. This tape provided sufficient hold to secure the lightweight laminate panels firmly against the cabinet back without the permanence or potential mess of traditional adhesives. The main advantage here is its removability; should tastes change or a different look be desired years down the line, the Pergo can be detached with minimal damage to the cabinet’s original surface. When applying the tape, ensure even pressure across all strips for optimal adhesion.
- Alternative: Liquid Nails or Strong Adhesives: For those seeking a more permanent solution, or if working with heavier materials, a construction adhesive like Liquid Nails or a similar strong glue would be a suitable alternative. These options provide an incredibly strong bond, ensuring the material stays put indefinitely. However, it’s important to consider that removal would likely involve some damage to the cabinet’s original finish.
Installation Sequence: Building from the Bottom Up
With the boards cut and the adhesive applied, the installation commenced, following a methodical, bottom-up approach to ensure stability and alignment. The first board was carefully positioned at the very bottom of the cabinet, making sure it was perfectly level. From there, we worked our way upwards, one board at a time. The beauty of Pergo, and indeed most laminate flooring, lies in its interlocking mechanism. Each board easily clicks into the one below it, creating a tight, seamless fit with no visible gaps between the panels. This interlocking feature not only contributes to the clean aesthetic but also provides additional structural integrity to the entire installation.
As we neared the top, the final board presented a common DIY challenge: it needed to be custom-fitted. This involved not only cutting it to the correct width to fit the remaining space but also ripping it lengthwise to match the narrower height. Precision here is key to achieving a polished, finished look. Despite the slight challenge of the final cut, the overall process was incredibly rewarding, and I couldn’t be happier with the striking transformation it brought to the cabinet’s interior.
Beyond the Backdrop: Finishing Touches and Hardware Upgrade
While the Pergo backdrop dramatically transformed the interior of the china cabinet, no renovation is truly complete without attention to the finer details. To further elevate the cabinet’s overall aesthetic and integrate it seamlessly with our dining room’s evolving style, I decided on a significant hardware upgrade. The original small brass knobs, while functional, felt a little dated and didn’t quite match the sophisticated warmth I was aiming for with the new backdrop.
I replaced these with elegant 8-inch oil-rubbed bronze pulls, specifically the Lugarno pulls from Restoration Hardware (find them here). This choice was deliberate. The rich, dark finish of the oil-rubbed bronze provides a striking contrast against the cabinet’s white exterior and complements the warm grey tones of the Pergo interior. The substantial 8-inch length of the pulls also adds a sense of grandeur and modernity, making the cabinet doors feel more substantial and luxurious. Hardware is often referred to as the “jewelry” of furniture, and this upgrade proved just how impactful a simple change in pulls can be. It instantly updated the cabinet, giving it a more bespoke and high-end feel, and tied it beautifully into the broader design scheme of the dining room.
The Grand Reveal: A Dining Room Reimagined and Complete
It’s hard to believe that it’s been almost a year since we moved into our house, and finally seeing this room completely finished brings an immense feeling of accomplishment. The dining room, once a work in progress, now feels like a fully realized, inviting space, perfect for hosting cherished gatherings and creating lasting memories. To explore more images and see how these elements integrate with the rest of the dining room, you can visit the full space reveal here. This project underscores the power of a few strategic design choices and a little DIY effort to completely revitalize a room.
Your Turn: Inspire Your Own Home Renovation
This china cabinet makeover is a testament to the idea that sometimes the most unexpected materials can yield the most stunning results. Don’t be afraid to think outside the box, explore unconventional options, and challenge traditional design norms. Whether you’re struggling with a bland backdrop, outdated hardware, or simply craving a refresh, remember that even small changes can make a monumental difference in the overall feel of your home.
I hope this journey inspires you to tackle your own home improvement projects, big or small. The satisfaction of transforming a space with your own hands, especially when it results in a more beautiful and functional home, is truly unparalleled. What areas of your home are you dreaming of transforming next? Share your thoughts and questions – happy decorating!
(Please note: This post includes affiliate links. For more details, see my full disclosure statement {here}.)