
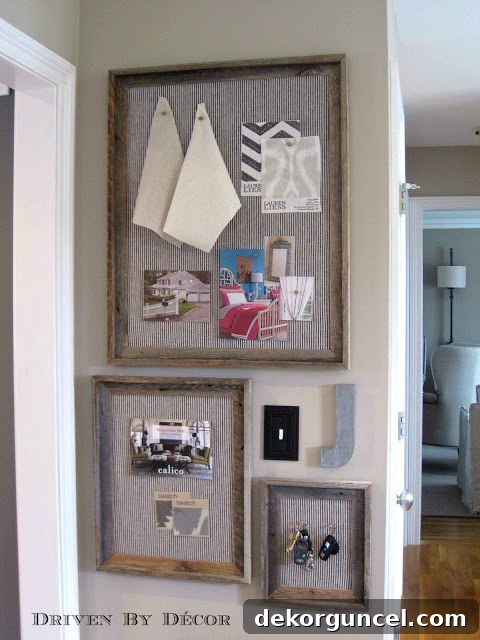
Discover how to craft a beautiful, custom-sized DIY linen pinboard that rivals high-end versions at a fraction of the cost.
Are you tired of the ever-growing mountain of papers, coupons, invitations, and inspiring magazine clippings cluttering your countertops or desk? We’ve all been there. That perpetual mess not only creates visual chaos but can also make it difficult to find important items when you need them most. Imagine a world where all those stray notes and cherished mementos have a designated, stylish home, neatly organized and always visible.
For a long time, I envisioned a grand linen pinboard gracing my kitchen wall, serving as both a functional organizational tool and an elegant piece of decor. It would be the perfect solution for taming the digital-age clutter that inevitably finds its way into physical form. While browsing for inspiration, I stumbled upon a stunning, large linen pinboard at Restoration Hardware. Its aesthetic was perfect, but the price tag was anything but. Determined to achieve the same sophisticated look without breaking the bank, I decided to embark on a DIY project to create not just one, but multiple custom-sized linen pinboards perfectly tailored to my space and needs. This guide will walk you through the simple steps to craft your own, demonstrating how easy it is to add both style and order to your home. (This post includes commissionable links; for more information, please refer to my full disclosure statement {here}).
Step 1: Gather Your Essential Supplies
The foundation of any successful DIY project lies in thorough preparation and gathering the right materials. For your custom linen pinboard, the first crucial step is selecting the perfect frame. This frame will define the overall aesthetic and dimensions of your finished board, so choose wisely to complement your existing decor.
I found an ideal open barnwood frame at Hobby Lobby, a fantastic source offering a variety of sizes—typically 10 to 12 different dimensions. A pro tip for shopping at craft stores like Hobby Lobby is to always wait for their frequent sales, which often include 50% off frames. This significantly reduces the cost, making your DIY project even more budget-friendly. Barnwood frames offer a rustic charm that can seamlessly blend with various interior styles, from farmhouse to modern eclectic.
Should you prefer shopping online or need a specific style, similar frames can also be conveniently found on Amazon in a multitude of sizes and finishes {here}. Consider the available space on your wall and the amount of items you plan to pin up when choosing your frame size. Remember, a larger frame offers more pinning real estate and a greater visual impact.
Beyond the frame, here’s a comprehensive list of other essential supplies you’ll need for each DIY linen pinboard:
Thick Cork Panel: Opt for a cork panel that is at least ½ inch thick, or ideally thicker, to ensure pins penetrate deeply and hold securely without poking through the back. The panel should be the same size as, or slightly larger than, the recessed opening on the back of your chosen frame. You can find suitable options {like this one}. The thickness is paramount for durability and function, preventing your pins from hitting the wall or falling out easily.
Linen Fabric: The star of the show! Choose a high-quality linen fabric that complements your room’s color scheme and texture. Linen provides a beautiful, natural texture and is durable enough to withstand repeated pinning. Consider the overall aesthetic you’re aiming for – a plain natural linen offers timeless elegance, while a subtle pattern or a pop of color can add personality. Ensure you purchase enough fabric to cover your cork board with an allowance for wrapping around the edges (typically 2-3 inches extra on all sides).
Glue Gun and Glue Sticks: An essential tool for securely attaching the fabric-covered cork board to your frame. A reliable hot glue gun will ensure a strong, lasting bond.
Staple Gun and Staples: Crucial for firmly securing the linen fabric around the cork board. A heavy-duty staple gun will make this task quick and efficient, ensuring a taut, professional finish.
Utility Knife: Indispensable for precisely cutting the cork board to size. A sharp blade is key for clean, straight edges.
D-Ring Picture Hangers: If your chosen frame does not come with pre-attached hanging hardware, D-ring hangers are a sturdy and secure option for mounting your pinboard firmly on the wall.
Measuring Tape or Ruler: For accurate measurements of your frame opening and cork board cuts.
Pencil: For marking cut lines on your cork board.
Cutting Mat or Cardboard: To protect your work surface when using the utility knife.
Step 2: Attach Hanging Hardware and Measure Recess
Before proceeding with the cork and fabric, it’s wise to address the hanging mechanism of your frame. If your frame arrives without pre-installed hangers, now is the time to add them. D-ring hangers are an excellent choice for pinboards as they provide robust support, especially for larger or heavier boards. To install, position a pair of D-ring hangers on the upper back corners of your frame, ensuring they are equidistant from the top edge and perfectly level with each other. Use small screws appropriate for your frame’s material to secure them firmly. Proper placement here will ensure your pinboard hangs straight and securely on the wall.
Once your hangers are in place, flip the frame over and accurately measure the recessed area on the back. This is the exact space where your cork board will eventually sit. Take precise measurements of both the length and width of this recess. These dimensions are critical for cutting your cork board to the perfect size in the next step, ensuring a snug fit and a professional finish.
Step 3: Cut Your Cork Board to Precise Size
With your accurate measurements from Step 2, it’s time to cut your cork board. Lay your cork panel on a protected work surface (a self-healing cutting mat or a large piece of cardboard works well). Using a ruler or a long straight edge, carefully mark your cutting lines on the cork panel according to the dimensions of your frame’s recessed opening. Remember, precision here is key for a tight, professional fit.
A crucial tip for cutting cork board is to make your cuts on the FRONT side of the cork. While it might seem counterintuitive, cutting from the front ensures that the visible edges of your cork board remain clean, straight, and crisp. The back side may appear a bit messy or frayed after cutting, but since this side will be hidden once the fabric is wrapped and the board is mounted, it won’t be seen. Use your utility knife with a fresh, sharp blade. Instead of trying to cut through the cork in a single pass, which can lead to uneven edges and tears, make several light, steady passes along your marked lines, gradually deepening the cut until you’ve gone all the way through. This technique results in much cleaner, more precise edges, which are essential for a polished final product.
Step 4: Wrap and Staple the Fabric Around Your Cork
This step brings your pinboard to life with the chosen fabric. First, iron your linen fabric to remove any creases or wrinkles, ensuring a smooth, professional finish. Lay your fabric face-down on a clean, flat surface. Center your cut cork board on top of the fabric, ensuring an even border of fabric extending beyond all four edges of the cork. This border should be sufficient to wrap around the cork and be stapled to the back – typically 2-3 inches on each side.
Starting with one side, pull the fabric taut over the edge of the cork board and onto the back. Be careful not to pull too tightly, which could distort the fabric weave, but firm enough to eliminate any slack. Using your staple gun, begin securing the fabric to the back of the cork. Start in the middle of one side and work your way outwards, placing staples every 1-2 inches. Repeat this process for the opposite side, pulling the fabric tautly before stapling to ensure an even tension across the entire surface. Then, tackle the remaining two sides, again starting from the middle and working your way out.
When you reach the corners, a neat fold is key. You can either miter the corners (cutting the fabric at a 45-degree angle to reduce bulk) or fold them like wrapping a present, creating crisp, flat edges. Whichever method you choose, make sure the fabric is pulled snugly and stapled securely to prevent any bulk that might interfere with the board lying flat in the frame. The goal is a smooth, wrinkle-free fabric surface on the front of the cork and neatly secured edges on the back.
Step 5: Secure the Fabric-Covered Cork Board to the Frame
Now, it’s time to bring the two main components together: your beautifully fabric-covered cork board and your chosen frame. Lay your frame face down on a clean, protected surface. Apply a continuous line of hot glue along the inner edge of the frame’s recessed area, where the cork board will rest. This step requires you to work quickly but carefully, as hot glue sets relatively fast. You need to complete the entire perimeter of glue before the initial application begins to dry, ensuring a strong, consistent bond.
Once the glue is applied, carefully position your fabric-covered cork board into the frame’s recess. Press down firmly and evenly across the entire surface of the cork board for one to two minutes, allowing the hot glue ample time to cool and set. Applying consistent pressure ensures maximum adhesion between the cork board and the frame. After this initial bond, for extra security and peace of mind, apply a second line of hot glue around the entire perimeter on the back, specifically in the seam where the cork board meets the frame. This additional layer of glue acts as a reinforcing seal, guaranteeing that your pinboard remains securely in place for years to come. Allow the glue to fully cure before moving or handling the frame too much.
Step 6: Hang It Up and Enjoy Your Organized Space!
With all the hard work complete, the most satisfying step is finally here: hanging your custom DIY linen pinboards! If you’re creating multiple boards, like I did, take some time to plan their arrangement on your wall. Consider spacing, alignment, and how they will visually interact with each other and any surrounding decor. For a symmetrical look, measure carefully to ensure even gaps between boards. Mark the locations for your screws or picture hooks on the wall, making sure they align perfectly with the D-ring hangers on the back of your frames.
Using a level is crucial here to ensure your boards hang perfectly straight. Once your wall anchors or screws are in place, carefully hang each framed cork board. The transformation is immediate and immensely rewarding. I repeated this process for two more boards, and the result was a stunning, organized display! To fill an awkward space to the right of my light switch, I added a decorative metal letter “J,” which personalized the arrangement and completed the look. Suddenly, all those scattered coupons, invitations, and magazine cut-outs that once created a chaotic pile on my desk found their new, stylish home, pinned neatly onto my beautiful new boards. This not only cleared my workspace but also added a sophisticated, functional focal point to my kitchen.
One of the many joys of a DIY project is the freedom to customize and adapt. Several months after creating my initial linen pinboards, I decided to refresh their look. With some leftover black and cream ticking stripe fabric from another project, I easily updated the boards, swapping out the natural linen for a new, graphic pattern. This demonstrates the versatility of this project; you can change the fabric whenever your style evolves or when you simply crave a fresh look, making your pinboards truly timeless and adaptable.
I hope you thoroughly enjoyed this detailed guide and feel inspired to create your very own custom DIY linen pinboard. It’s a rewarding project that combines practicality with personal style, offering a beautiful and organized solution for your home.
