
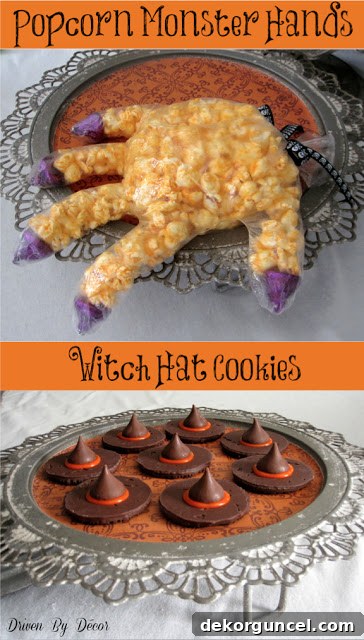
As the crisp autumn air settles in and the nights grow longer, the last weeks of October inevitably bring with them the delightful anticipation of Halloween. This enchanting holiday is synonymous with spooky fun, creative costumes, and, of course, an abundance of sweet and savory treats! For families, it’s a wonderful opportunity to bond in the kitchen, transforming simple ingredients into ghoulishly good snacks. My daughters absolutely adore helping out, so I’ve curated a collection of quick, easy, and incredibly fun Halloween recipes that are perfect for little hands to assist with. Two perennial favorites that always steal the show at our Halloween gatherings are the delightfully eerie Popcorn Monster Hands and the charmingly festive Witch Hat Cookies. These aren’t just treats; they’re edible crafts that add an extra layer of magic to your Halloween festivities, making memories as sweet as the creations themselves.
Crafting Spooky Delights: DIY Popcorn Monster Hands
The concept of Popcorn Monster Hands first entered our Halloween tradition two years ago when I was tasked with organizing activities for one of my daughter’s classroom parties. In my quest for unique and engaging ideas, I stumbled upon various images of monster hands, often filled with plain popcorn and adorned with candy corn nails. While the idea was undeniably clever, I envisioned a version that was a bit more visually striking and flavorful. By making a few simple tweaks, I created a recipe that has since become a staple in our Halloween repertoire, captivating both kids and adults alike. These monster hands are not only a fantastic party favor but also an incredibly satisfying snack for your most deserving trick-or-treaters.
Ingredients for Popcorn Monster Hands:
- Clear Disposable Gloves: Opt for gloves that are thin, clear, and possess wide fingers without much stretch. The transparency allows the “monster” effect to shine through, and wider fingers make filling easier. I often find packs of 100 for a dollar at local discount stores, ensuring a budget-friendly and plentiful supply.
- Cheddar Popcorn: While plain popcorn works, cheddar popcorn adds a vibrant orange hue and a savory-cheesy flavor that really makes these monster hands pop, both visually and taste-wise. You can use pre-made bags or pop your own and season generously.
- Hershey’s Special Dark Kisses: These delightful chocolate kisses, with their distinctive purple wrappers, serve as the perfect “monster nails.” The dark chocolate provides a stark, eerie contrast to the orange popcorn, enhancing the ghoulish aesthetic. Ensure you have enough for five “nails” per hand!
- Halloween Themed Ribbon: A festive ribbon is essential for tying off the gloves and adding a final decorative flourish. Look for inexpensive options with classic Halloween motifs like pumpkins, ghosts, spiders, or bats at craft stores such like Hobby Lobby or Michael’s.
Step-by-Step Guide to Assembling Popcorn Monster Hands:
Creating these spooky hands is remarkably straightforward and a fantastic activity for children, fostering their creativity and fine motor skills. Here’s how to bring your popcorn monsters to life:
- Prepare the “Nails”: Begin by carefully unwrapping each Hershey’s Special Dark Kiss. This step is a great task for kids, though adult supervision might be needed to avoid accidental consumption before assembly! Make sure to remove the little white paper strips completely.
- Place the “Nails”: For each finger of a disposable glove, gently drop one unwrapped Hershey’s Kiss into the fingertip. Position the point of the kiss facing down, mimicking the appearance of a sharp, dark fingernail protruding from the popcorn. Ensure they are snugly fit into the very tip.
- Fill with Popcorn: Once all five “nails” are in place, begin filling the glove with cheddar popcorn. To ensure the glove’s fingers are plump and well-formed, it’s helpful to gently squeeze and manipulate the popcorn within the fingers, breaking it up slightly and allowing it to settle into all the crevices. Fill the entire hand until it’s pleasantly full but not overly stretched.
- Secure with Ribbon: When the glove is fully packed, gather the open end neatly. Take your chosen Halloween-themed ribbon and tie it securely around the wrist of the monster hand. A festive bow adds a charming touch and ensures the popcorn remains contained.
Tips for Perfect Popcorn Monster Hands:
- Popcorn Quality: Ensure your popcorn is fresh and crisp. Stale popcorn will diminish the snack’s appeal.
- Finger Fullness: Don’t be shy about really packing the popcorn into the fingers. This gives the monster hands a more defined and visually appealing shape.
- Variations: Experiment with different popcorn flavors – kettle corn, caramel corn, or even plain for a less colorful but equally fun treat. You could also use different small candies for the “nails,” like jelly beans or even almonds for a truly grotesque touch.
- Allergen Awareness: If making these for a classroom, consider using plain popcorn and ensuring the chocolate is allergen-free, or clearly label ingredients for children with dietary restrictions.
Why Popcorn Monster Hands Are a Classroom and Party Favorite:
These Popcorn Monster Hands are an absolute smash hit, particularly in a classroom Halloween party setting. Their appeal lies in their simplicity and engaging nature. The activity doesn’t require excessive time or complex instructions, thus maintaining the children’s attention span. Kids delight in the hands-on process of creating their own spooky snack, which serves as a unique party favor they can proudly take home. It’s a delightful blend of craft and culinary fun. Beyond classroom parties, they are the perfect alternative to traditional candy for special trick-or-treaters or as a fun, portion-controlled snack for your own family Halloween movie night. They combine visual appeal with a satisfying crunch, making them an unforgettable Halloween treat.
Enchanting Edibles: Simple Witch Hat Cookies
Another beloved Halloween treat that my children and I eagerly anticipate making each year is the Witch Hat Cookie. This recipe, a brilliant creation from Betty Crocker, stands out for its incredible simplicity and charm. It requires no baking, minimal ingredients, and comes together in mere minutes, making it an ideal last-minute treat or a stress-free activity for busy parents and enthusiastic young chefs. These delightful cookies are guaranteed to bring a smile to anyone’s face, making them a perfect addition to any Halloween celebration.
Essential Ingredients for Witch Hat Cookies:
- Hershey’s Kisses: Just like with the monster hands, Hershey’s Kisses play a starring role here, forming the peak of our witch hats. Any flavor will work, but classic milk chocolate is always a crowd-pleaser. Ensure they are unwrapped and ready to be placed.
- Keebler Fudge Stripes Shortbread Cookies: These iconic cookies form the broad brim of our witch hats. You have a choice between the Original Fudge Stripes, which have a distinctive fudge ring on the bottom, or the new Dark Chocolate Fudge Stripes. I personally adore the dark chocolate version for these cookies, as their uniform dark color on both sides creates a more striking and realistic witch hat appearance. However, when making them for kids, the taste of the original might be preferred by a wider audience.
- Orange Decorating Icing: A tube of orange decorating icing is crucial for both adhering the chocolate kiss to the cookie and adding a festive, contrasting band around the hat. You can find pre-made tubes with various tips at any grocery store’s baking aisle.
Crafting Your Witch Hat Cookies: A Simple Guide:
These cookies are incredibly fun and straightforward to assemble, making them a fantastic no-bake option that even the youngest kitchen helpers can manage with ease:
- Prepare the Cookie Base: Take a Keebler Fudge Stripe cookie and flip it over so that the flat, undecorated backside is facing upwards. This provides a stable and level surface for constructing your witch hat. The fudge stripes will be on the bottom, creating a nice contrast.
- Apply the Icing “Band”: Using your tube of orange decorating icing, pipe a small, neat circle of icing directly around the central hole of the flipped cookie. This circle of icing serves two purposes: it acts as the decorative band of the witch’s hat and, more importantly, provides the adhesive to hold the chocolate kiss in place. Don’t make the circle too wide; you want it to be just enough for the kiss to sit on.
- Attach the “Hat Peak”: Finally, take an unwrapped Hershey’s Kiss and gently place it, point facing upwards, directly onto the center of your orange icing circle. Press down very lightly to ensure it adheres well without squishing the icing too much. This simple step completes your basic witch hat!
- Optional Decoration: While we often prefer to keep things simple for quick assembly, you can easily dress up these hats by adding a tiny icing bow or other decorative elements on the orange band. A small dot of green or purple icing could also add a fun pop of color.
Enhancing Your Witch Hat Cookies: Tips and Variations:
- Icing Colors: Don’t limit yourself to orange! Green, purple, or even black icing can create different witch hat styles.
- Cookie Alternatives: If Keebler Fudge Stripes aren’t available, other flat, round cookies with a central hole (or even solid ones) can work, though the distinctive “brim” effect might vary.
- Chill to Set: For firmer hats, especially if transporting them, consider placing the assembled cookies in the refrigerator for about 10-15 minutes to allow the icing to set more quickly.
- Extra Sparkle: A sprinkle of edible glitter or small Halloween-themed sprinkles on the icing band before it sets can add an extra magical touch.
- Storage: Store these cookies in an airtight container at room temperature for up to a few days.
Serving and Presentation:
These Witch Hat Cookies are perfect for Halloween parties, school lunchbox treats, or simply as a festive snack to enjoy at home. Arrange them on a platter with other spooky treats for a delightful display. Their vibrant colors and charming design make them an instant hit, and the combination of crisp shortbread, creamy fudge, and smooth chocolate is utterly irresistible.
Whether you’re crafting playful Popcorn Monster Hands or enchanting Witch Hat Cookies, these recipes offer a delightful way to celebrate Halloween with minimal effort and maximum fun. They embody the spirit of the season: creative, slightly spooky, and utterly delicious. So gather your ingredients, enlist your little goblins and ghouls, and get ready to conjure up some unforgettable Halloween treats!
Happy Halloween!