
Mastering Your Kitchen Backsplash Height: A Definitive Guide to Stunning Design
Embarking on a kitchen renovation project is an exciting journey, yet it often brings with it a myriad of design decisions that can feel overwhelming. From selecting the perfect cabinet color and countertop material to choosing the ideal kitchen sink, every detail contributes to the overall aesthetic and functionality of your space. Among these crucial choices, one often overlooked yet highly impactful element is the kitchen backsplash. Specifically, deciding how high your backsplash tile should go can dramatically influence your kitchen’s style, perceived spaciousness, and practicality.
The backsplash isn’t just a protective barrier against splatters; it’s a significant design feature that can serve as a focal point, add texture, and introduce color to your kitchen. The question of “how high to tile the kitchen backsplash” is more nuanced than it appears, with various options catering to different design philosophies and architectural layouts. This comprehensive guide will explore the most popular backsplash height options, offering insights, inspiration, and practical considerations to help you make the best decision for your dream kitchen.
The Undeniable Impact of Backsplash Height on Your Kitchen’s Aesthetic and Functionality
Before diving into specific height options, it’s essential to understand why this decision holds such weight. The height of your backsplash can influence several key aspects of your kitchen:
- Visual Flow and Perceived Space: A backsplash can either expand or compress the visual perception of your kitchen. Tiling higher can draw the eye upward, making ceilings feel taller, while a lower backsplash might ground the space.
- Protection and Maintenance: Functionally, the primary role of a backsplash is to protect your walls from moisture, grease, and food splatters. The extent of this protection naturally depends on how much wall surface is covered by tile.
- Budget Implications: More tile means higher material costs and potentially increased labor expenses. Your chosen height directly impacts your overall renovation budget.
- Overall Kitchen Style: Different backsplash heights lend themselves to distinct design styles, from ultra-modern and minimalist to classic and traditional.
- Focal Point Creation: A strategically placed and dimensioned backsplash can highlight architectural features, accentuate a range hood, or simply become the kitchen’s undeniable star.
With these considerations in mind, let’s explore the most common and compelling backsplash height options available to homeowners today.
Option 1: Tiling to the Ceiling – A Dramatic Statement and Seamless Design
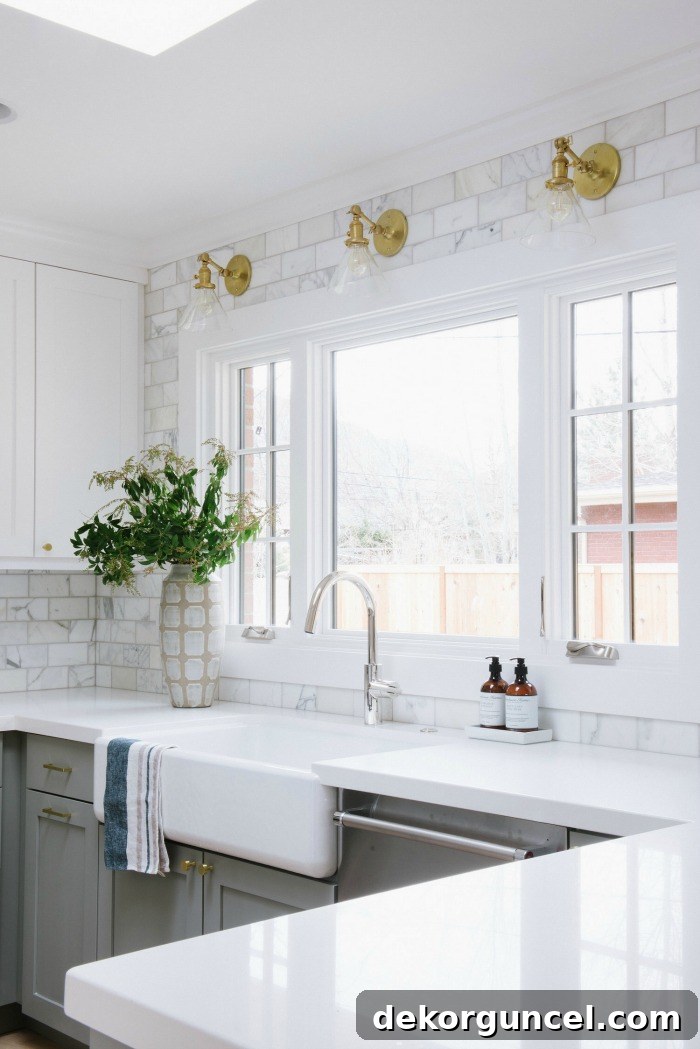
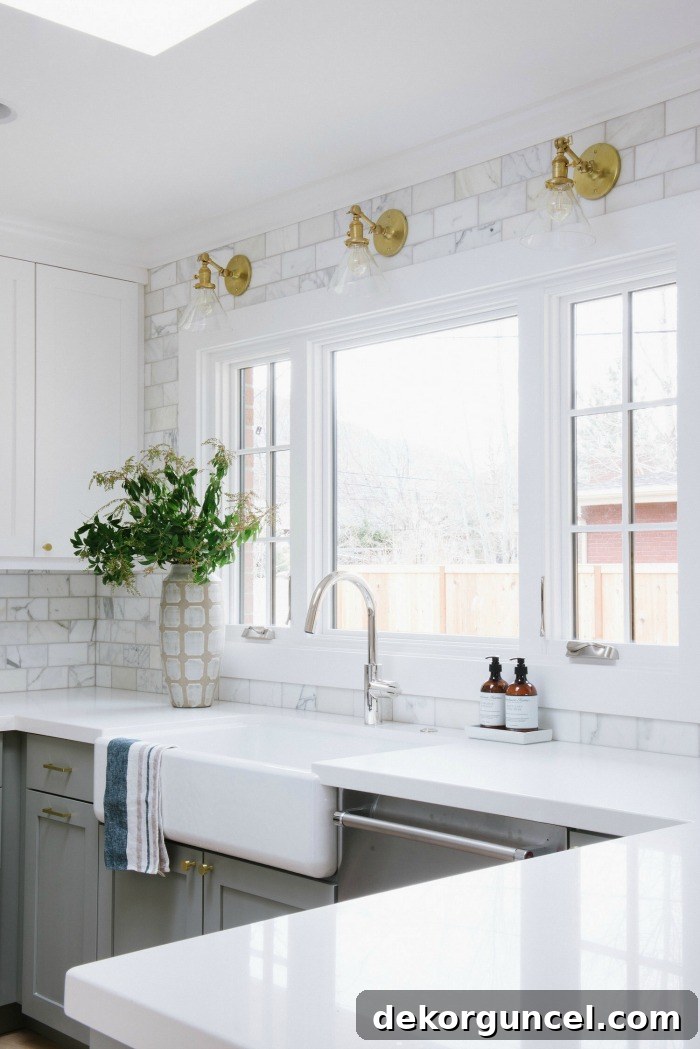
One of the most striking and increasingly popular choices is to extend your kitchen backsplash tile all the way up to the ceiling. This bold design move creates a truly immersive and cohesive look, transforming your kitchen into a showstopping space. This approach is particularly effective in modern and minimalist designs, but it can also be adapted to traditional or industrial styles depending on the tile choice.
The beauty of a floor-to-ceiling (or rather, countertop-to-ceiling) backsplash lies in its ability to create a seamless visual flow. It eliminates awkward stopping points and provides continuous protection for your walls, especially behind major appliances like the range or sink. When wrapping tile around windows, as seen in this gorgeous kitchen designed by Studio McGee, the tile becomes an integral part of the architecture, framing the view and enhancing natural light. This method can make a kitchen feel larger, brighter, and more luxuriously appointed by drawing the eye upwards and emphasizing vertical lines.
Studio McGee
Benefits of a Ceiling-Height Backsplash:
- Maximized Visual Impact: Creates a powerful focal point and an undeniable “wow” factor.
- Enhanced Sense of Space: Draws the eye upward, making ceilings appear higher and the room feel more expansive.
- Superior Wall Protection: Offers the highest level of protection against cooking splatters and moisture across the entire wall surface.
- Clean and Cohesive Look: Eliminates the need for awkward transitions or trim pieces at a specific height, resulting in a streamlined appearance.
- Showcases Tile: Allows you to fully appreciate the beauty and pattern of your chosen tile.
Considerations for Tiling to the Ceiling:
- Budget: Naturally, this option requires more tile and labor, which can increase overall costs.
- Tile Choice: A busy or highly patterned tile might become overwhelming when covering such a large area. Opt for more subtle patterns or solid colors if you’re concerned about visual clutter.
- Window Integration: Requires careful planning around windows to ensure a polished finish, often involving precise cuts and attention to trim details.
Other stunning examples of backsplashes extended to the ceiling include this beach-style kitchen by Caldwell and Johnson, this elegant design by Amber Interiors, and this beautiful farmhouse kitchen featuring classic subway tile.
Option 2: The Classic Choice – Backsplash Ending at the Base of Upper Cabinets
Perhaps the most traditional and widely adopted approach is to install the backsplash tile from the countertop up to the bottom of the upper cabinets, or just a couple of inches above. This method creates a clean, defined line that perfectly complements the horizontal alignment of your cabinetry, offering a sense of order and conventional elegance.
This classic backsplash height provides excellent protection for the most vulnerable areas of your kitchen – those directly above your countertops where most food preparation and cleaning takes place. It’s a highly functional choice that also allows for diverse design expressions, fitting seamlessly into almost any kitchen style, from farmhouse to contemporary. The termination point is typically finished with a decorative trim piece, such as a bullnose tile, pencil liner, or a simple straight edge, which adds a refined touch and a clear boundary between the tiled and painted surfaces.
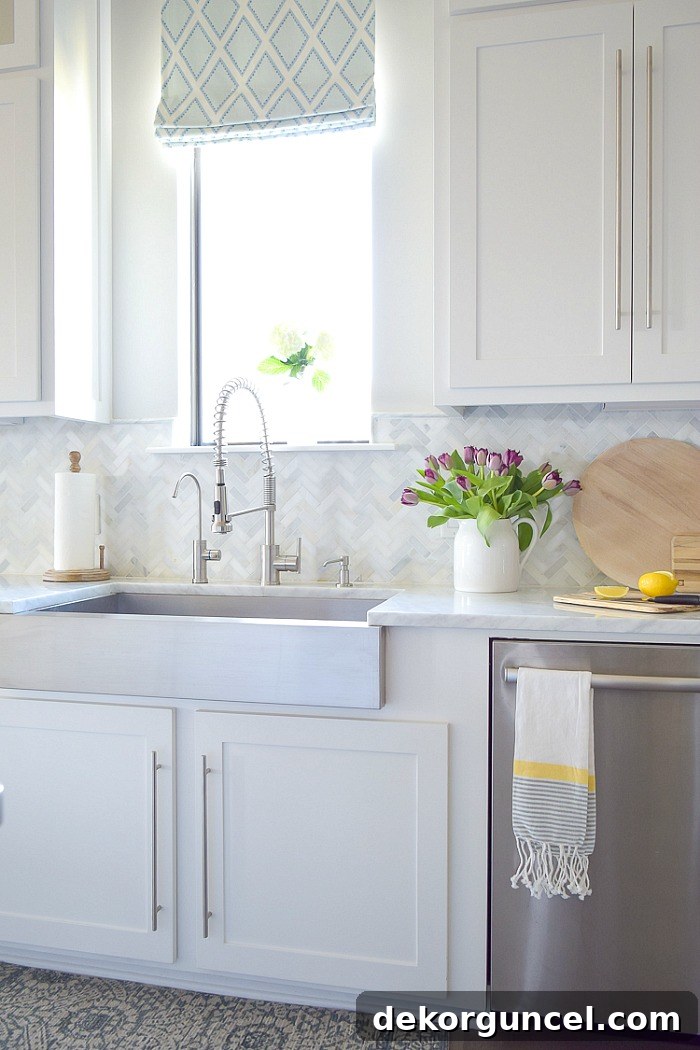
A beautiful illustration of this approach is found in ZDesign at Home’s stunning kitchen featuring Carrara marble herringbone tile. Here, the backsplash thoughtfully concludes beneath the upper cabinetry, demonstrating how this height can emphasize the cabinet lines while providing essential coverage and a sophisticated finish.
ZDesign at Home
Benefits of a Cabinet-Height Backsplash:
- Cost-Effective: Generally requires less material and labor than tiling to the ceiling, making it a more budget-friendly option.
- Optimal Protection: Effectively shields the primary splash zones directly above countertops and stovetops.
- Versatile Design: Adapts well to nearly all kitchen styles and layouts, providing a clean and traditional look.
- Defined Lines: Creates a clear visual separation between the working area and the upper wall space, often highlighting the cabinetry.
- Easy Finishing: Trim pieces like bullnose or pencil liners provide a polished and professional edge where the tile meets the painted wall.
Considerations for a Cabinet-Height Backsplash:
- Less Dramatic: While elegant, it might not offer the same “wow” factor as a ceiling-height backsplash.
- Potential for Open Wall Space: The wall above the backsplash and cabinets might feel bare in kitchens with very high ceilings, or it may collect dust.
- Upper Cabinet Gaps: If your upper cabinets have varied heights, you’ll need a consistent strategy for where the tile ends.
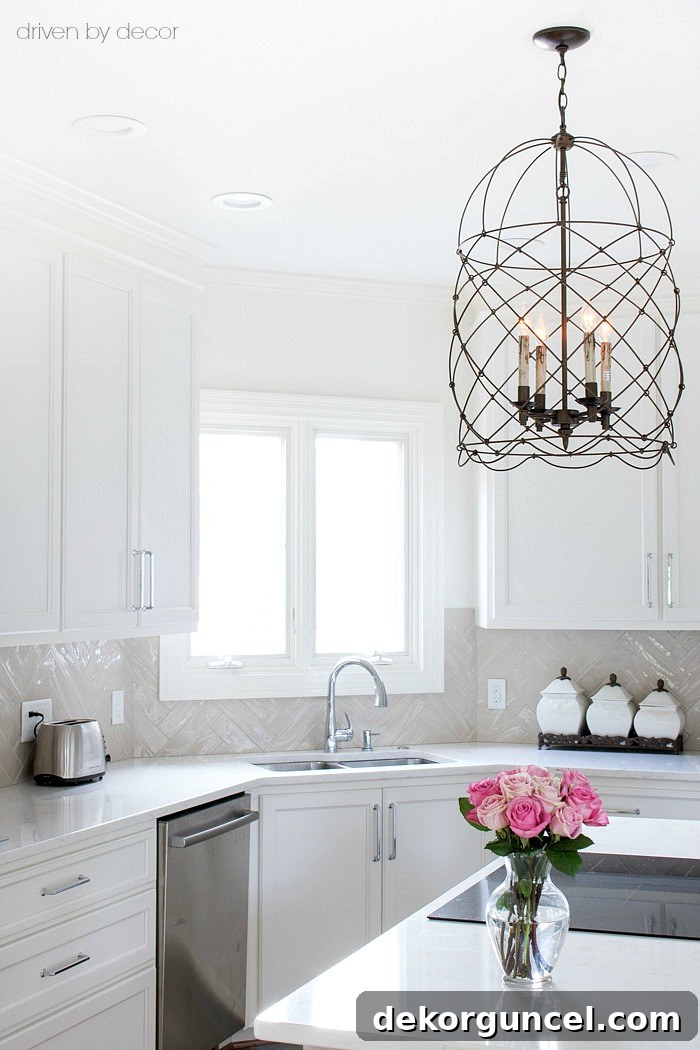
Another excellent illustration of a backsplash that concludes at the base of the upper cabinets is this example featuring a larger scale herringbone pattern, showcasing how even more elaborate tile designs can be beautifully contained within this classic height definition:
Option 3: The Mid-Height Backsplash – A Creative and Contemporary Compromise
While less common than the other two primary options, choosing to end your backsplash tile somewhere in the middle – between the base of the upper cabinets and the ceiling – can be a deliberate design choice that introduces a unique aesthetic to your kitchen. This mid-height backsplash offers a contemporary compromise, often used to create a distinct visual break or to highlight specific architectural features.
This approach allows for greater creative freedom, enabling you to define a specific zone, such as the area directly behind a range or sink, with tile, while leaving the rest of the wall painted. It can be particularly effective in kitchens where there’s a desire to infuse personality without fully committing to a floor-to-ceiling application. The key to making a mid-height backsplash successful is ensuring the ending point feels intentional and contributes positively to the overall design, rather than appearing arbitrary.
Examples of thoughtfully executed mid-height backsplashes can be seen in this gorgeous kitchen by Christine Donner and in this beautiful design by Kitchens by Eileen. In both instances, the chosen height adds a unique character, proving that breaking from convention can lead to exceptional results.
Benefits of a Mid-Height Backsplash:
- Unique Design Statement: Offers a distinctive look that sets your kitchen apart from more traditional layouts.
- Design Flexibility: Allows for creative expression and the ability to define specific zones with tile.
- Partial Protection: Provides more wall protection than a standard 4-inch backsplash while still allowing painted wall space above.
- Cost Management: Can be a middle-ground option for budgets that don’t allow for ceiling-height tiling but desire more than just a minimal backsplash.
Considerations for a Mid-Height Backsplash:
- Intentionality is Key: The chosen stopping point must look deliberate and integrated into the design, not haphazard.
- Less Common: Might require more creative visualization as there are fewer examples to draw direct inspiration from.
- Finishing Details: Requires careful attention to the top edge finish to ensure a polished appearance.
Option 4: Backsplash Considerations for Open Shelving and Unique Layouts
Modern kitchen design often incorporates open shelving, floating cabinets, or unique architectural features that require a different approach to backsplash planning. When traditional upper cabinets are absent, the decision of where to end your backsplash becomes even more critical for visual harmony and practical protection.
Open Shelving:
For kitchens featuring open shelving, a common and highly effective strategy is to tile up to the bottom of the lowest shelf. This creates a visually grounded base for your displayed items while still offering crucial wall protection. Alternatively, some designs opt to tile the entire wall section behind the open shelves, turning the tiled area into a dramatic backdrop that frames the shelves themselves. This approach can make the shelving feel more integrated and cohesive with the overall design.
South Harlow Interiors provides a fantastic example of handling backsplash tile with open shelving in this gorgeous kitchen, where the tile beautifully concludes at the base of the top open shelf. This decision creates a clean line that defines the lower working area while allowing the open shelving above to breathe.
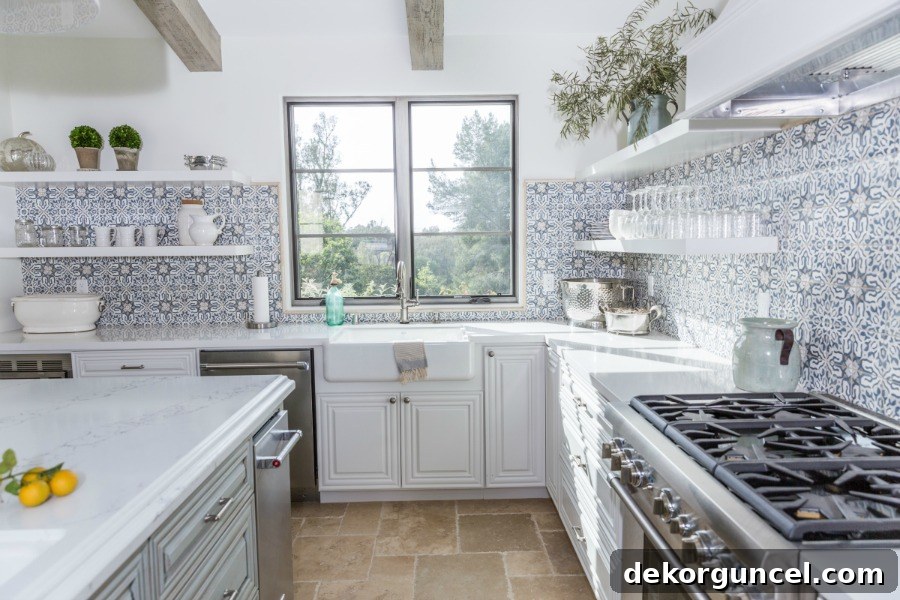
South Harlow Interiors
Unique Layouts (Window Walls, Vaulted Ceilings, etc.):
- Window Walls: If your kitchen features expansive windows or a wall primarily dedicated to windows, the backsplash around them needs careful consideration. Tiling around the window frame and up to the ceiling (as discussed in Option 1) can create a stunning, integrated look. Alternatively, you might choose to stop the tile just below the window sill, or use a shorter backsplash on window walls while maintaining a higher backsplash elsewhere for continuity.
- Vaulted Ceilings: For kitchens with vaulted or unusually shaped ceilings, tiling to the ceiling can be particularly dramatic, accentuating the architectural height. However, it requires precise cuts and planning to follow the ceiling line gracefully.
- Peninsulas/Islands: Extend your backsplash design down the sides of peninsulas or islands for a cohesive look. This can be especially effective when using a tile with a strong pattern or texture.
Practical Tips for Choosing Your Perfect Backsplash Height
With so many beautiful options available, making the final decision for your kitchen backsplash height can still be challenging. Here are some practical tips to guide you:
- Consider Your Kitchen’s Style: A farmhouse kitchen might lean towards a cabinet-height backsplash, while a modern design could embrace the ceiling-height tile. Let your overall aesthetic guide your choice.
- Evaluate Your Budget: Be realistic about material and installation costs. Tiling a larger area, especially with intricate patterns or premium materials, will increase expenses.
- Think About Functionality First: Where do you cook the most? Where are the highest splash zones? Ensure your chosen height provides adequate protection in these critical areas.
- Visualize the Space: Use painter’s tape or cardboard cutouts to mock up different backsplash heights on your walls. This visual aid can help you envision the final look and feel before committing.
- Tile Choice Matters: The type of tile you select can influence the ideal height. A simple, large-format tile might look stunning from countertop to ceiling, while a mosaic might be more impactful in a smaller, defined area.
- Consult with a Professional: If you’re unsure, an experienced kitchen designer or contractor can provide invaluable insights tailored to your specific kitchen layout and preferences.
- Lighting and Reflections: Consider how natural and artificial light will interact with your tile at different heights. Glossy tiles can reflect light beautifully, but too much might be overwhelming if extended high.
- Long-Term Trends vs. Timelessness: While some trends favor full-height backsplashes, a classic cabinet-height option offers enduring appeal. Choose what truly resonates with your taste and desired longevity.
The decision of how high to take your kitchen backsplash tile is a personal one, deeply intertwined with your kitchen’s unique characteristics and your individual design preferences. Whether you opt for a dramatic, floor-to-ceiling statement, a timeless cabinet-height finish, or a creative mid-height solution, the key is to ensure it aligns with your vision for a beautiful and functional kitchen. Consider these options, draw inspiration from the examples, and confidently create a space you’ll love for years to come.
Which look truly captures your imagination? Do you prefer the grandeur of a backsplash that reaches the ceiling, or the classic elegance of tile ending lower down? Share your thoughts and let us know what inspires your kitchen design!
