
Transform Your Home with Annie Sloan Chalk Paint on Floors: A Comprehensive Guide to Stunning Floor Makeovers
Are you dreaming of a fresh, new look for your floors without the expense and hassle of traditional renovation? Look no further than the incredible versatility of Annie Sloan Chalk Paint. This revolutionary paint has long been a favorite for furniture upcycling, celebrated for its minimal preparation requirements – often requiring no priming or sanding. But its capabilities extend far beyond cabinets and dressers. Imagine the possibilities for your floors!
The idea of painting floors might seem daunting, but with chalk paint, it becomes an accessible and rewarding DIY project. Whether you’re dealing with worn hardwood, dated concrete, or even tired tile, chalk paint offers an affordable and creative solution to breathe new life into your living spaces. I, like many home decorators, initially explored chalk paint for furniture, experiencing firsthand its remarkable ease of use and stunning finish. This success naturally led me to wonder: could this magic paint transform floors too?
The answer, as you’ll soon discover, is a resounding yes! A deep dive into the world of home renovation blogs and design showcases revealed a treasure trove of inspiring chalk paint floor ideas. From elegant stenciled patterns to chic checkerboard designs and sophisticated solid colors, homeowners are harnessing the power of Annie Sloan Chalk Paint to create truly unique and durable floor surfaces. Join us as we explore six breathtaking examples that prove just how amazing your floors can look with a little paint and a lot of imagination. Get ready to be inspired and perhaps even embark on your own DIY floor makeover journey!
1. Elegant Concrete Transformation: Shades of Amber’s Graphite & Old White Stenciled Floor
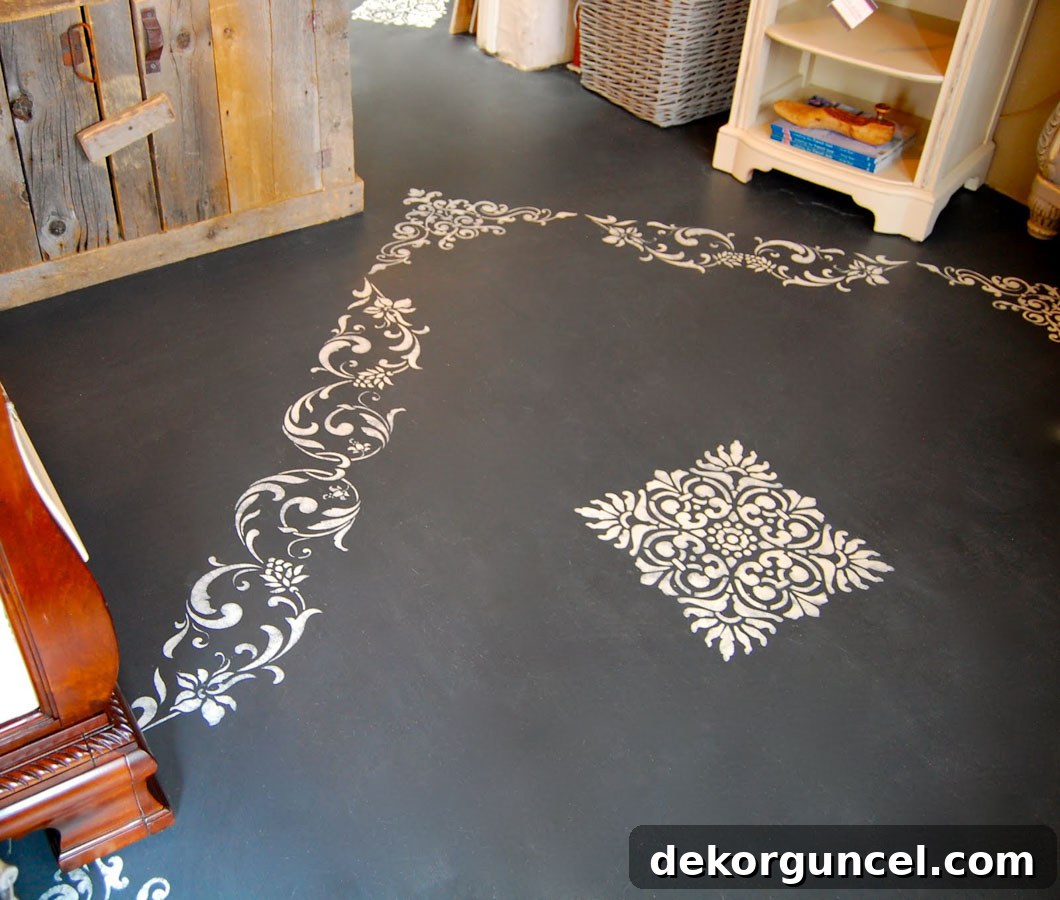
Our first stop for inspiration takes us to Shades of Amber, where a remarkable floor transformation unfolded. Faced with a tired and outdated carpet in her retail store, Amber and her husband made the bold decision to rip it out entirely. What lay beneath was a utilitarian concrete slab, which most might consider a challenge. However, they saw it as a blank canvas, perfectly suited for an Annie Sloan Chalk Paint floor makeover.
Shades of Amber
Their chosen palette for this DIY concrete floor project was both sophisticated and striking. They began by painting the entire concrete surface with Annie Sloan Chalk Paint in Graphite, a deep, rich black-grey that provided a solid, elegant foundation. Once this base coat was dry, they introduced an intricate stenciled pattern using Old White. This delicate contrast created a timeless and visually captivating design that elevated the concrete from drab to fab.
Crucial to the success and durability of any painted floor, especially in a commercial setting, is the sealing process. Amber and her husband wisely chose Annie Sloan Lacquer, a robust, water-based varnish specifically designed for painted floors. This final protective layer ensures that the beautiful stenciled design withstands the rigors of daily foot traffic, making it not just a stunning aesthetic choice but also a practical and long-lasting one. The transformation is truly incredible, turning a basic concrete floor into a statement piece that perfectly complements their store’s aesthetic. Discover the full journey of this amazing concrete floor transformation on Shades of Amber.
2. Classic Elegance: Storywood Designs’ Checkerboard Hardwood Floor Makeover
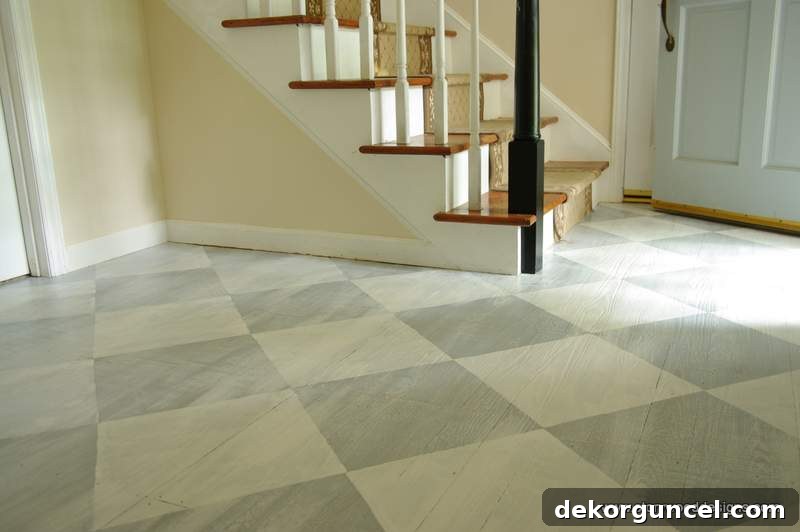
Next, we visit Holly from Storywood Designs, who embraced the timeless charm of a checkerboard pattern to revitalize her foyer floor. Instead of traditional tile, Holly ingeniously applied Annie Sloan Chalk Paint to her existing hardwood floors, creating a soft, inviting entrance that exudes classic elegance with a modern twist.
Storywood Designs
Holly’s creative approach involved using a unique color combination for her checkerboard design. She masterfully blended Paris Grey and Louis Blue to achieve a subtly muted, sophisticated tone for one set of squares. This gentle, almost ethereal hue was then alternated with crisp Pure White, creating a delightful visual rhythm across the foyer. The beauty of chalk paint lies in its ability to blend seamlessly, allowing for such nuanced color creations.
To ensure her stunning painted hardwood floors would stand up to the foot traffic of a busy foyer, Holly, like Amber, sealed her work with Annie Sloan Lacquer. This durable topcoat provides essential protection, preserving the delicate color palette and intricate pattern for years to come. The transformation utterly revitalized her space, offering a grand yet welcoming entry that showcases the incredible potential of chalk paint design ideas on floors. It’s a testament to how a relatively simple technique can completely redefine the look and feel of an area, turning a functional space into a focal point of home decor.
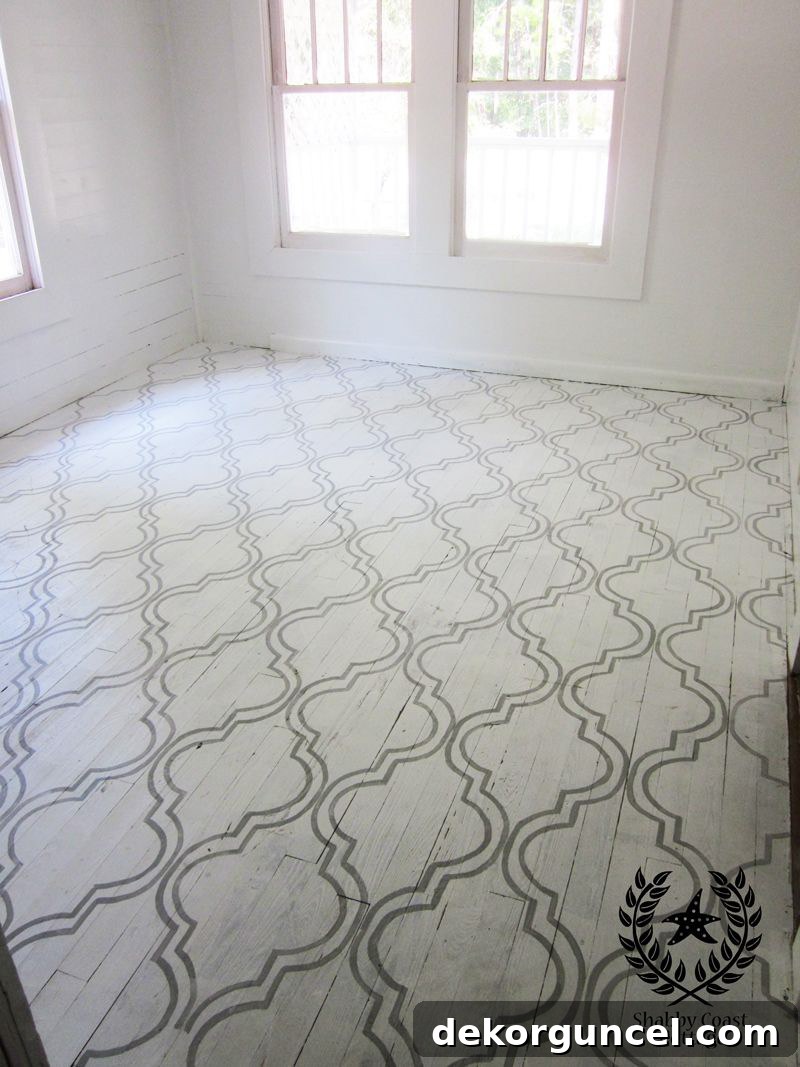
3. Coastal Chic: Shabby Coast Cottage’s Paris Grey Lattice Floor with Natural Distressing
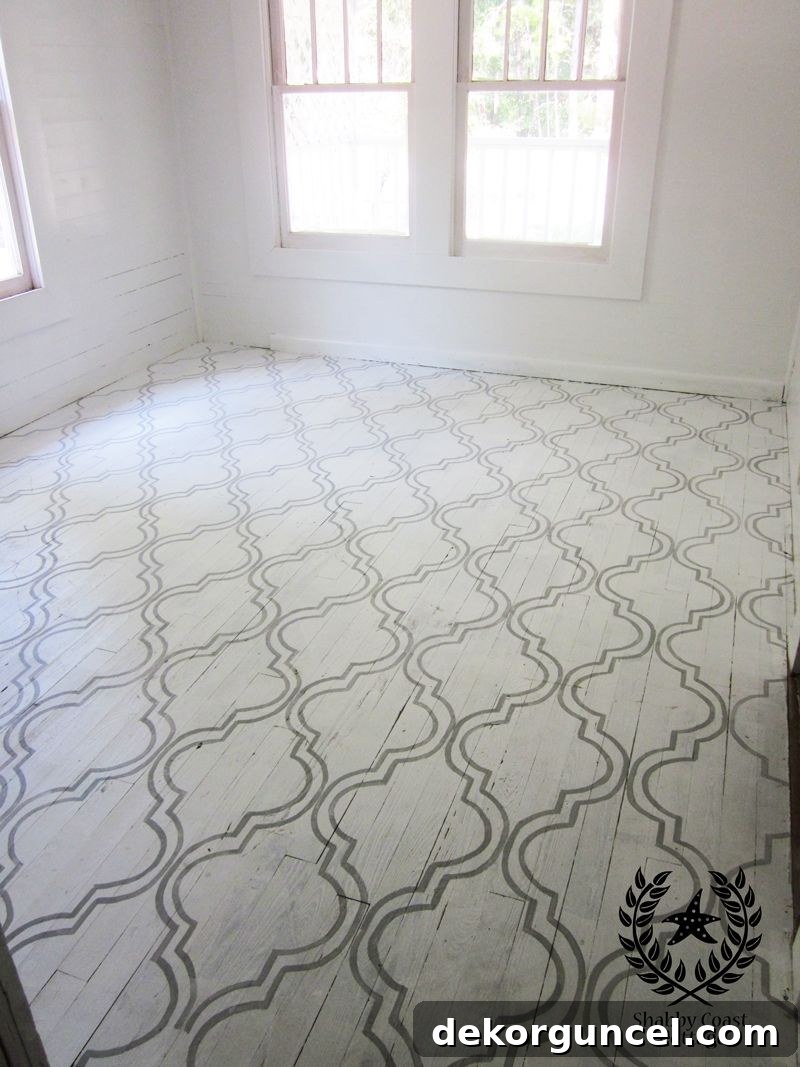
Venturing into the charming coastal boutique, Shabby Coast Cottage, we discover another innovative application of Annie Sloan Chalk Paint on floors. Jeri, the creative mind behind the boutique, sought to infuse her space with a distinctive coastal vibe, and her floor treatment perfectly encapsulates this aesthetic.
Shabby Coast Cottage
Jeri opted for a serene and inviting Paris Grey as her base color, a quintessential choice for achieving a relaxed, sophisticated coastal feel. She then elevated this base with a beautiful lattice stencil design, adding a layer of intricate detail that perfectly complements the boutique’s curated offerings. The choice of a lattice pattern introduces a subtle architectural element, bringing depth and character to the floor.
What sets Jeri’s approach apart is her innovative sealing method. Eschewing the more common polyurethane or Annie Sloan Lacquer, she chose to lightly sand her painted floors and then finish them with a durable floor wax. This deliberate decision was made to allow the floors to age gracefully and naturally over time, developing a beautifully authentic distressed look that perfectly aligns with the shabby chic ethos of her coastal boutique. This method highlights an alternative to high-gloss protective finishes, embracing the charm of natural wear and tear. It’s a wonderful example of how distressed chalk paint floors can add immense character and a lived-in feel to a space, making them ideal for those who appreciate the beauty of imperfection and the story that a well-loved floor can tell.
4. Whimsical Wonderland: Lady Butterbug’s Soft Pink & Pure White Stenciled Hardwood Floor
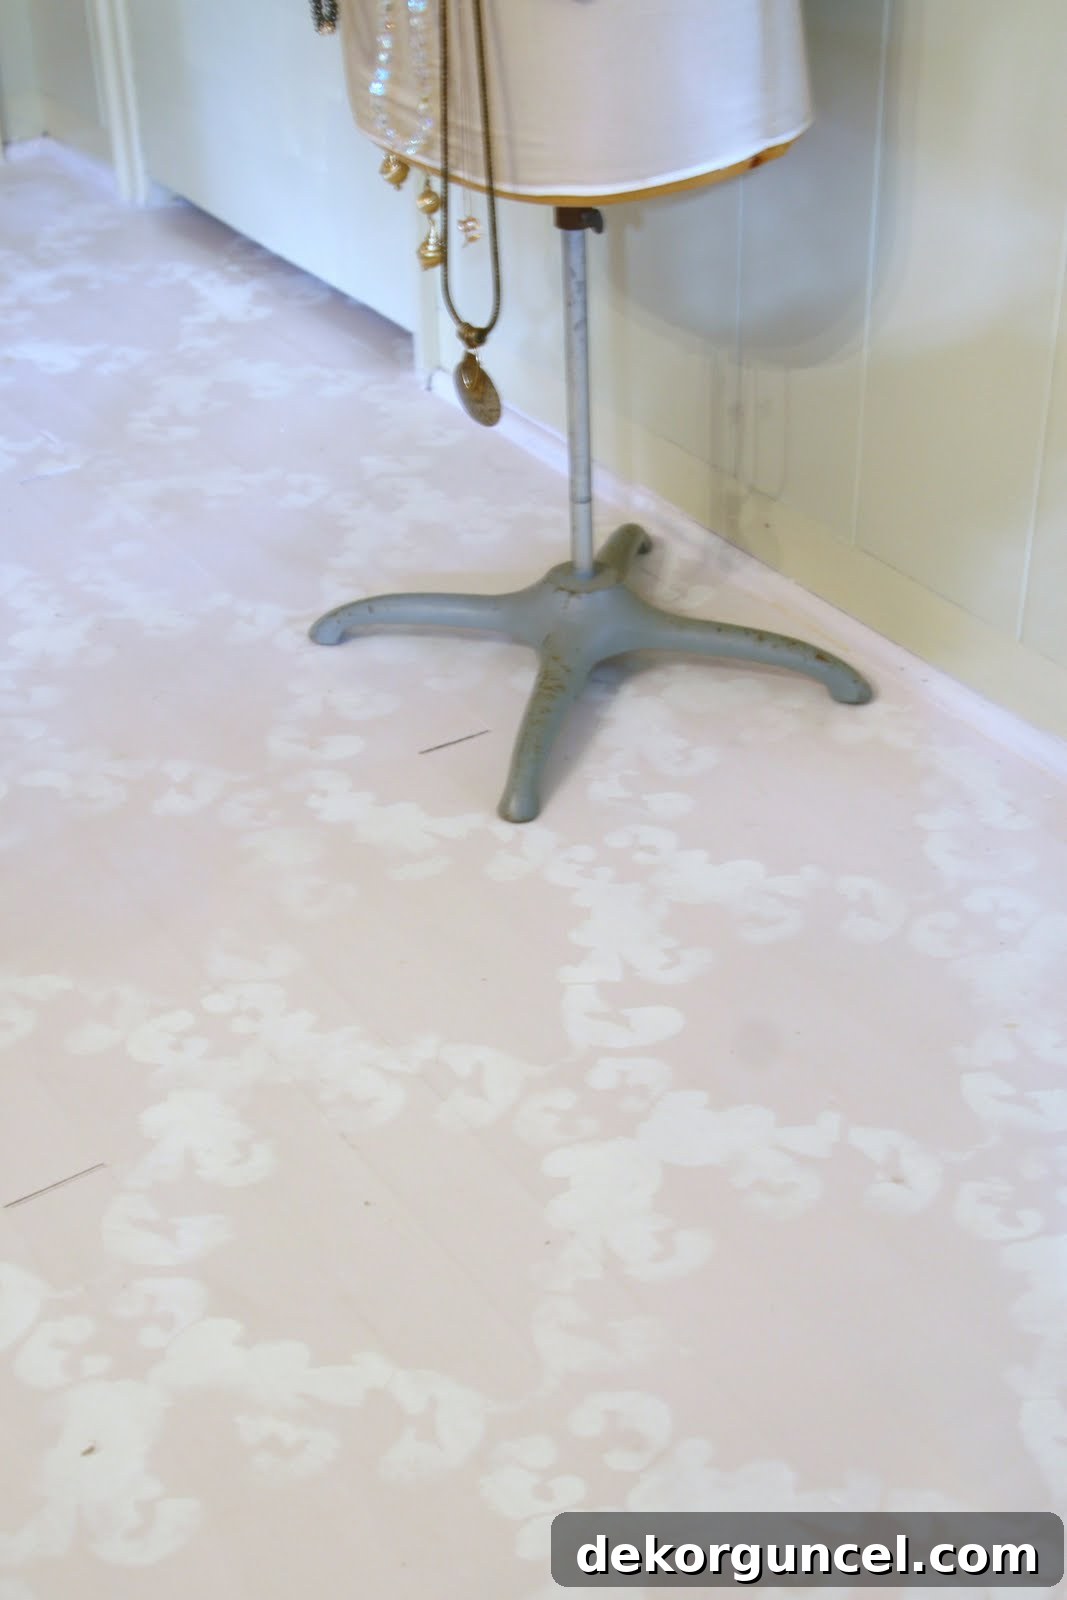
Karla at Lady Butterbug provides a brilliant solution for extensively damaged hardwood floors that might otherwise seem beyond repair. Rather than enduring the costly and laborious process of refinishing or replacing her scraped and water-damaged hardwoods, Karla opted for a truly transformative and budget-friendly chalk paint remedy.
Lady Butterbug
Her approach was both practical and immensely creative. She began by painting the entire floor in a delightful soft pink hue, effectively masking all the imperfections and providing a clean, fresh canvas. Over this charming base, she meticulously applied an elegant stenciled pattern using Annie Sloan Chalk Paint in Pure White. This combination creates a whimsical, almost fairytale-like ambiance, making the floor a central, joyful element of the room’s design.
To ensure this delicate yet durable finish would last, Karla sealed her creation with two generous coats of Annie Sloan Floor Lacquer. This robust topcoat is essential for protecting the painted surface, especially in areas that experience regular use, preserving the intricate stencil work and vibrant color. This project perfectly illustrates how stenciled chalk paint floors can completely redefine a space, turning what was once a liability into a stunning asset. It’s an ideal inspiration for a little girl’s nursery or any room desiring a touch of feminine charm and sophisticated playfulness. Explore more details of this captivating floor transformation on Lady Butterbug.
5. Cleverly Designed: Perfectly Imperfect’s Subtle Stripe Design on New Pine Floors
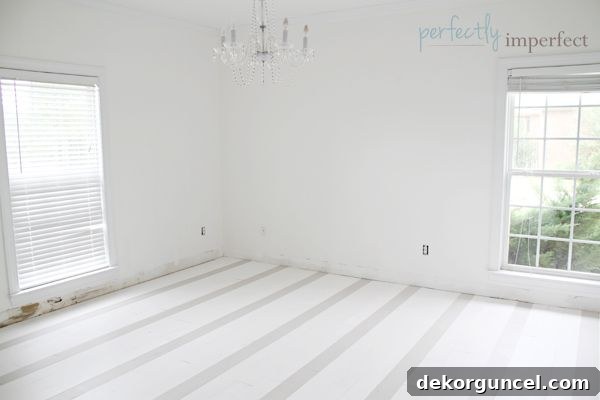
Shaunna from Perfectly Imperfect offers an ingeniously planned approach to painted floorboards, showcasing how foresight can lead to a truly remarkable result. As part of her daughter’s room makeover, Shaunna was installing new, unfinished white pine floorboards. Instead of painting them after installation, she embarked on a “smart girl” strategy: painting the individual boards *before* they were laid down.
Perfectly Imperfect
This pre-painting technique allowed her to create an exquisite subtle stripe pattern. The majority of the boards were painted with crisp Annie Sloan Chalk Paint in Pure White. For the alternating stripe, she cleverly mixed Annie Sloan French Linen with Pure White, achieving a slightly darker, contrasting shade that, when installed, created a delicate and sophisticated striped effect. This method not only ensured perfectly straight lines but also allowed for a more even application of paint on all edges of the boards, contributing to a professional finish.
Once the custom-painted boards were installed, the entire floor was sealed with Annie Sloan Lacquer, providing a durable and protective topcoat against daily wear and tear. The result is a stunningly unique floor that adds immense character and a bespoke feel to her daughter’s room. It’s a testament to the creative possibilities that open up when you think outside the box with chalk paint floor design. This project is a fantastic example for anyone considering installing new floorboards and wanting to personalize them from the start. Dive into all the details of this ingenious chalk paint floor project on Perfectly Imperfect.
6. Rustic Charm: VanHook & Co.’s Distressed Chalk Paint Wash on Hardwoods
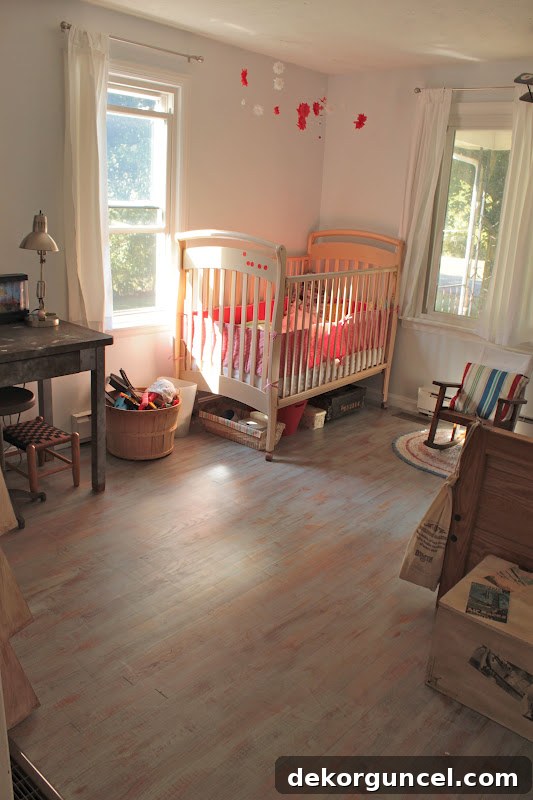
Our final inspiring example comes from Rachel of VanHook & Co., who crafted a uniquely beautiful and incredibly durable floor for her kids’ room. This project perfectly illustrates how chalk paint can save damaged floors from expensive refinishing or replacement, offering a budget-friendly yet highly aesthetic solution.
VanHook & Co.
Rachel began by removing old carpet, revealing the existing hardwood floors that, while functional, were in need of a significant refresh. Instead of a full, opaque paint job, she opted for a chalk paint wash. This technique involves diluting the chalk paint with water to create a translucent stain, allowing some of the original wood grain and texture to peek through. This creates a softer, more organic look than a solid paint coat, imparting an aged, almost weathered appearance.
Following the wash, Rachel strategically distressed the floors, enhancing their rustic character and making any future wear and tear blend seamlessly into the design rather than appearing as damage. For a highly durable finish, particularly important in a children’s room, she chose to coat the floors with polyurethane. While Annie Sloan Lacquer is a popular choice, polyurethane is another excellent option for sealing painted floors, offering robust protection against scratches and spills. The result is a truly unique and charming floor that is not only visually appealing but also incredibly practical and resilient. This project proves that achieving a stunning hardwood floor makeover doesn’t have to break the bank. Explore the full details of this creative chalk paint kids’ room project on VanHook & Co.
Why Choose Annie Sloan Chalk Paint for Your Floors?
After witnessing these inspiring transformations, you might be wondering why Annie Sloan Chalk Paint stands out for floor painting projects. Here’s a closer look at the key benefits:
- Minimal Preparation: One of the biggest advantages of Annie Sloan Chalk Paint is its famous “no priming, no sanding” requirement on most surfaces. While a thorough cleaning is always recommended for floors, this significantly cuts down on prep time and effort compared to traditional floor paints or refinishing.
- Exceptional Adhesion: Chalk paint adheres beautifully to a wide variety of surfaces, including wood, concrete, and even tile, making it incredibly versatile for different types of flooring.
- Rich Color Palette: Annie Sloan offers a diverse range of colors, from vibrant hues to subtle neutrals, allowing for endless creative possibilities to match any decor style.
- Versatility in Design: As seen in the examples, chalk paint allows for solid colors, intricate stenciled patterns, checkerboard designs, subtle washes, and distressed finishes. You can achieve almost any look you envision.
- Cost-Effective Renovation: Painting your floors with chalk paint is a significantly more affordable alternative to replacing or professionally refinishing them. It’s a budget-friendly way to achieve a high-impact aesthetic change.
- Low VOCs: Annie Sloan Chalk Paint is a water-based, low VOC (Volatile Organic Compound) paint, making it a more environmentally friendly choice for your home.
Essential Tips for a Successful Chalk Paint Floor Project
While Annie Sloan Chalk Paint is forgiving, tackling a floor project requires some careful planning and execution to ensure a durable and beautiful finish. Here are some crucial tips:
Surface Preparation is Key (Even with Minimal Sanding)
Although chalk paint famously requires minimal prep, floors are high-traffic areas and demand attention. Ensure your floor is:
- Thoroughly Clean: Vacuum and mop extensively to remove all dirt, dust, and grime. For stubborn stains or grease, use a strong degreaser.
- Dry: Allow the floor to dry completely before painting.
- Repaired: Fill any significant cracks, holes, or deep gouges in wood or concrete. Sand these repaired areas smooth.
- Light Scuff Sanding (Optional but Recommended): For very glossy or smooth surfaces (like some tiles or sealed hardwoods), a light scuff sand can help with adhesion, though often not strictly necessary with chalk paint.
Application Techniques for Floors
- Multiple Thin Coats: Apply two to three thin, even coats of chalk paint. Thin coats dry faster and adhere better than one thick coat. Use a roller for large areas and a brush for edges and details.
- Allow Adequate Drying Time: Follow the manufacturer’s recommendations for drying time between coats. Rushing this step can lead to a less durable finish.
- Stenciling and Patterns: If adding a stencil, ensure your base coat is fully cured. Use low-tack painter’s tape to secure your stencil and apply paint with a stencil brush or a small foam roller, using very little paint to prevent bleed-through.
The Non-Negotiable Step: Sealing Your Chalk Painted Floors
This is arguably the most critical step for floor durability. Never skip sealing your chalk painted floor. For floors, you generally have two primary options:
- Annie Sloan Lacquer: This is a water-based, clear varnish specifically formulated for chalk paint and ideal for floors. It comes in Matt and Gloss finishes. Lacquer offers excellent durability and protection against scuffs, scratches, and water. It’s highly recommended for high-traffic areas like foyers, kitchens, and dining rooms. Apply 2-3 coats for optimal protection, allowing each coat to dry thoroughly.
- Floor Wax (e.g., Annie Sloan Clear Wax, or a dedicated Floor Wax): As seen with Shabby Coast Cottage, wax can be used for a softer, more natural, and naturally distressed look. It’s more labor-intensive to apply and requires periodic reapplication (every 6-12 months, depending on traffic). Wax offers a more matte, velvety finish and allows for natural distressing over time. It’s generally better suited for lower-traffic areas or where a truly antique, worn look is desired.
- Polyurethane (Alternative): Some DIYers choose a water-based polyurethane as an alternative sealant, as Rachel from VanHook & Co. did. It offers strong protection and durability but may alter the chalky finish slightly and can yellow over time with oil-based varieties. Always opt for water-based clear coats if using polyurethane to preserve the color.
Whichever sealant you choose, ensure the paint is fully cured before applying the topcoat – typically 24-48 hours after the final paint coat, though always check specific product instructions.
Maintenance and Longevity
- Gentle Cleaning: Once sealed, clean your chalk-painted floors with a mild, pH-neutral cleaner and a damp (not soaking wet) mop. Avoid harsh chemicals or abrasive scrubbers.
- Protect from Damage: Use felt pads under furniture legs and area rugs in high-wear zones to extend the life of your painted floors.
- Touch-Ups: Chalk paint makes touch-ups relatively easy. Keep some leftover paint and sealant for minor repairs.
Your Next DIY Floor Makeover Awaits!
As these six incredible examples vividly demonstrate, Annie Sloan Chalk Paint on floors is far more than just a trend; it’s a powerful and accessible solution for transforming any room. Whether you’re aiming to conceal damage, introduce a unique design element, or simply refresh a tired space, chalk paint offers unparalleled versatility, durability (when properly sealed), and aesthetic appeal.
From the urban chic of stenciled concrete to the rustic charm of a distressed wash on hardwoods, the possibilities are truly endless. The convenience of minimal prep, combined with the rich, velvety finish of chalk paint, makes it an ideal choice for both seasoned DIY enthusiasts and those new to home improvement projects. Why settle for mundane or damaged floors when you can unleash your creativity and craft a custom look that truly reflects your personal style?
So, are you inspired to take on a chalk paint floor project of your own? The journey to beautiful, unique floors might be just a paint can away!
My Own Chalk Painted Floor Journey: A Tile Transformation!
On a personal note, the inspiration from these projects eventually led me to embark on my own painted floor adventure! I decided to tackle the ceramic tile in our powder room, and I couldn’t be happier with the results. It’s truly amazing what a few coats of paint and a good sealant can do to outdated tile, giving it a completely fresh and modern look without the cost and mess of replacement. Discover all the comprehensive details, including step-by-step instructions and tips, for our painted ceramic tile floor project here.
I hope this comprehensive guide inspires your next home decor endeavor. Happy painting!