
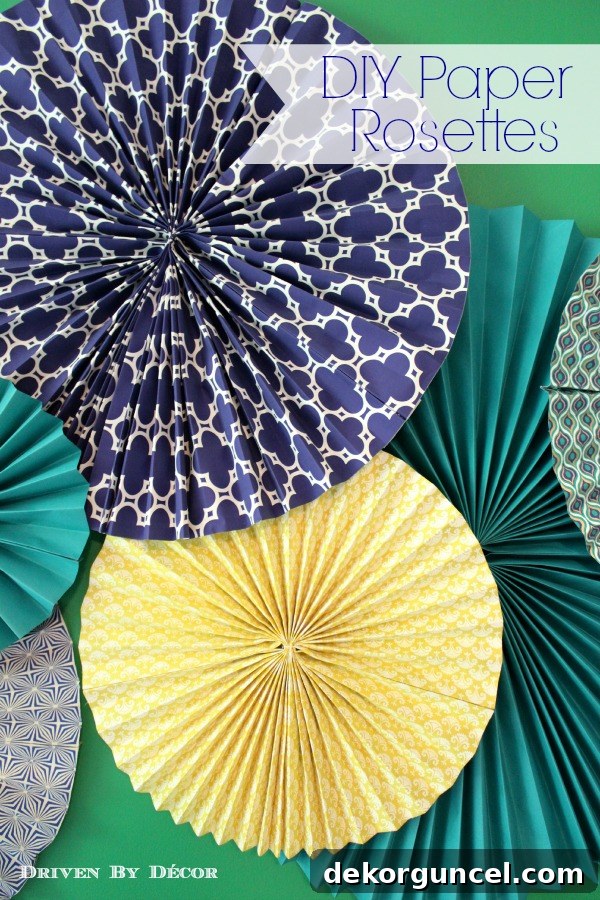
DIY Paper Rosettes: Create Stunning, Budget-Friendly Decorations for Any Occasion
Are you searching for an affordable, fun, and customizable way to elevate your home decor or add a special touch to your next celebration? Look no further than beautiful paper rosettes! These charming, accordion-folded paper decorations are incredibly easy to make, and the creative possibilities are endless. Whether you want to add a whimsical touch to a child’s room, create an eye-catching party backdrop, or simply infuse your living space with personalized style, learning how to make paper rosettes is a skill you’ll love.
Recently, I embarked on a mission to adorn a blank wall in my daughter’s room. I wanted something vibrant, unique, and most importantly, budget-friendly. Paper rosettes emerged as the perfect solution, and I couldn’t be happier with the delightful outcome. Not only are they simple to craft, but they also offer an inexpensive avenue to infuse personality into kids’ rooms or serve as captivating decorations for birthdays, baby showers, and other special events. This comprehensive guide will walk you through every step of creating your own stunning paper rosettes, making the process effortless and enjoyable. (Please note: This post includes affiliate links, meaning I may earn a small commission if you make a purchase through them, at no extra cost to you. Full disclosure statement available {here})
Why Choose Paper Rosettes for Your Decor?
Paper rosettes offer a multitude of benefits that make them a favorite among DIY enthusiasts and savvy decorators alike:
- Cost-Effective: You can create impressive decorations using inexpensive materials like wrapping paper, scrapbook paper, or even construction paper. This allows for a grand impact without a hefty price tag.
- Highly Customizable: Unlike store-bought decorations, paper rosettes give you complete control over colors, patterns, and sizes. Match them perfectly to your existing decor, party theme, or personal aesthetic.
- Versatile Applications: From wall art and party backdrops to gift toppers and table centerpieces, rosettes can be adapted for countless uses.
- Simple to Make: The process is straightforward and doesn’t require advanced crafting skills, making it an ideal project for beginners and experienced crafters alike.
- Temporary & Guilt-Free: If your preferences change or your child outgrows a theme, these decorations are easy to remove and replace without any financial burden or sentimental guilt.
My inspiration for these rosettes came from a vibrant display at Paper Source. The idea of selecting papers in specific colors and patterns, rather than being limited to pre-made options, was incredibly appealing. This DIY approach allows for truly personalized decor that reflects your unique style.
Gathering Your Materials: What You’ll Need
Before you dive into the crafting process, ensure you have all the necessary supplies on hand. The beauty of paper rosettes lies in their simplicity and the common availability of materials.
- Decorative Paper: This is your star ingredient! You can use:
- Rolls of Wrapping Paper: Often more economical for larger rosettes or multiple projects. Look for interesting patterns and textures.
- Sheets of Decorative Paper: Available at craft stores, stationery shops like Paper Source, or even online. These often come in thicker stocks and more intricate designs.
- Cardstock: For smaller, more rigid rosettes.
- Ruler or Measuring Tape: Essential for accurate cutting and folding.
- Pencil: For marking cutting lines.
- Scissors or Paper Trimmer: A paper trimmer will ensure perfectly straight cuts, which contribute to a cleaner final look.
- Strong Adhesive: For joining paper sections and securing the rosette.
- Adhesive Lines (e.g., ZIPS clear adhesive lines or Glue Dots): These are highly recommended for their strong hold and ease of use.
- Craft Glue: A strong, quick-drying craft glue can also work, but ensure it doesn’t warp the paper.
- Double-Sided Tape: Can be used for initial joining, but may not be strong enough for the final rosette closure.
- Embroidery Floss or Strong Thread: For tying the center of the accordion-folded paper. Doubled thread works best for durability.
- Optional for Hanging:
- Small Nails or Hooks
- Additional Embroidery Floss or Thread (for hanging loops)
- Command Strips or Double-Sided Foam Tape (for less invasive hanging)
Step-by-Step Guide to Making Beautiful Paper Rosettes
Now that you have your materials ready, let’s dive into the fun part: crafting your paper rosettes!
1. Planning Your Rosette Size and Paper Dimensions
The first crucial step is to determine the desired size of your finished rosette. This will dictate how much paper you need and how wide to cut your strips.
- Rosette Diameter: Decide how many inches wide you want your final rosette to be. This measurement will be the width of the paper strip you cut. For example, a 14-inch rosette requires a paper strip that is 14 inches wide.
- Rosette Fullness (Paper Length): The length of your paper strip determines how full and dense your rosette will appear. A good rule of thumb is to make the paper length approximately 2.5 to 3 times the width of your paper. So, for a 14-inch wide strip, you’d aim for a length between 35 and 42 inches. It’s always better to err on the side of a longer strip, as you can easily trim excess later.
2. Preparing Your Paper for Folding
Once you’ve decided on your dimensions, it’s time to cut your paper.
- Using Wrapping Paper Rolls: If using a roll, simply unroll and cut one continuous sheet to your determined width and length. For a 14-inch wide rosette needing a 36-inch length, you would cut a single 14″ x 36″ piece.
- Using Decorative Paper Sheets: Individual sheets of decorative paper are often not long enough for larger rosettes. In this case, you’ll need to join two (or more) sheets together. To create a seamless look, cut each sheet to half of your desired final length. For instance, if you need a 14″ x 36″ piece, cut two sheets to 14″ x 18″ each. You will then glue or tape these two sheets together to form your single long strip.
- Pattern Alignment Tip: If your paper features a continuous pattern, pay close attention when cutting. For the most visually appealing final rosette, try to cut the pattern at the same point on both the left and right sides of your strip. This ensures a smoother, more cohesive look when the two ends of the folded paper meet to form the circle.
3. The Accordion Folding Technique
This is where your rosette begins to take shape! You’ll be folding your paper accordion-style, similar to how you’d make a paper fan.
- First Fold: Place your paper patterned-side down (if applicable). Fold up a small section, about ½ inch to ¾ inch, along the width (the shorter side) of the paper. Press firmly along the edge to create a sharp, crisp fold.
- Flip and Fold: Now, flip the entire paper strip over. Make another fold of the exact same size (½” to ¾”) in the opposite direction. This creates the ‘accordion’ effect.
- Repeat Consistently: Continue flipping the paper and making consistent folds until you reach the very end of your paper strip. The key to a beautiful rosette is maintaining uniform fold sizes throughout the entire length. Avoid making your folds gradually larger or smaller.
- Final Fold Orientation: Ensure that your very last fold on the paper strip faces downwards. If it ends up facing upwards, simply trim off one single fold so that the last fold correctly faces down. This ensures a clean join later on.
- Handling Multiple Sheets: If you are working with two separate sheets that you plan to join, repeat the accordion folding process for the second sheet. For the second sheet, you’ll want to start with the patterned side facing UP for your first fold, ensuring proper alignment when joined.
4. Joining Multiple Paper Strips (If Applicable)
If your rosette requires two or more paper strips, you’ll need to join them seamlessly.
- Choose Your Adhesive: While double-sided tape might seem convenient, I’ve found that it doesn’t always provide the strong, lasting hold needed. I highly recommend using ZIPS clear adhesive lines or similar strong adhesive dots/lines. These are incredibly sticky and ensure a durable bond.
- Applying the Adhesive: Run an adhesive line (or place a few dots) all the way down the length of the end fold on one of your accordion-folded sheets.
- Connecting the Strips: Carefully align and press the end fold of the second sheet onto the adhesive-covered end of the first sheet. Ensure the folds align perfectly to create one long, continuous accordion-folded strip.
5. Securing the Center of Your Rosette
With your paper fully folded, it’s time to bring it all together.
- Gather the Folds: Gently gather all the accordion folds tightly together at the very center of the strip. The tighter you gather them, the more compact and defined your rosette’s center will be.
- Tie the Center: Turn the gathered paper over so that the patterned side is facing down. Carefully tie the center of the accordion folds with a piece of embroidery floss or doubled-up strong thread. Tie it securely with a double knot to prevent it from unraveling.
6. Forming the Rosette and Adhering Edges
This is the magical moment when your folded paper transforms into a beautiful rosette!
- Preliminary Opening: Flip the paper back over so the patterned side is up. Gently pull the ends of the accordion together on both sides. This will give you a preliminary look at your rosette’s shape and fullness.
- Adjusting Fullness (Optional): If you find your rosette is too full or too sparse at this stage, you can easily adjust it. Cut the tie you just made in the middle. Carefully cut an equal amount of paper from both ends of your accordion-folded strip. Then, retie the center as described in the previous step. This adjustment allows for perfect customization.
- Final Adhesion: Once you’re satisfied with the fullness, use your strong adhesive (ZIPS lines, Glue Dots, or strong craft glue) to adhere the two outer paper edges to one another. Press firmly and hold for a few moments to ensure a strong bond, creating a complete circular paper rosette.
Creative Ways to Use Your Paper Rosettes
Paper rosettes are incredibly versatile! Here are just a few ideas to inspire your next project:
- Wall Art: As demonstrated, a grouping of rosettes in various sizes and patterns can transform a blank wall into a vibrant focal point. Ideal for kids’ rooms, nurseries, playrooms, or even a craft studio.
- Party Backdrops: Create a stunning photo booth backdrop or dessert table display by arranging multiple rosettes on a wall. Mix in some balloons or fairy lights for extra flair.
- Gift Toppers: Instead of a traditional bow, attach a small, handmade paper rosette to a wrapped gift for a unique and personal touch.
- Table Centerpieces: Scatter rosettes across a party table, or arrange them around a vase of flowers for a festive centerpiece.
- Banners and Garlands: String several rosettes together with ribbon or twine to create charming banners for birthdays, holidays, or everyday decor.
- Nursery Decor: Soft pastel rosettes can add a dreamy, whimsical feel to a baby’s room.
- Classroom Decorations: Bright and colorful rosettes are perfect for decorating classrooms or school events.
- Seasonal Decor: Choose papers in holiday themes (red/green for Christmas, orange/black for Halloween) to create festive seasonal decorations.
Tips for Perfect Paper Rosettes Every Time
To ensure your paper rosette projects are always a success, keep these tips in mind:
- Experiment with Paper Types: Don’t limit yourself to just thin wrapping paper. Thicker scrapbook paper or cardstock can create more durable and structured rosettes, especially for smaller sizes.
- Consistent Folds are Key: The most important factor for a neat rosette is making all your accordion folds the exact same size. Take your time with this step.
- Sharp Creases: Use your fingernail, a ruler, or a bone folder to create crisp, sharp creases on every fold. This helps the rosette hold its shape better.
- Strong Adhesive Matters: Investing in good quality adhesive lines or a strong craft glue will prevent your rosettes from coming apart over time.
- Mix and Match: Don’t be afraid to combine different patterns, colors, and sizes within a single display. This adds visual interest and depth.
- Pre-Measure and Pre-Cut: Doing all your measuring and cutting before you start folding can streamline the process, especially if you’re making multiple rosettes.
Hanging Your Beautiful Paper Rosettes
Once your rosettes are complete, it’s time to display them! Here are a couple of effective hanging methods:
- Single Rosette Hanging: For individual rosettes that are positioned independently, a simple method is to gently push a small hook or nail into the wall. Then, carefully slide the hook underneath the embroidery floss or thread that ties the center of the rosette. This keeps the hanging mechanism discreet.
- Layered Rosette Hanging: If you’re creating a layered display where one rosette might overlap another’s center, attaching it directly to a hook in the middle might not be feasible. In this scenario, create a loop with additional thread or embroidery floss. Tie this loop securely to the back center of the rosette. Then, attach the looped thread to a hook or nail positioned above where you want the rosette to hang. You can adjust the length of the loop to fine-tune the height and arrangement of your rosettes, ensuring they sit perfectly within your design.
- Alternative Hanging: For non-damaging options, consider using Command strips or double-sided foam tape on the back of the rosette and directly onto the wall. This is great for temporary displays or rentals.
Endless Creativity at Your Fingertips
Making paper rosettes is truly an enjoyable and rewarding craft. They are incredibly easy to create, visually delightful, and significantly more economical than almost any other type of artwork or party decoration. I spent approximately $50 on the papers for my daughter’s room project, and still had plenty left over for wrapping gifts, which is an added bonus! There’s a wonderful freedom in knowing that if your little one outgrows a particular decor style in a year or two, there’s absolutely no guilt in refreshing the space with something new. The low cost and simple DIY nature make it a perfect creative outlet.
I sincerely hope you found this guide helpful and inspiring for your next crafting adventure! Feel free to explore more of my DIY projects {here} and discover other creative kids’ room decorating ideas {here}.