

Unlock the full potential of Annie Sloan Chalk Paint with our comprehensive guide! From selecting the perfect brush to mastering the art of waxing, discover expert tips and techniques to transform your furniture with ease.
Your Ultimate Guide to Annie Sloan Chalk Paint: Tips, Techniques, and Transformations
Embark on a creative journey to refresh your home decor with the unparalleled versatility of Annie Sloan Chalk Paint. Renowned for its ease of use and beautiful matte finish, this remarkable paint allows you to breathe new life into old furniture without the typical hassle. Forget tedious sanding, stripping, or priming – Annie Sloan Chalk Paint simplifies the process, making it accessible for both beginners and seasoned DIY enthusiasts.
To truly illustrate the magic of this paint, let me share a recent project that beautifully showcases its transformative power. I was on the hunt for a compact gray kitchen table for months, yet nothing quite fit my vision. Then, serendipitously, I found a cream-colored desk, perfectly sized and priced, waiting for a new purpose. It was the ideal canvas for Annie Sloan Chalk Paint, destined to become the kitchen table of my dreams. The most incredible aspect? Absolutely no prep work was needed – no sanding, no priming, just pure painting enjoyment. Ready to dive into the details and learn how to achieve stunning results yourself? (This post includes affiliate links; a full disclosure statement is available here.)
Mastering Annie Sloan Chalk Paint Application
Choosing your paint color is the first exciting step in any furniture transformation. For my project, I selected “French Linen,” a sophisticated dark gray that offers a timeless appeal. You can easily find a local stockist for Annie Sloan Chalk Paint here to explore their extensive color palette. Each shade is carefully curated to offer unique character and can be mixed to create custom hues, allowing for endless creative possibilities.
The “No Prep” Advantage: A Game Changer
One of the most celebrated features of Annie Sloan Chalk Paint is its legendary “no prep” requirement. Unlike traditional paints that demand hours of stripping, sanding, and priming, chalk paint adheres beautifully to almost any surface – wood, laminate, metal, even fabric – without these strenuous steps. This revolutionary characteristic saves immense time and effort, making furniture painting a truly enjoyable activity rather than a daunting chore. This means you can pick up a brush and start painting almost immediately, transforming pieces faster than you ever thought possible.
Applying the First Coats for Flawless Coverage
With my chosen “French Linen” and a high-quality natural bristle brush in hand, I began applying the first coat. It quickly became clear that a single layer wouldn’t fully obscure the existing cream color. However, there was no cause for concern, as Annie Sloan Chalk Paint dries remarkably fast. Before I knew it, the first coat was dry to the touch and ready for the second application. This quick-drying property is a huge advantage, allowing you to apply multiple coats in a single day. The difference after the second coat was truly remarkable – a night and day transformation, providing significant coverage and depth. You can clearly see the progression from the original surface to the beautifully painted second coat.
While two coats often suffice for excellent coverage, especially when painting a similar color, I opted for a third coat on my kitchen table. Given that this piece would endure daily use and potential wear and tear, adding an extra layer provided enhanced durability and a deeper, richer color payoff. What I particularly adore about this paint (aside from the glorious lack of prep work!) is its incredible ability to self-level. As the paint dries, brush marks magically smooth out, resulting in a beautifully consistent and professional-looking finish. This forgiving nature makes it an ideal choice for those new to furniture painting, as small imperfections tend to blend seamlessly.
Achieving a Perfectly Smooth Finish and Correcting Mistakes
Even seasoned painters can encounter minor mishaps, but with Annie Sloan Chalk Paint, these are easily remedied. For instance, I once discovered a stray brush bristle embedded in the paint after the final coat had dried. Instead of panicking, I gently sanded it out, applied a touch more paint, and watched it blend in flawlessly. This remarkable forgiveness is a testament to the paint’s quality. If you’re aiming for an even smoother finish, here’s a professional trick: lightly dampen your natural bristle brush with water and offload any excess before dipping it into the paint. This subtly thins the paint, helping it settle more evenly and glide on with less resistance, reducing visible brush strokes.
The Art of Waxing: Protecting and Enhancing Your Finish
Once your paint has dried completely, the next crucial step is applying wax. Chalk paint’s porous and chalky texture is incredibly receptive to wax, and this union forms a durable, protective, and aesthetically pleasing bond. Waxing not only seals and protects your painted surface but also deepens the color and adds a beautiful, subtle sheen.
Choosing and Applying Chalk Paint Wax
For this essential step, I highly recommend using a specialized round waxing brush. Apply a very thin, even coat of wax. Both Annie Sloan Wax and Staples 211 Clear Wax (found here) are excellent choices, known for their true clear finish that won’t yellow or discolor your paint over time. The key to successful waxing is restraint; a little wax goes a very long way. Load only a small amount onto your brush at a time. Work the wax into the paint using mild pressure and a circular motion, which I find works best for optimal penetration and an even coat. Ensure you cover the entire painted surface thoroughly but thinly.
Creating a Distressed Look
If you desire a charming distressed aesthetic, similar to the edges I created on my table, this is the perfect stage to achieve it. After applying the first thin layer of wax, use fine-grit sandpaper (around 220-grit) to gently sand the edges or any areas where natural wear would occur. This technique allows glimpses of the original surface or a contrasting base coat to peek through, adding character and an aged appearance. Be mindful not to over-sand; a light hand is crucial for a natural look.
Buffing for Shine and Long-Lasting Protection
After distressing, use a clean, lint-free rag to wipe away any sanded paint dust. Allow the first coat of wax to set for approximately 10-15 minutes, then buff the entire surface with a fresh rag. This initial buffing helps to work the wax further into the paint and begin building a subtle sheen. For enhanced durability and protection, especially for high-traffic pieces like a kitchen table, apply a second thin coat of wax after 24 hours. Pay particular attention to covering any distressed areas well. Finally, go over the entire table one last time with a clean rag, smoothing out any excess wax and ensuring an even finish. The following day, a final buff with a clean rag will bring out a beautiful, soft sheen, completing the transformation.
Curing Time and Ongoing Care
It’s important to remember that Annie Sloan Wax takes close to a month to fully cure and reach its maximum hardness. During this curing period, treat your newly waxed furniture piece with a bit of extra care and “TLC.” Avoid harsh cleaners or heavy scrubbing. For frequently used surfaces such as a kitchen table or desk, consider adding a glass top for ultimate protection against spills, scratches, and daily wear, ensuring your beautiful finish lasts for years to come.
Essential Tools: Choosing the Best Brushes for Chalk Paint & Wax
The right tools can significantly enhance your chalk painting experience and the quality of your finish. Investing in appropriate brushes is key to achieving professional-looking results.
Brushes for Annie Sloan Chalk Paint
For applying Annie Sloan Chalk Paint, a natural bristle brush (often labeled as “pure bristle”) is highly recommended over typical synthetic brushes designed for wall painting. Natural bristles have a unique structure that allows them to hold more paint and distribute it evenly, creating a beautiful texture that synthetic brushes often can’t replicate. They help achieve the signature chalky finish. You don’t necessarily need to break the bank; something as inexpensive as this set of brushes can provide excellent results. While natural bristle brushes may shed slightly more than synthetic ones, simply keep an eye out for any loose bristles as you paint and gently remove them.
Brushes for Chalk Paint Wax
When it comes to applying wax, a specialized waxing brush is a worthwhile investment. These brushes, like this one, are designed with densely packed bristles that effectively work the wax into the porous surface of the paint, ensuring deep penetration and an even application. Their rounded shape is excellent for reaching into crevices and providing thorough coverage, which is crucial for maximum protection and durability. Cleaning your brushes properly after each use – warm water and mild soap for paint brushes, and mineral spirits or specific brush cleaner for wax brushes – will ensure their longevity and performance.
Maximizing Your Investment: Value and Inspiration
While the initial cost of Annie Sloan Chalk Paint, wax, and specialized brushes might seem higher than conventional paints, the long-term value and project versatility make it a smart investment. After completing my kitchen table, I still had over half a quart of paint and more than three-quarters of the wax remaining. These supplies have since been used on several other projects, proving their cost-effectiveness. Furthermore, the “no prep” aspect eliminates the need to purchase expensive paint strippers, primers, and extensive sanding supplies, offsetting the initial investment.
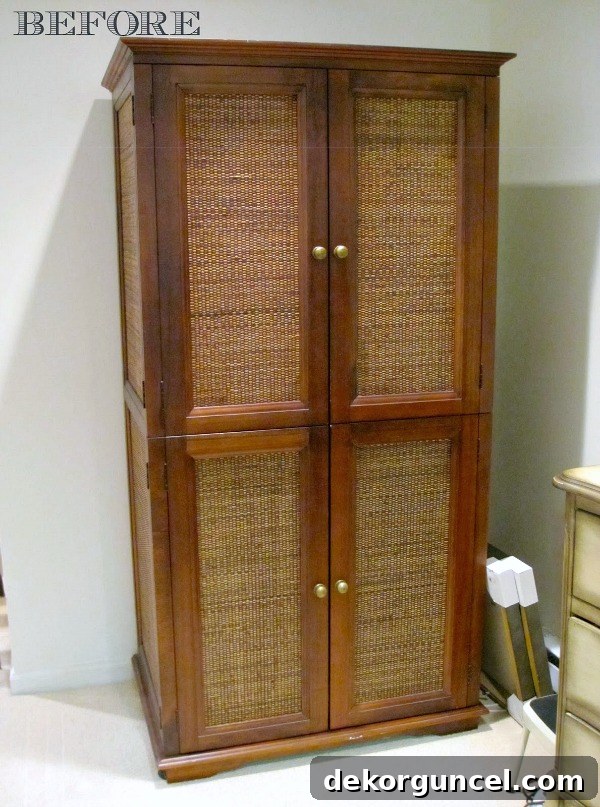
My favorite Annie Sloan Chalk Paint project, following the transformation of this kitchen table, was bringing a dated armoire back to life. Initially, it was a heavy, uninspired piece:
Using Annie Sloan Chalk Paint, it has been completely reimagined and is now one of the most stunning and cherished pieces in our home:
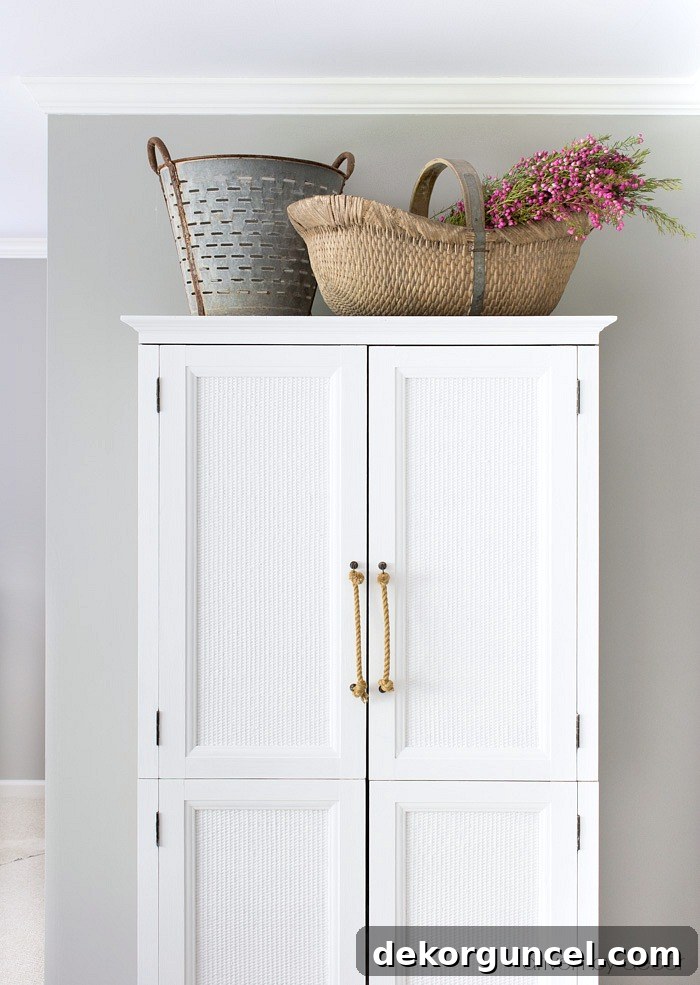
You can discover more details and see it in context within my tour of our guest bedroom here.
As you embark on your own Annie Sloan Chalk Paint projects, remember one crucial piece of advice: have fun! The inherent beauty of painted furniture lies in its character and unique charm. It doesn’t have to be flawlessly perfect. Embrace minor imperfections; they contribute to the handcrafted aesthetic and tell a story, making each piece truly one-of-a-kind. Don’t stress over achieving an immaculate, factory-like finish – that’s not what chalk paint is about. Enjoy the creative process and the joy of transforming something old into something beautifully new.
We hope this comprehensive guide has empowered and inspired you to begin your own Annie Sloan Chalk Paint journey! Be sure to explore our other DIY projects here for more creative ideas and inspiration.
