
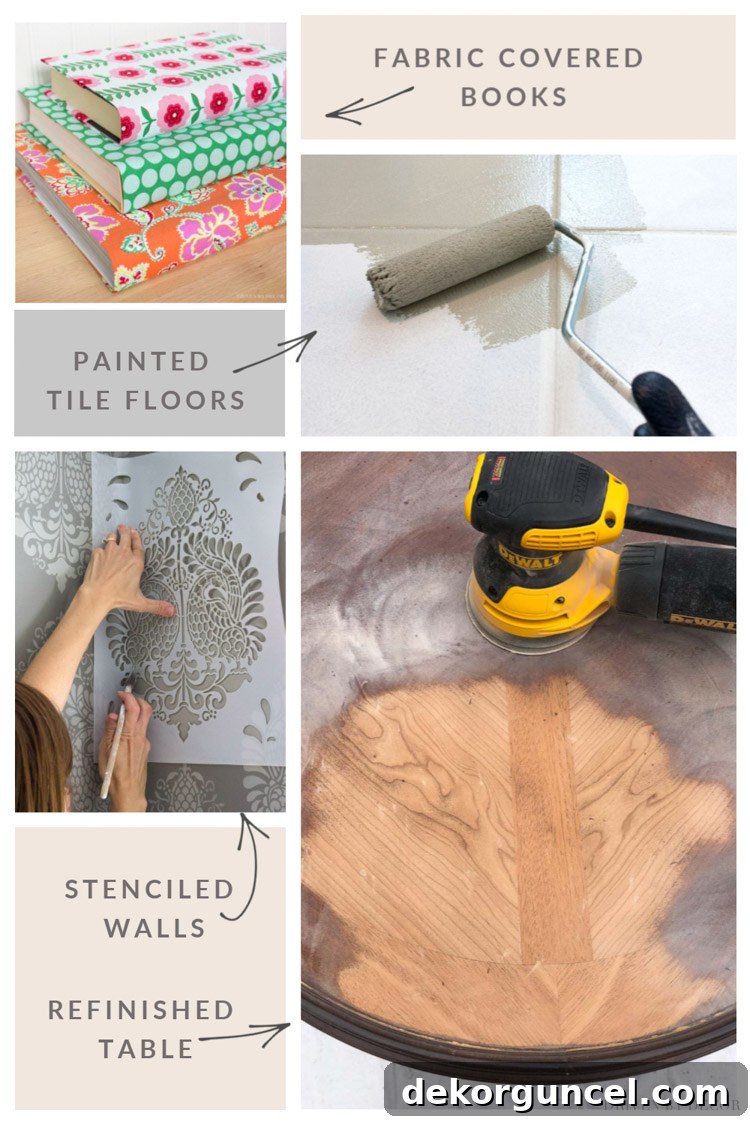
Discover how to elevate your living space without breaking the bank! These ten favorite DIY home projects prove that a little effort can lead to stunning transformations.
The weekend offers a golden opportunity to tackle those home improvement projects you’ve been dreaming about. Over the years, our home has been a canvas for numerous do-it-yourself ventures, and today, I’m thrilled to share my top ten favorite DIYs. This curated collection spans a variety of projects, from the intricate artistry of stenciling bathroom walls years ago to the more recent, refreshing paint job on my girls’ bathroom cabinets. Whether you’re a long-time follower or new to our journey, you’re bound to discover some inspiring home projects you might have missed! Get ready to unlock the potential of your home with these creative and budget-friendly ideas. (post includes affiliate links; full disclosure statement available {here})
1. DIY Painted Tile Floors: A Game-Changer for Outdated Bathrooms
One of my most cherished DIY successes, and perhaps the one I most feared would be an epic failure, was painting the rather unsightly tile floor in our powder room. When we first moved in, this small but essential space was a design anomaly, featuring custom-cut carpet (a truly questionable choice for a bathroom!) that concealed an even more dated, vibrant red tile floor underneath. It was an aesthetic challenge that cried out for a transformative solution.
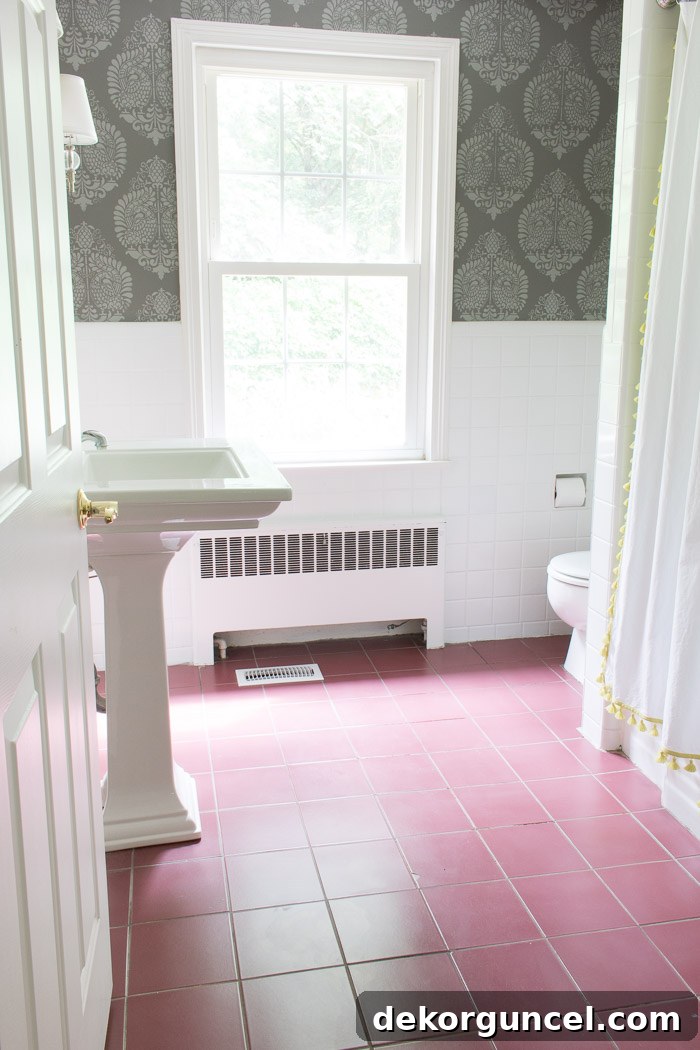
Driven by a desire for change and a tight budget, I took a leap of faith, deciding to paint the tile floor. My initial thought was that this would be a temporary fix, a stopgap measure until we could save enough for a complete tile replacement. However, to my utter surprise and delight, the results were far beyond expectations. The painted floor not only held up beautifully but also completely revolutionized the room’s aesthetic. It transformed the space so effectively that we kept it as-is for the entire duration of our stay in that home, proving that a budget-friendly DIY can sometimes outperform costly renovations. This project stands as a testament to the power of a little paint and a lot of courage.
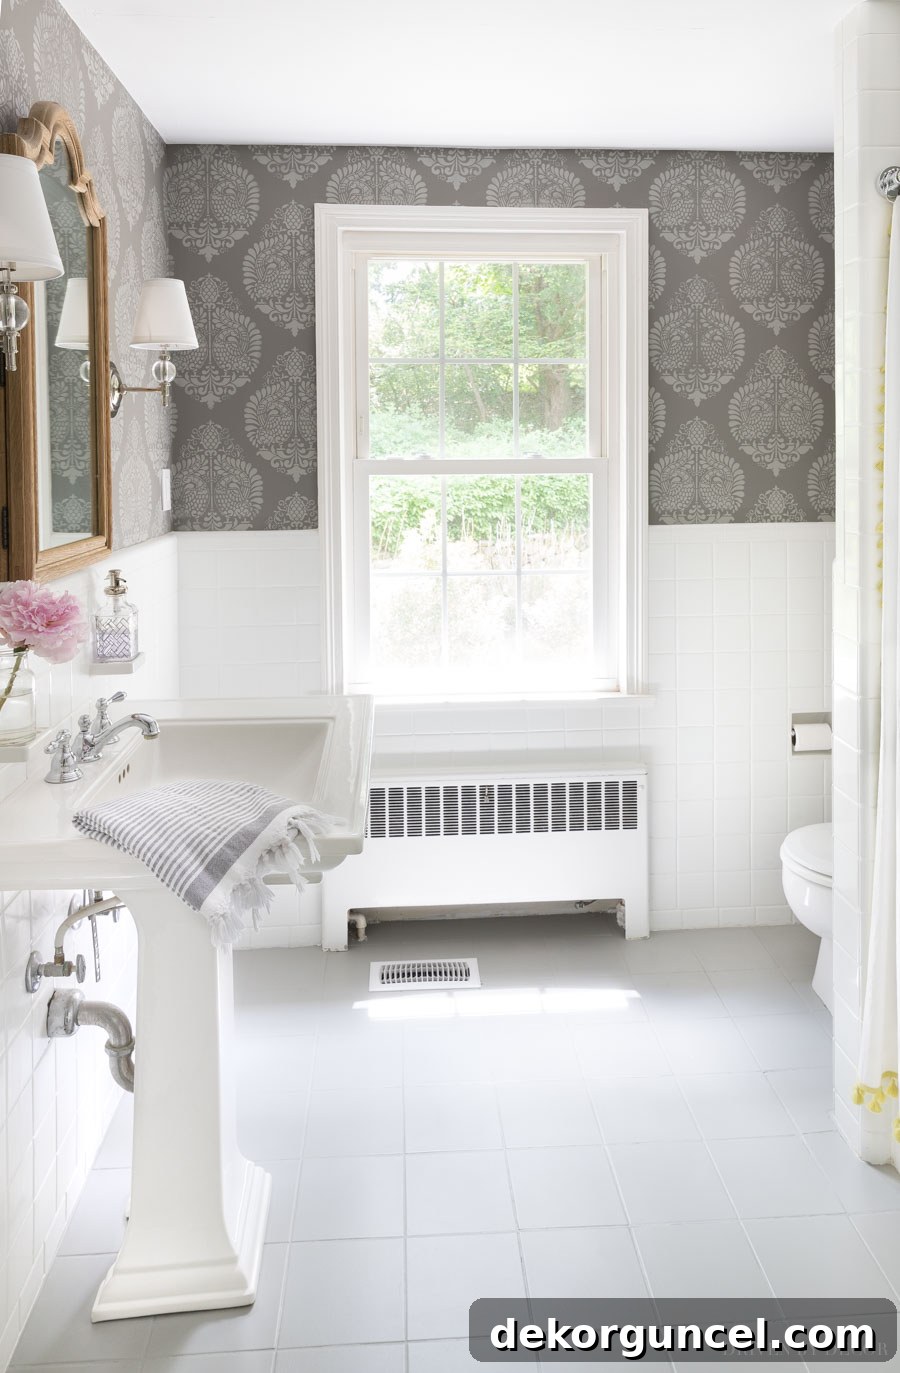
Powder Room Sources: Annapakshi Indian Damask Wall Stencil (11.25″ x 15.5″) | Arched wood mirror (similar) | Pedestal Sink | Sconces (Polished Nickel) | Tassel Shower Curtain
For a detailed guide on how this remarkable transformation was achieved, check out my comprehensive post on painting tile floors {here}. You’ll find all the steps, tips, and product recommendations to help you achieve a similar stunning result in your own home.
2. DIY Stenciled Bathroom Walls: Wallpaper Look for Less
Continuing our tour of the powder room, another project that firmly secures its spot in my top ten DIY list is the stenciled walls. Beyond the “carpet-over-tile” flooring predicament, this small bathroom was plagued by truly dated and visually unappealing yellow wallpaper. It made the space feel cramped, old-fashioned, and far from the elegant sanctuary I envisioned.
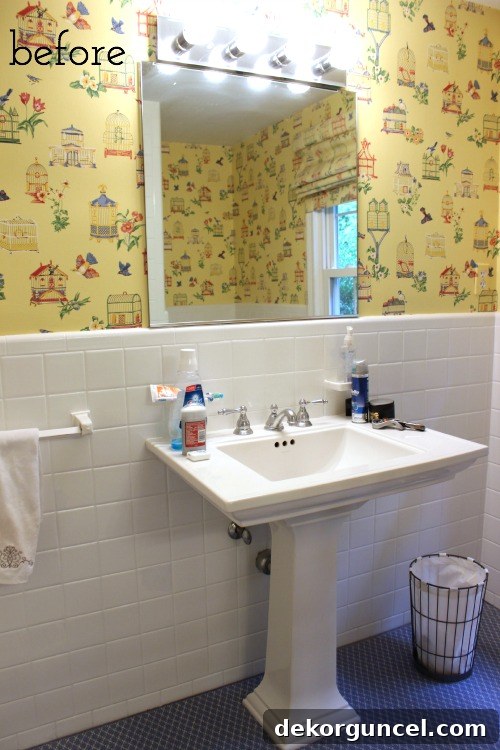
With a very limited budget for sprucing up this area, traditional re-wallpapering was simply not an option. Instead, I decided to venture into the world of stenciling. The process involved painting the walls a sophisticated dark gray, which immediately provided a modern base. On top of this, I meticulously stenciled a delicate light gray damask pattern, aiming to achieve the intricate look of high-end wallpaper without the exorbitant cost. This artistic endeavor allowed for significant customization and personalization, transforming a drab space into one with character and charm.
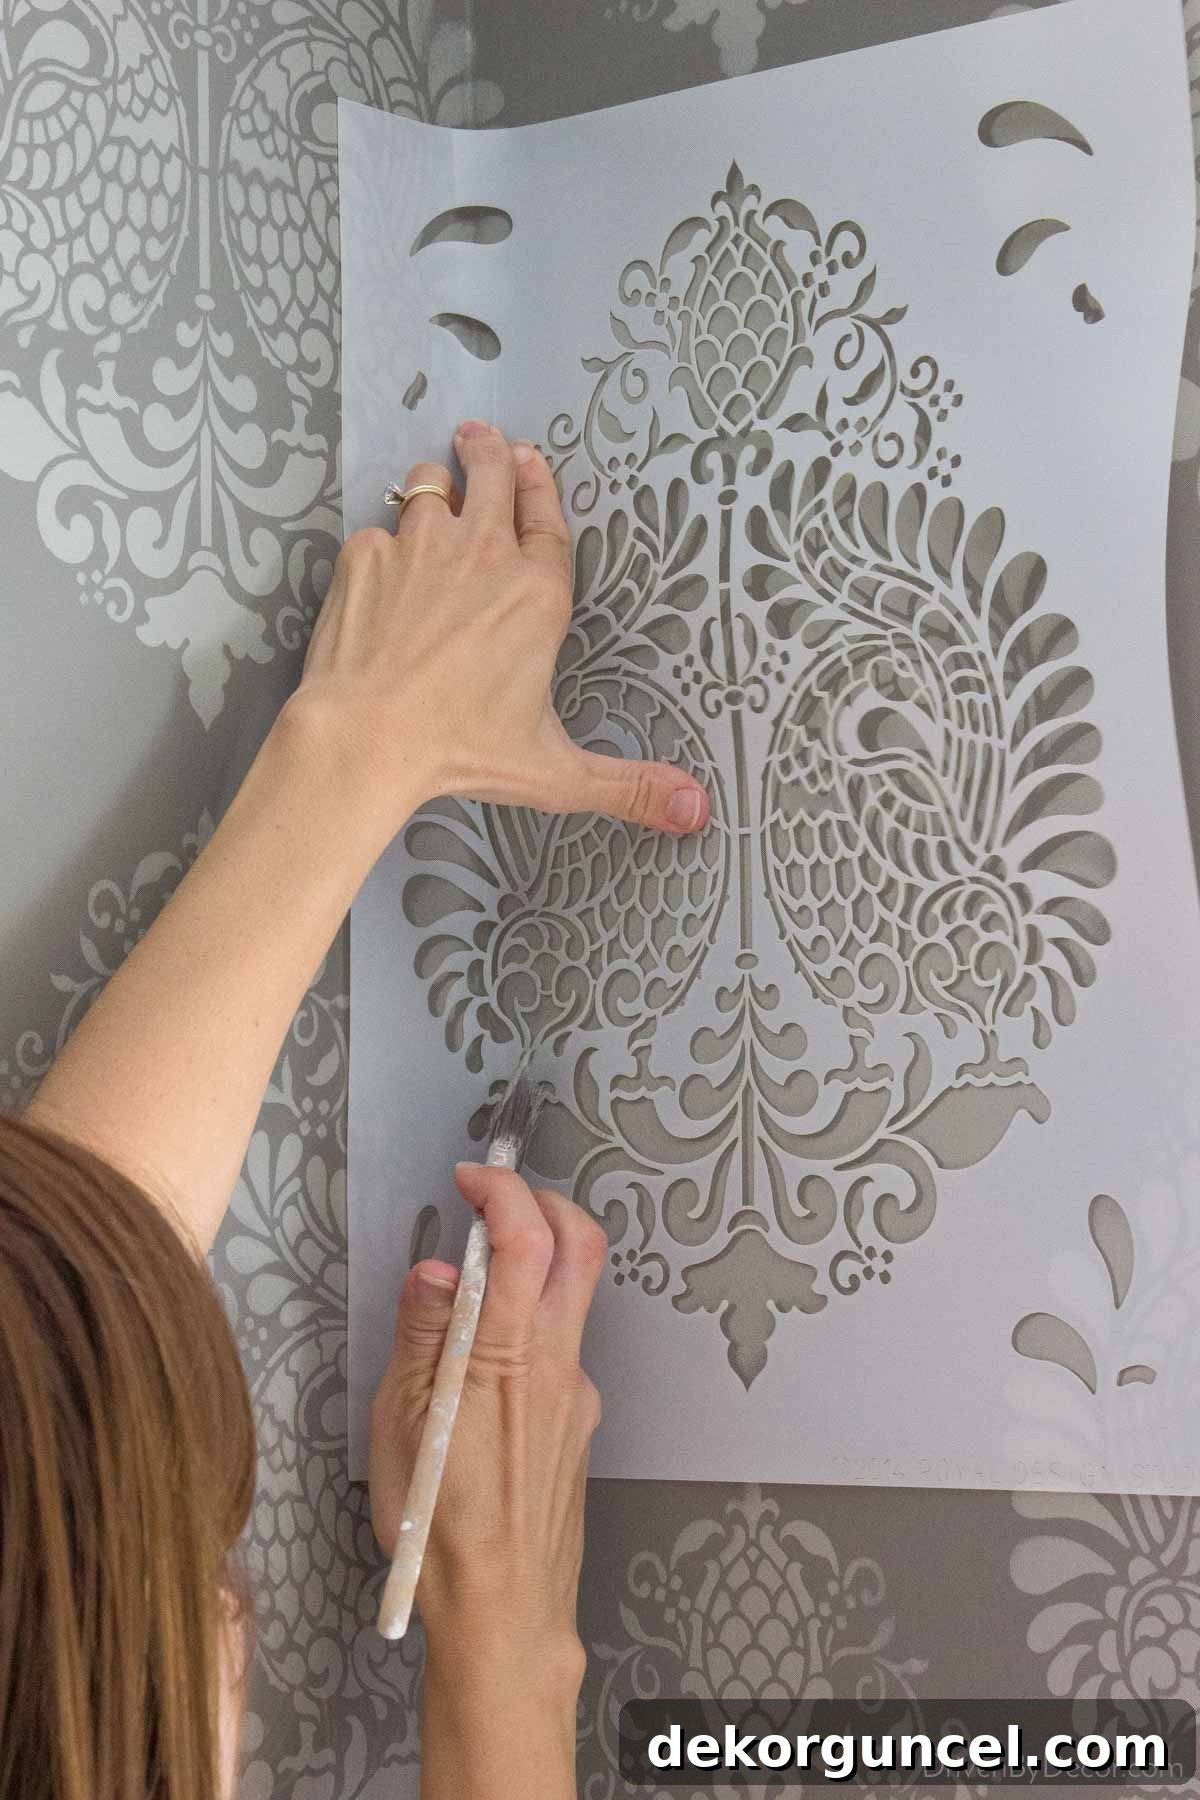
While the project was undeniably time-intensive and presented its fair share of challenges and minor mistakes (as most ambitious DIYs do!), the end result was incredibly rewarding. I managed to achieve the luxurious aesthetic of wallpaper for approximately one-tenth of the price. This project not only saved a substantial amount of money but also provided the immense satisfaction of creating something beautiful with my own hands. The stenciled walls became a true focal point, demonstrating that ingenuity and effort can overcome budget constraints to create truly stunning home decor.
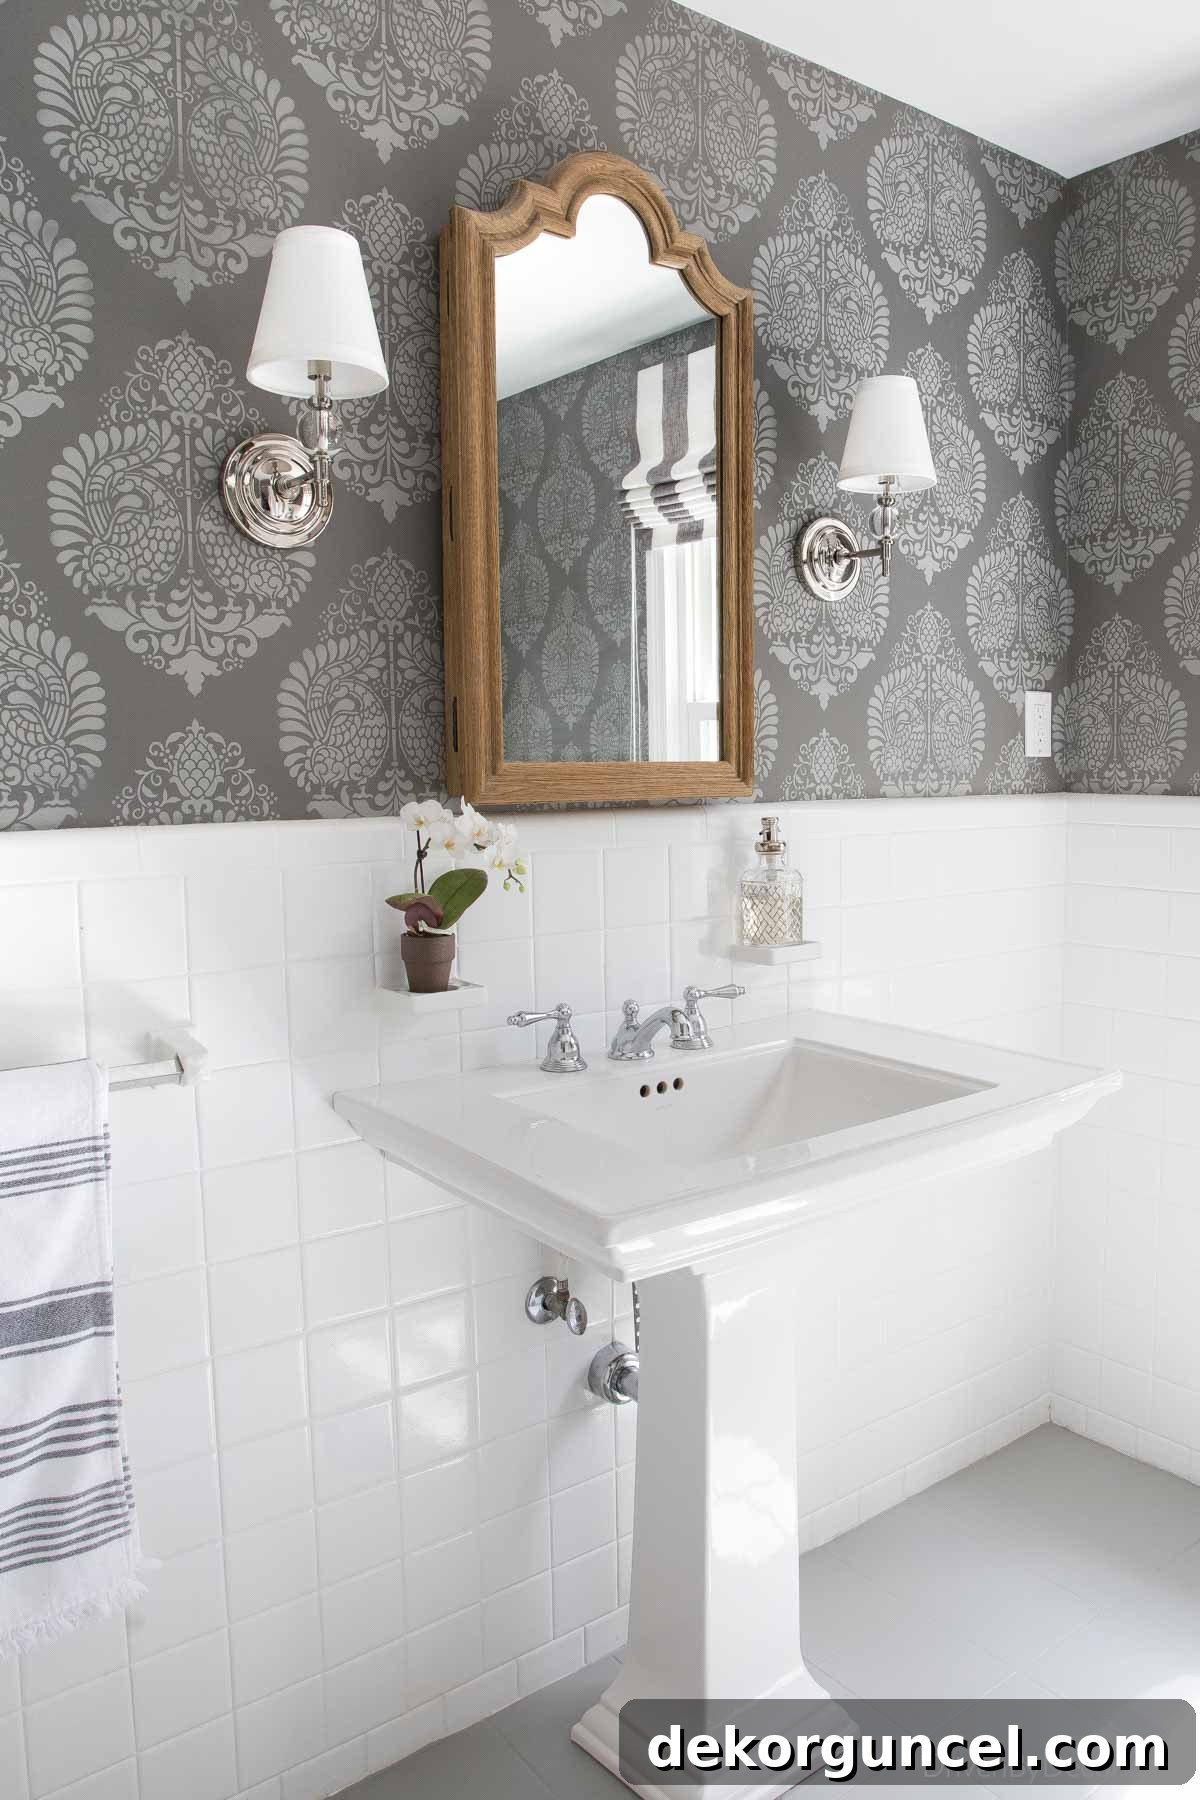
For comprehensive details on the specific stencil I used, along with a wealth of helpful stenciling tips and tricks to ensure your success, be sure to see my full post on wall stencils. You can also gain further insights into our bathroom’s transformation by visiting my post on our budget bathroom remodel.
3. Simple Custom Bed Skirt from a Flat Sheet: Perfect Fit, Budget Price
When I embarked on the exciting task of redecorating my youngest daughter’s bedroom shortly after our move to Connecticut, I encountered a common dilemma: finding the ideal bed skirt that perfectly complemented her new bedding proved to be a significant challenge. The options available in stores didn’t quite match the aesthetic I was aiming for, or they simply weren’t the right size.
However, serendipity struck when I stumbled upon some adorable polka dot flat sheets at HomeGoods. This discovery sparked an idea: why not create a DIY bed skirt? The brilliant part of this approach was utilizing the finished edge of the flat sheet as the bottom hem of the bed skirt. This clever trick dramatically reduced the amount of sewing required, making it an incredibly simple project even for those with minimal sewing skills. The result was a perfectly custom-sized bed skirt that seamlessly integrated with her bedroom decor, all achieved for a mere fraction of the cost of a store-bought alternative. This project exemplifies how a little creativity and resourcefulness can lead to a bespoke look that’s both stylish and incredibly budget-friendly.
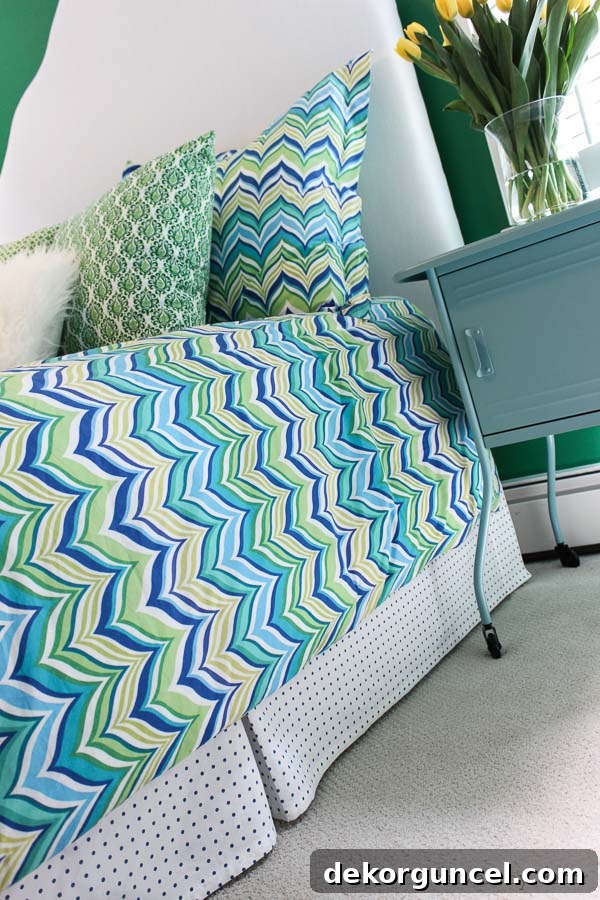
To recreate this clever and economical custom bedding solution for your own home, you can find the complete step-by-step instructions for how I crafted my DIY bed skirt {here}. It’s an easy project that delivers impressive results!
4. DIY Framed Bulletin Board: Stylish Organization for Any Room
Are you in search of a quick, easy, and incredibly satisfying DIY project that allows you to showcase a favorite piece of fabric while boosting your home’s organization? Look no further! This DIY framed bulletin board, thoughtfully designed with a practical bottom pocket, is an absolute game-changer for keeping clutter at bay. It quickly becomes the go-to spot for stashing coupons, letters awaiting mail, receipts, important notes, and any other small items that typically end up strewn across kitchen countertops or buried under piles of papers.
What makes this project truly versatile and a favorite among DIY enthusiasts is its adaptability. Depending on your choice of fabric and the style of frame you select, you can effortlessly tailor this bulletin board to suit any interior aesthetic. From sleek and modern minimalist designs to charming farmhouse chic or eclectic bohemian vibes, the possibilities are endless. It’s an excellent way to introduce a personalized touch to your kitchen, home office, craft room, or even a child’s bedroom, all while maintaining a tidy and functional space. This project is not only simple to execute but also delivers significant practical and decorative impact, making organization stylish and accessible for everyone.
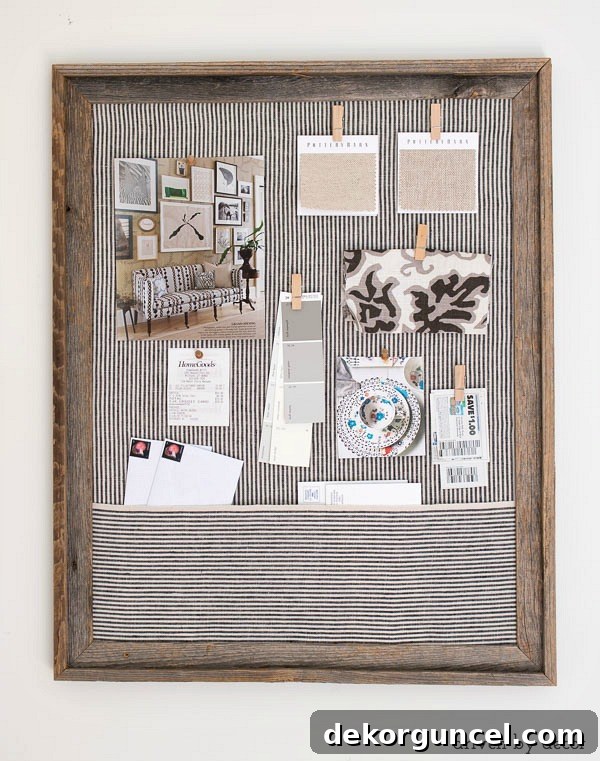
You’ll find the complete supply list and a comprehensive how-to guide for creating my DIY framed cork board {here}. Additionally, for another variation on this practical project, you can discover the DIY instructions for a similar burlap bulletin board {here}.
5. DIY Shiplap Walls: Adding Character and Hiding Imperfections
Upon moving into our new home, our master bedroom presented a significant decorating challenge: the walls were adorned with a blue faux-finished plaster that was not only highly textured but also riddled with numerous cracks. Repairing and smoothing these walls to achieve a clean, modern finish would have demanded a considerable investment of both time and money, resources we preferred to allocate elsewhere.
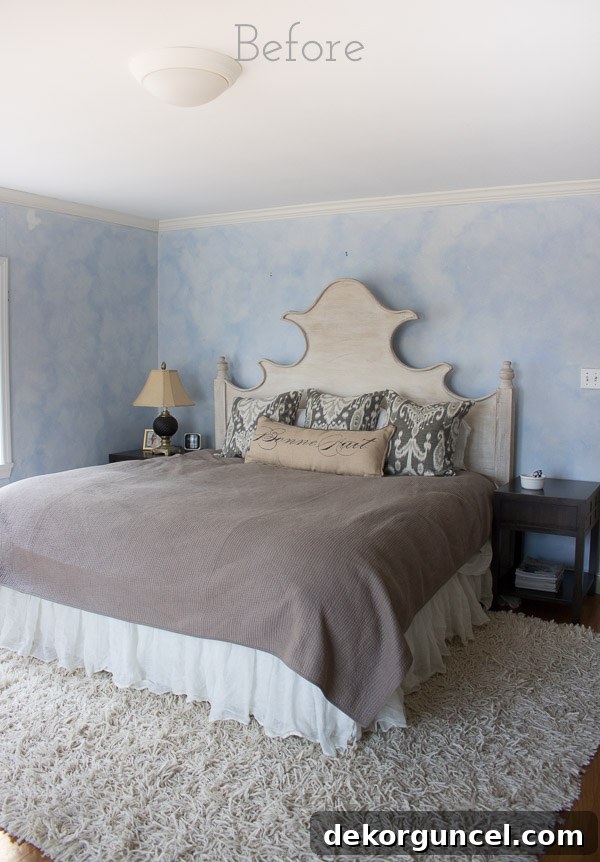
Instead of embarking on a costly plaster repair, I opted for a creative and highly impactful DIY home project: covering the existing walls with shiplap. This decision was a game-changer. By strategically utilizing ¼″ plywood sheets, I was able to execute this transformation on a remarkably tight budget. The shiplap not only concealed all the imperfections and textures of the original walls but also instantly infused the room with a sense of charm, character, and a modern farmhouse aesthetic. The result was a dramatic upgrade that completely revitalized the bedroom, making it feel fresh, inviting, and effortlessly stylish. I couldn’t be happier with how this project turned out, proving that sometimes, the best solution is to embrace a new surface entirely.
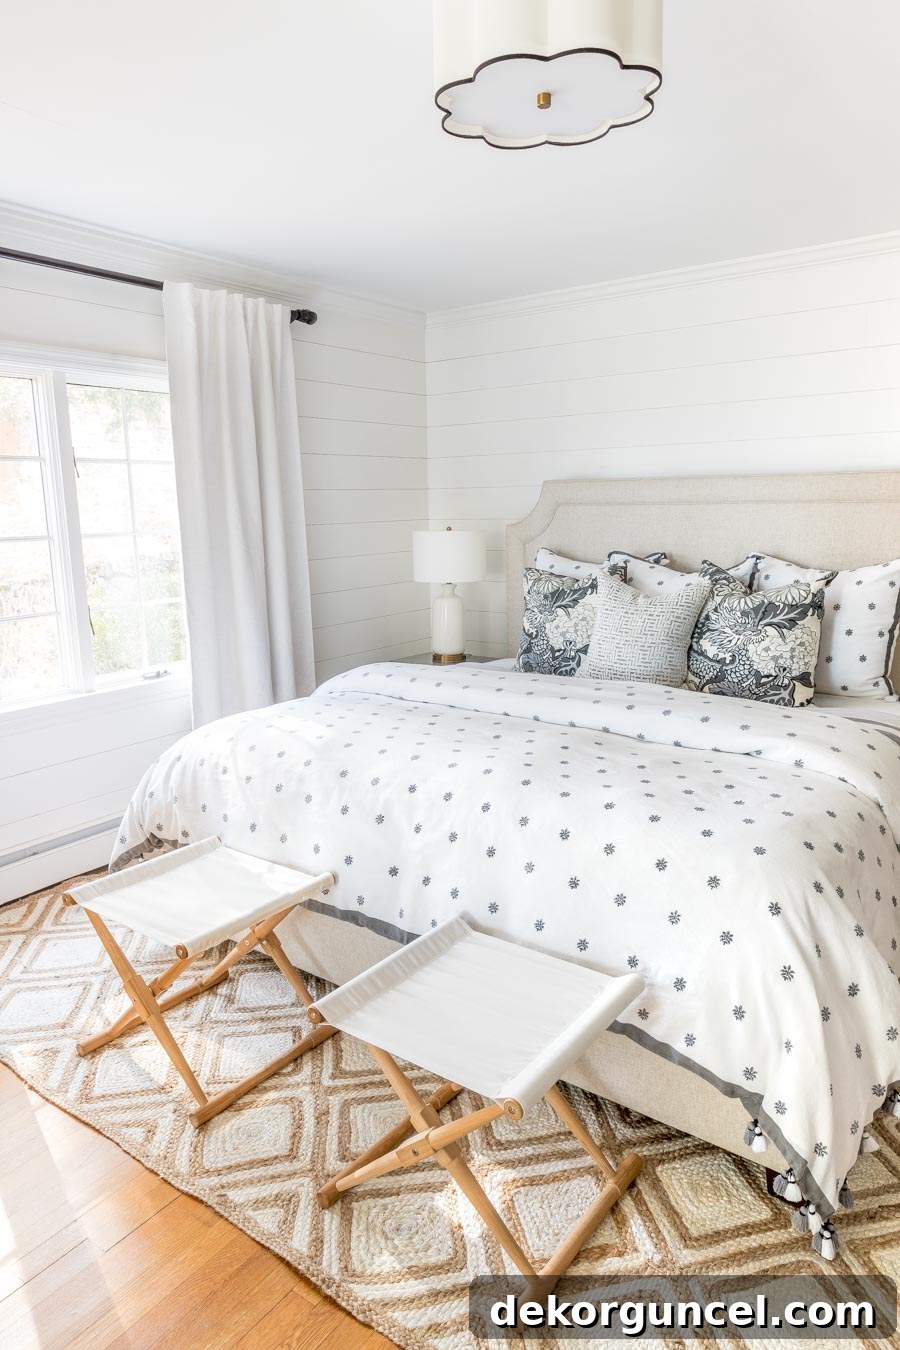
Bedroom sources: Gray nightstands | Camp stools (similar) | White USB table lamps | Semi flushmount light (available {here} and {here}) | Gray & white patterned linen duvet – no longer available | Gray & white dragon/floral pillows | Quilt in king (color is Flagstone) | Drapes (mine are single-width blackout lined) | Diamond jute rug
For a detailed breakdown of the entire process, including tips for a seamless installation and specific material recommendations, be sure to get all of the details in my post on our DIY shiplap walls. This guide will help you achieve a similar high-impact transformation.
6. DIY Painted Bathroom Vanity: A Quick and Dramatic Refresh
Many of you will undoubtedly recall this particular project, as it’s one of my most recent and impactful DIYs on this list! The bathroom shared by my daughters was undeniably showing its age and looking rather tired. A complete, costly makeover wasn’t a feasible option at the time, but the space desperately needed a refresh. My solution? A strategic and budget-friendly approach involving painting the walls and, more significantly, transforming their worn-out vanity. This seemingly simple change proved to be an incredibly effective way to inject new life into the entire bathroom without undergoing a full-scale renovation.
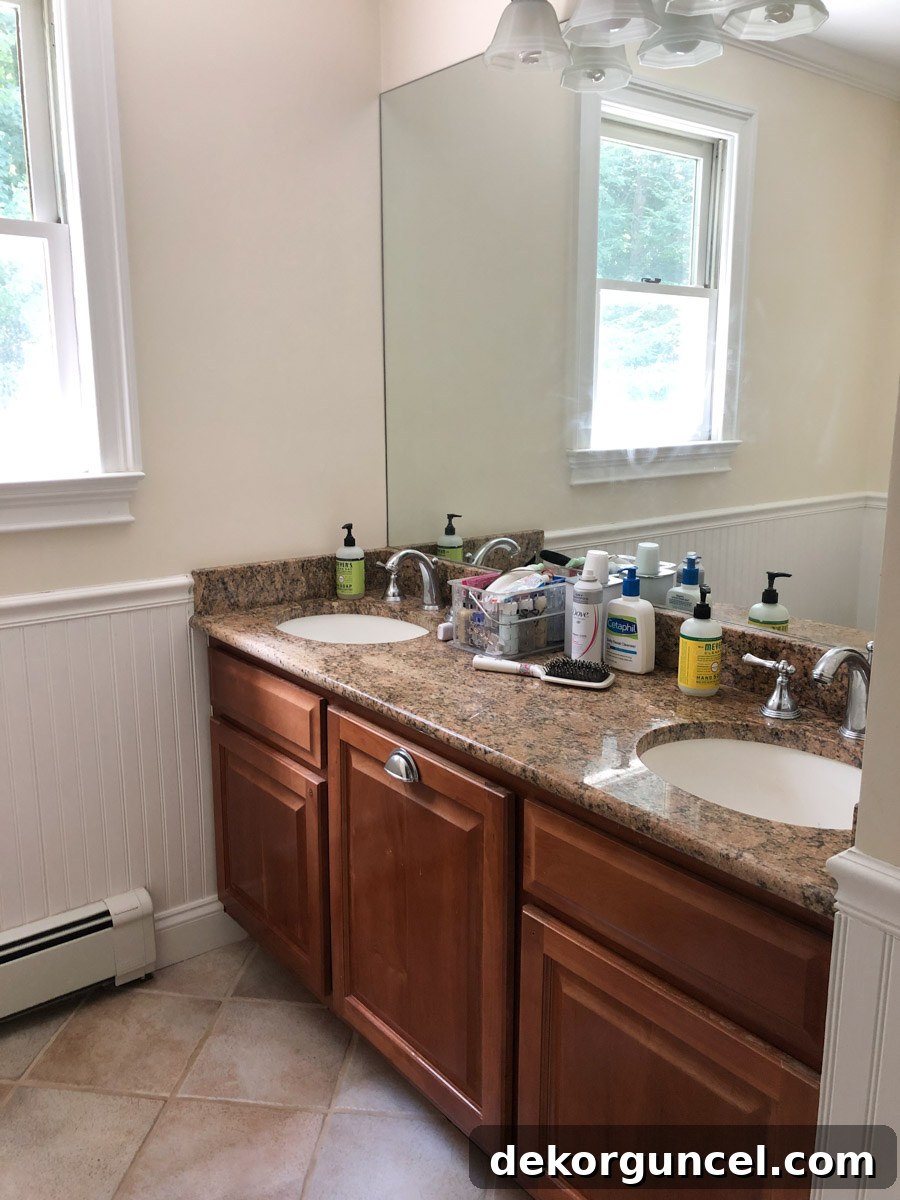
The impact of painting the vanity was truly remarkable, creating a stark and beautiful contrast between its previous worn state and its fresh, modern appearance. It made such a significant difference to the overall feel and aesthetic of the bathroom. Furthermore, what might seem like a daunting task—painting cabinetry—is actually much more achievable than you might initially think. With the right preparation, paint, and technique, anyone can achieve a professional-looking finish that will revitalize their bathroom and add years of life to existing furniture. This project is a prime example of how targeted DIY efforts can yield stunning results, proving that a little paint can go a very long way in home decor.
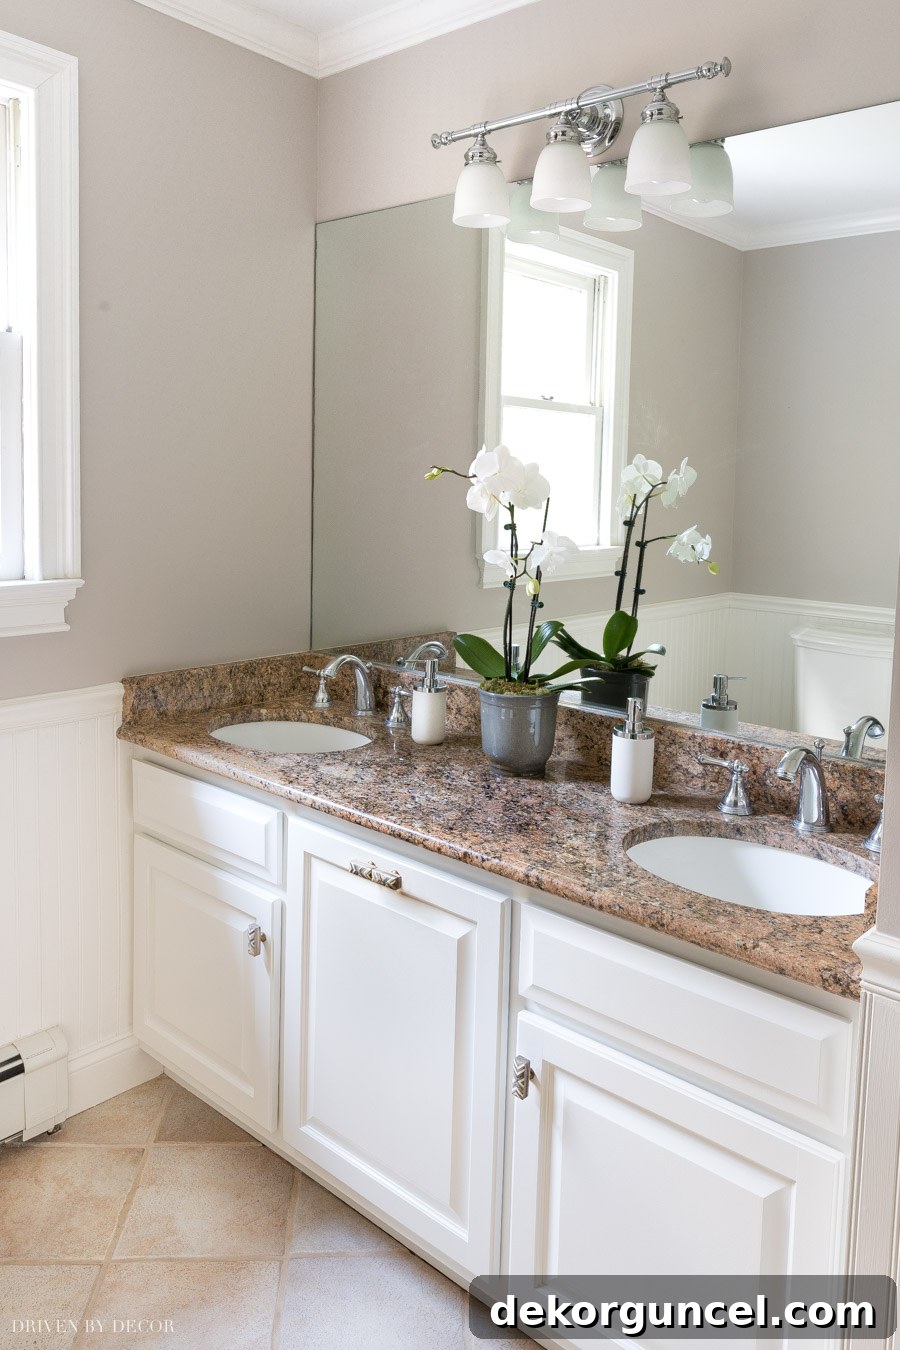
To embark on your own bathroom vanity transformation, access my comprehensive step-by-step guide for painting a bathroom vanity {here}. This detailed tutorial will walk you through every stage, ensuring a smooth and successful project.
7. DIY Upholstered Headboard: Custom Comfort and Style
As part of the initial tween room makeover I orchestrated for my daughter shortly after our relocation to Connecticut, one of the standout projects was crafting a simple yet elegant DIY upholstered headboard. This particular DIY project remains one of my all-time favorites, primarily because it offered unparalleled customization. I had the freedom to create it in the exact size, shape, and color that perfectly suited her room’s aesthetic. The added bonus? The ability to easily recover it with a different fabric in the future, should her style preferences evolve, ensuring its longevity and adaptability.
Fortunately, when we undertook the second round of her bedroom makeover, incorporating boho bedroom colors and a fresh new vibe, the original upholstered headboard seamlessly blended with all the other changes we made. This adaptability underscored its timeless design and the smart investment of effort. The headboard not only served as a comfortable backrest but also as a sophisticated focal point, anchoring the entire bedroom design.
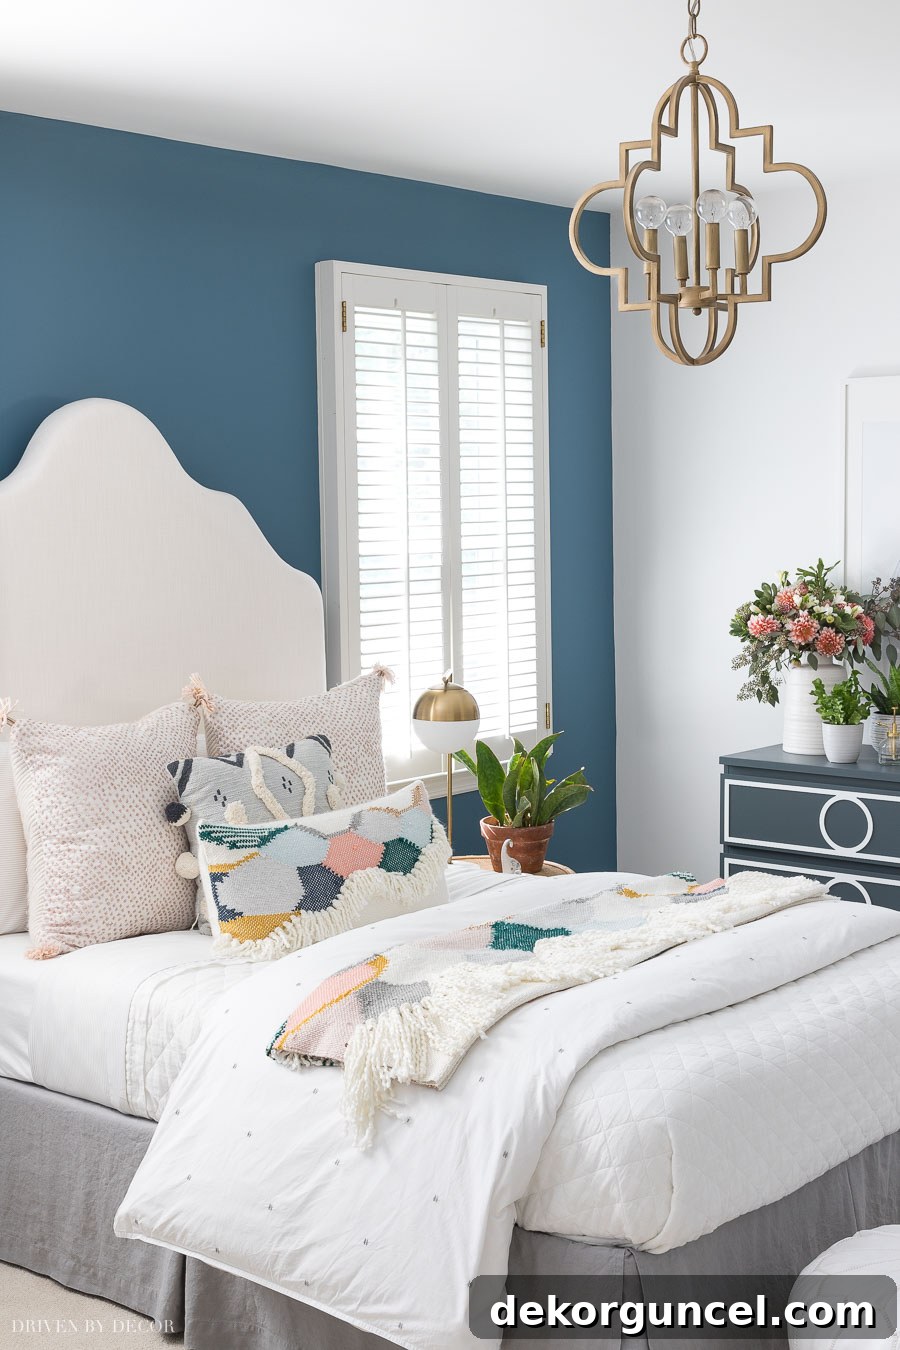
Bedroom sources: Quatrefoil pendant | White quilt | White leather poufs | Other bedding & accessories no longer available
Creating an upholstered headboard is actually a much more accessible DIY home project than many people imagine. To demystify the process, be sure to check out the step-by-step instructions for her DIY upholstered headboard. The skills I honed during this project proved invaluable and highly transferable. I later applied these very same DIY techniques to construct the tall, upholstered back of our kitchen banquette. For that project, I followed the headboard creation method but added an elegant finishing touch with upholstery nails, elevating the custom seating area even further. This demonstrates the versatility of DIY skills – one project can often inspire and equip you for many more!
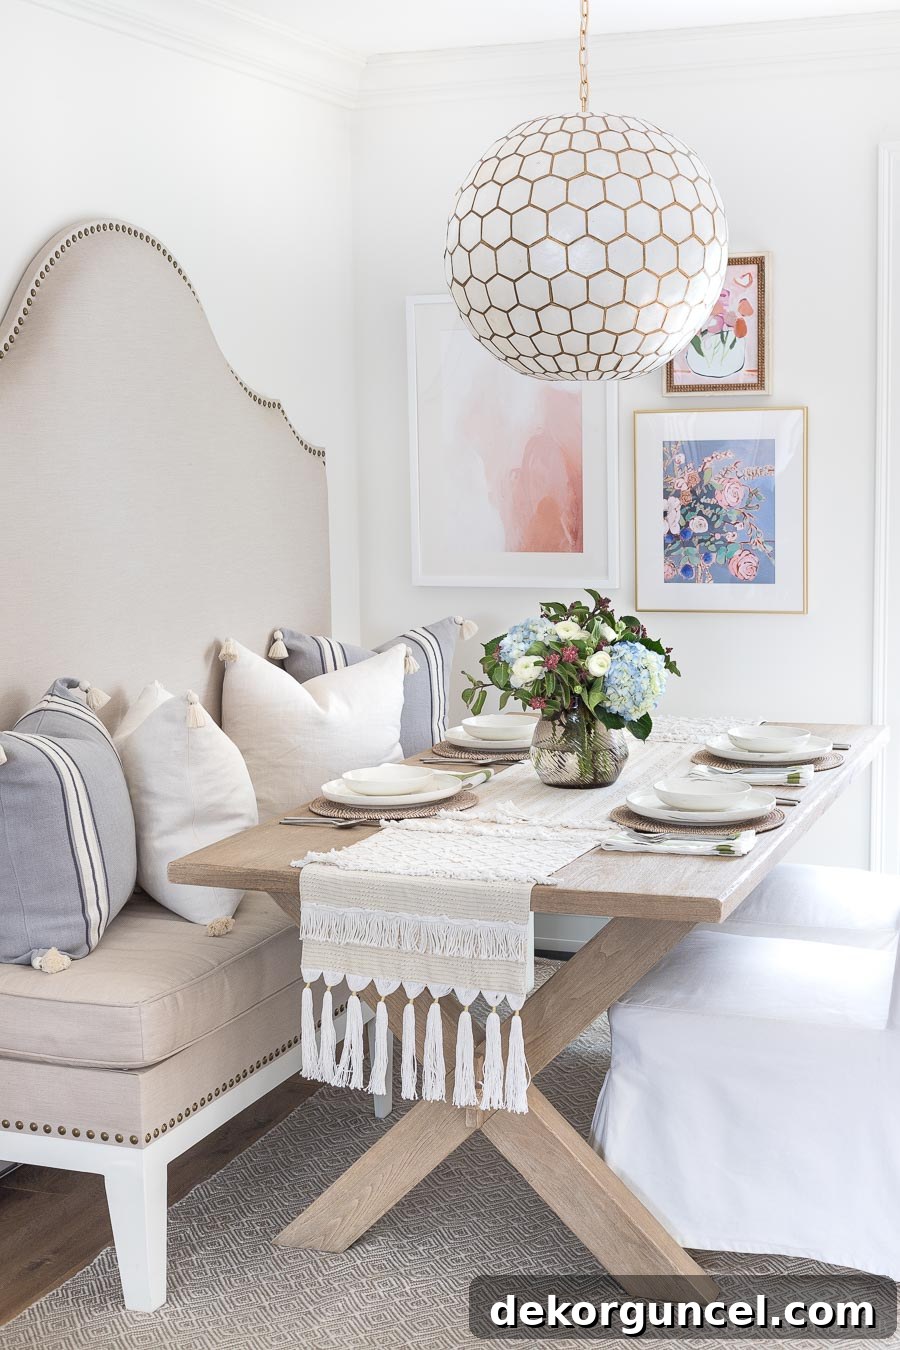
Sources: Capiz pendant | Geometric gray rug | Faux peonies | Rattan chargers | Large blush abstract framed art | Blue floral framed art | Pink floral framed art | Slipcovered dining chairs (similar) | Table runner no longer available
For an in-depth look at how I brought this custom seating area to life, check out the step-by-step guide in my post on our DIY banquette seating. It’s a rewarding project that adds both comfort and style to your kitchen or dining space.
8. DIY Fabric Book Covers: Instant Decor Upgrade (No Sewing Required!)
This is truly a super simple DIY project that absolutely anyone can tackle, regardless of their crafting experience! If you’re looking for a quick, effective, and stylish way to add a personalized touch or a pop of color to your home decor, creating fabric book covers is the perfect solution. All you need are a few readily available items: a treasured fabric remnant (perhaps a leftover from another project or a small piece that catches your eye), your trusty iron, and some Stitch Witchery, which can be easily sourced online or at most craft stores. With these simple tools, you can transform ordinary books into charming and stylish decorative accents.
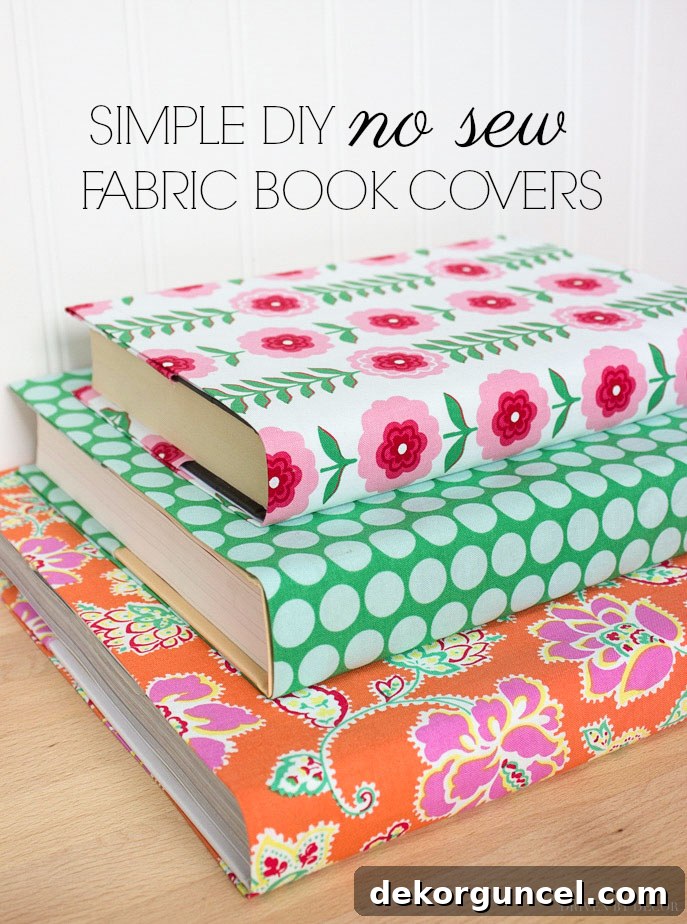
This ingenious no-sew method allows you to instantly inject seasonal color, introduce intriguing patterns, or simply unify a collection of books to create a cohesive decorative display. It’s a fantastic way to utilize those beautiful fabric scraps you’ve been saving or to experiment with new textures and prints without a major commitment. Imagine swapping out covers for holidays or changing seasons, or simply creating a bespoke collection that perfectly matches your current room design. It’s a small detail that makes a big impact on shelf styling and overall home aesthetics, proving that beautiful decor doesn’t always require advanced skills or a large budget.
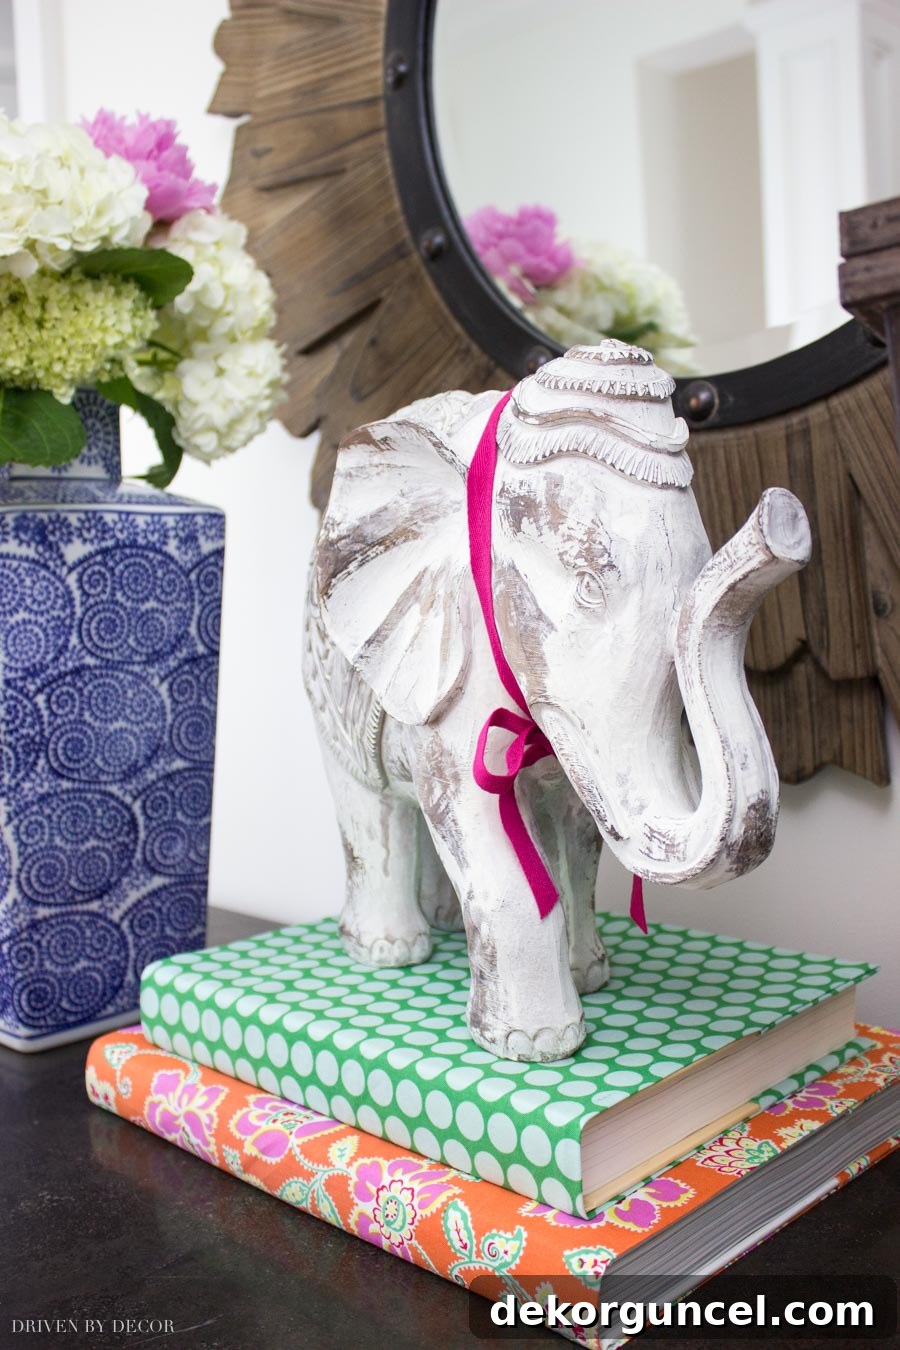
Ready to give your book collection a fresh, decorative update? Just follow the easy, step-by-step instructions to create these fabric book covers {here}. You’ll be amazed at how quickly you can transform your shelves!
9. DIY Refinished Table: Restoring Beauty to Beloved Furniture
For many years, I held onto an old end table, not for its aesthetic appeal – which was certainly lacking with its numerous scratches and dark, dated stain – but purely for sentimental reasons. It was a piece that had stories, but its worn exterior no longer fit the style of our home. I knew it had potential, but it required a significant intervention to bring it back to life.
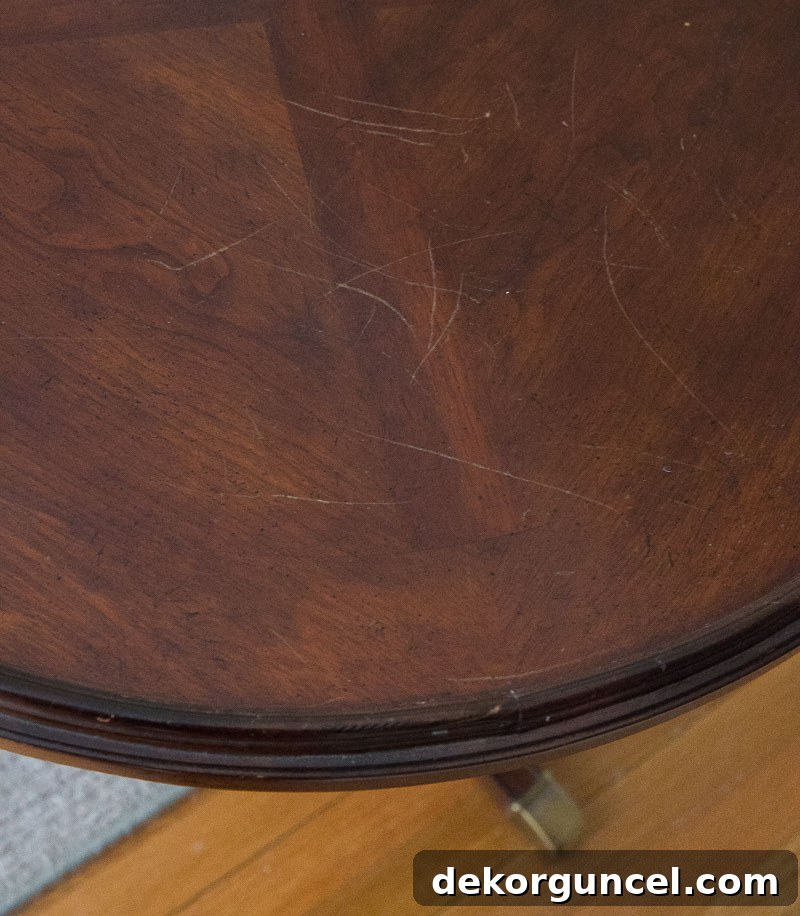
Instead of replacing it, which would have meant losing its sentimental value, I decided to embark on a furniture refinishing project. The transformation began by meticulously sanding down the entire piece, stripping away years of wear and the heavy, dark stain to reveal the raw wood beneath. This crucial step prepared the surface for its new look. I then applied a modern gray stain, which completely revitalized the table, giving it a sophisticated, contemporary feel while preserving its classic lines. The once scratched-up, forgotten piece was transformed into a beautiful, functional, and stylish addition to our home, proving that beloved furniture can indeed be given a second, stunning life through DIY efforts.
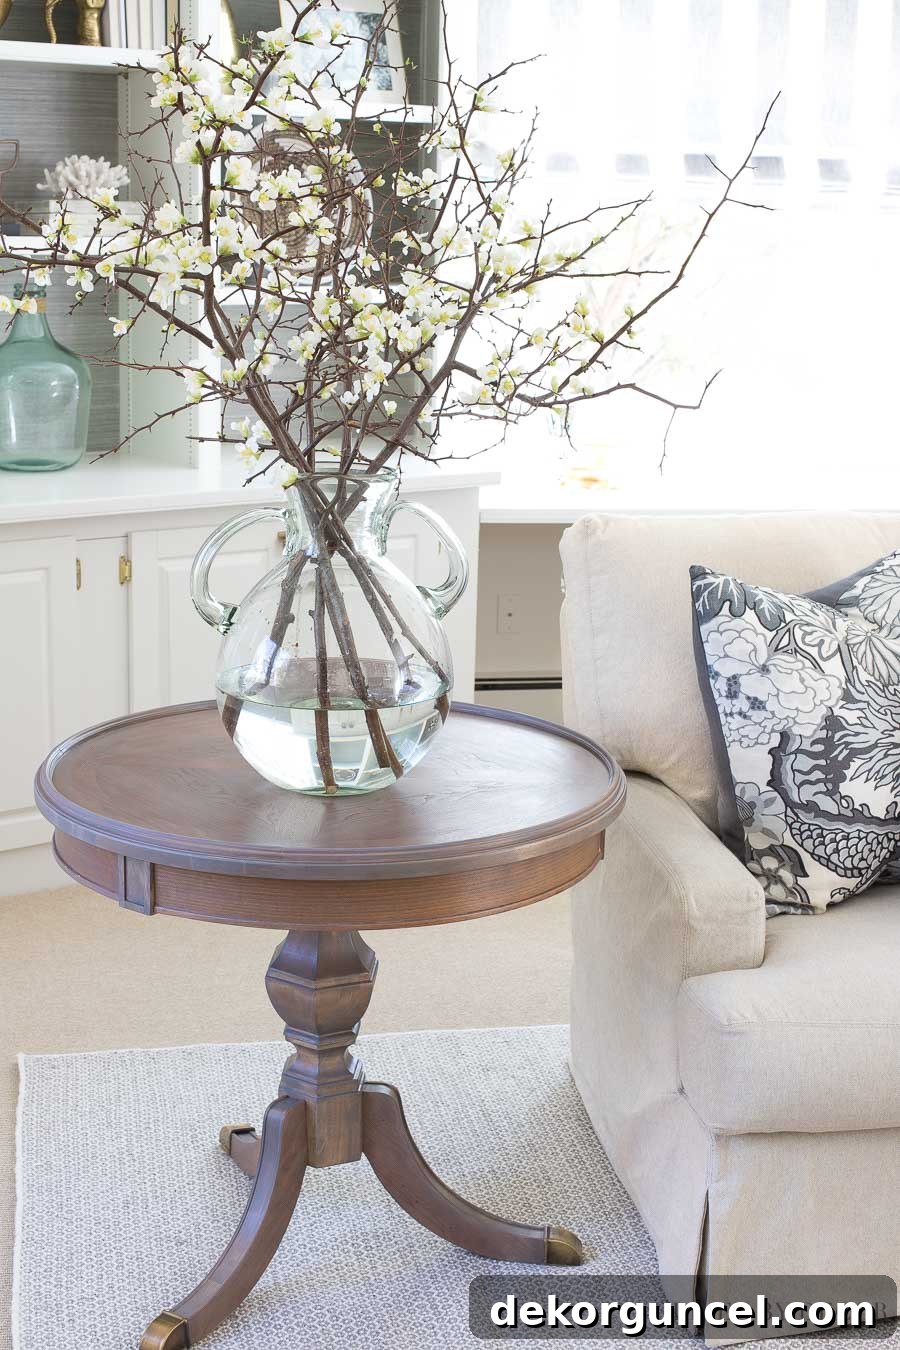
If you have a piece of furniture that’s seen better days and is yearning for some tender loving care, I highly encourage you to explore the possibilities of refinishing. Check out my detailed post on how to refinish a table {here}. The steps outlined are versatile and can be applied to revive a chair, dresser, or virtually any other wooden furniture piece you wish to transform.
10. DIY Paneled Doors: Elevating Standard Flat Doors
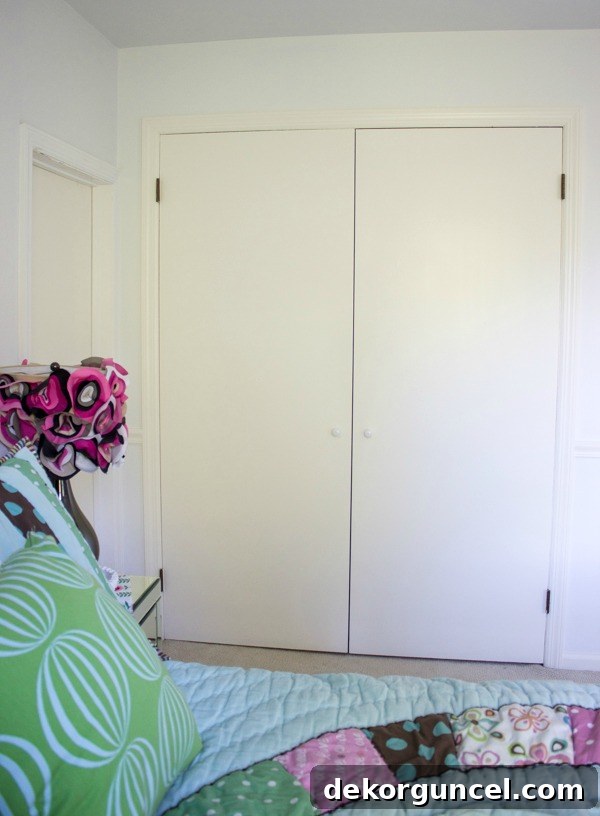
While most of the doors throughout our home featured the classic and desirable six-panel design, our closet doors were originally simple, flat slabs. These plain doors, common in many homes, often convey a somewhat cheap or unfinished look, detracting from the overall aesthetic of a room. Rather than incurring the significant expense of replacing all these doors with new, paneled versions, I sought a more creative and budget-friendly DIY solution to enhance their appearance.
My youngest daughter’s closet doors, which initially presented as these unremarkable flat panels, were the perfect candidates for this transformation:
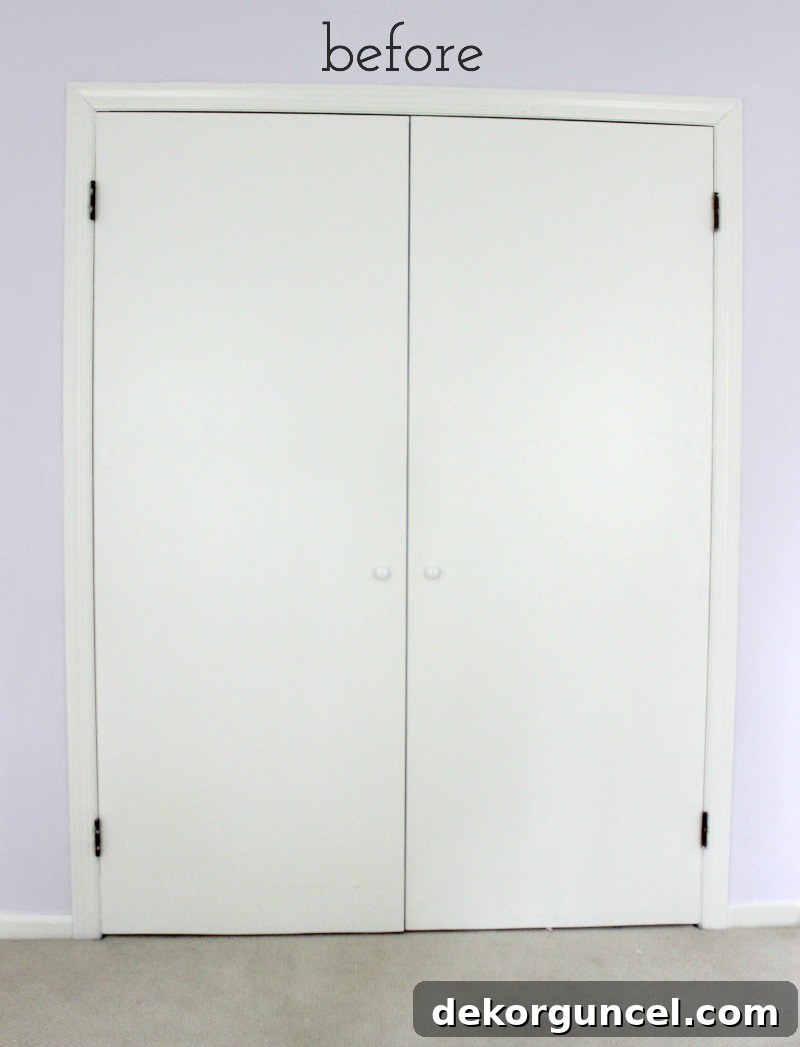
The solution was deceptively simple yet remarkably effective: I dressed them up by adding decorative molding pieces to their front surface. By strategically arranging the molding in an appealing pattern, the flat doors instantly gained depth, character, and the appearance of custom-built paneled doors. To complete the transformation and further elevate their look, I also replaced the standard hardware with more stylish options. This DIY project completely revolutionized the doors, making them a beautiful and integrated part of the room’s design rather than a functional afterthought.
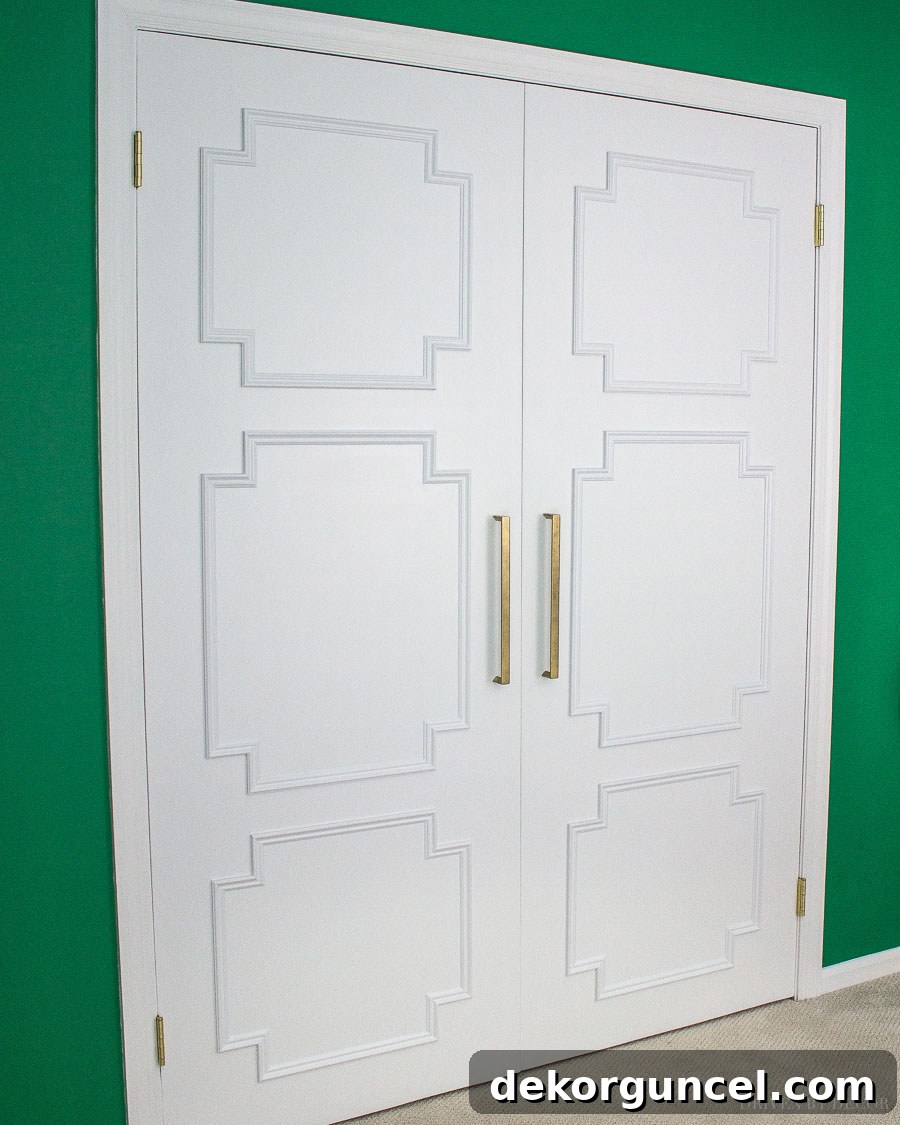
You can discover all the detailed steps for this impactful DIY home project, including tips on selecting and attaching molding, in my post dedicated to our flat panel door makeover. It’s an accessible way to add architectural interest to any room.
My oldest daughter’s closet door started with the exact same flat profile, presenting the same opportunity for a creative upgrade:
For her door, I took the paneled concept a step further by not only adding simple box molding but also integrating functional cork boards into the top two boxes. This ingenious addition created dedicated spaces for her to pin notes, photos, artwork, and reminders, making the closet doors not just aesthetically pleasing but also highly practical and personalized. It was a fantastic way to blend decor with organization, tailored specifically to her needs and style, showcasing how versatile and functional DIY door makeovers can be.
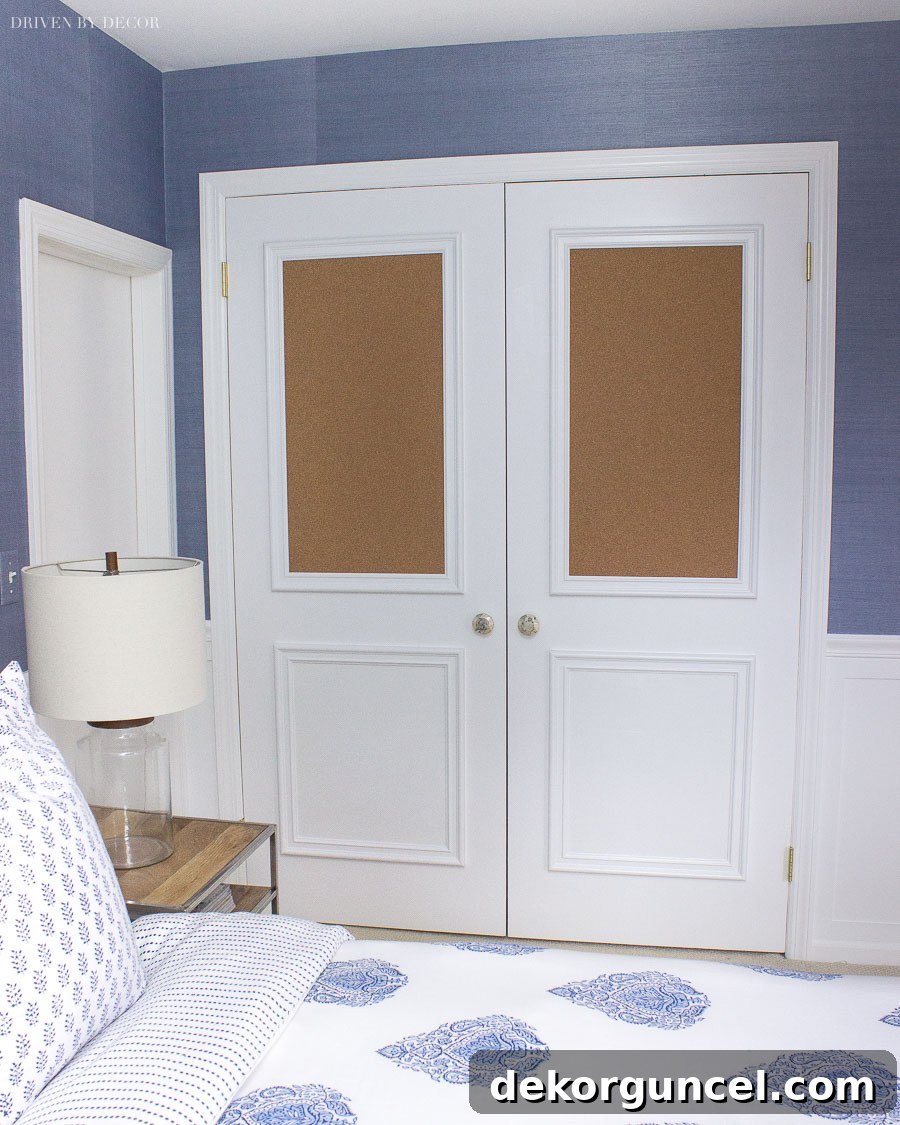
To learn how to replicate this clever and functional door transformation, complete with the cork board integration, you can find the comprehensive step-by-step tutorial in my post on closet doors ideas. Discover how to create doors that are both beautiful and incredibly useful.
Enjoy your weekend, and happy DIYing!
