
Transform Your Kitchen: The Ultimate Guide to DIY Marble Contact Paper Countertops
Are you tired of staring at outdated, dull, or simply ugly countertops? Do you dream of a luxurious marble look without the hefty price tag and extensive renovation? This comprehensive guide will show you how to achieve a stunning kitchen makeover with marble contact paper for countertops – a simple, inexpensive, and surprisingly durable solution! We were facing a major kitchen renovation in the future, so investing a lot of money into temporary fixes wasn’t an option. However, I believe in making smart, budget-friendly upgrades to refresh a space until a full remodel is feasible. That’s why I decided to embrace one of my favorite kitchen remodel ideas on a budget: applying elegant marble contact paper to revitalize our dated, white laminate wood-edged countertops. The transformation was truly remarkable!
Initially, I admit I was skeptical about how well this DIY project would turn out. Would it look cheap? Would it peel easily? However, the risk was minimal since the contact paper could be easily removed if I disliked the outcome. To my absolute delight, the results far exceeded my expectations! My kitchen now boasts a refreshed, elegant aesthetic after completing the countertop transformation and incorporating a few other strategic, budget-conscious upgrades:
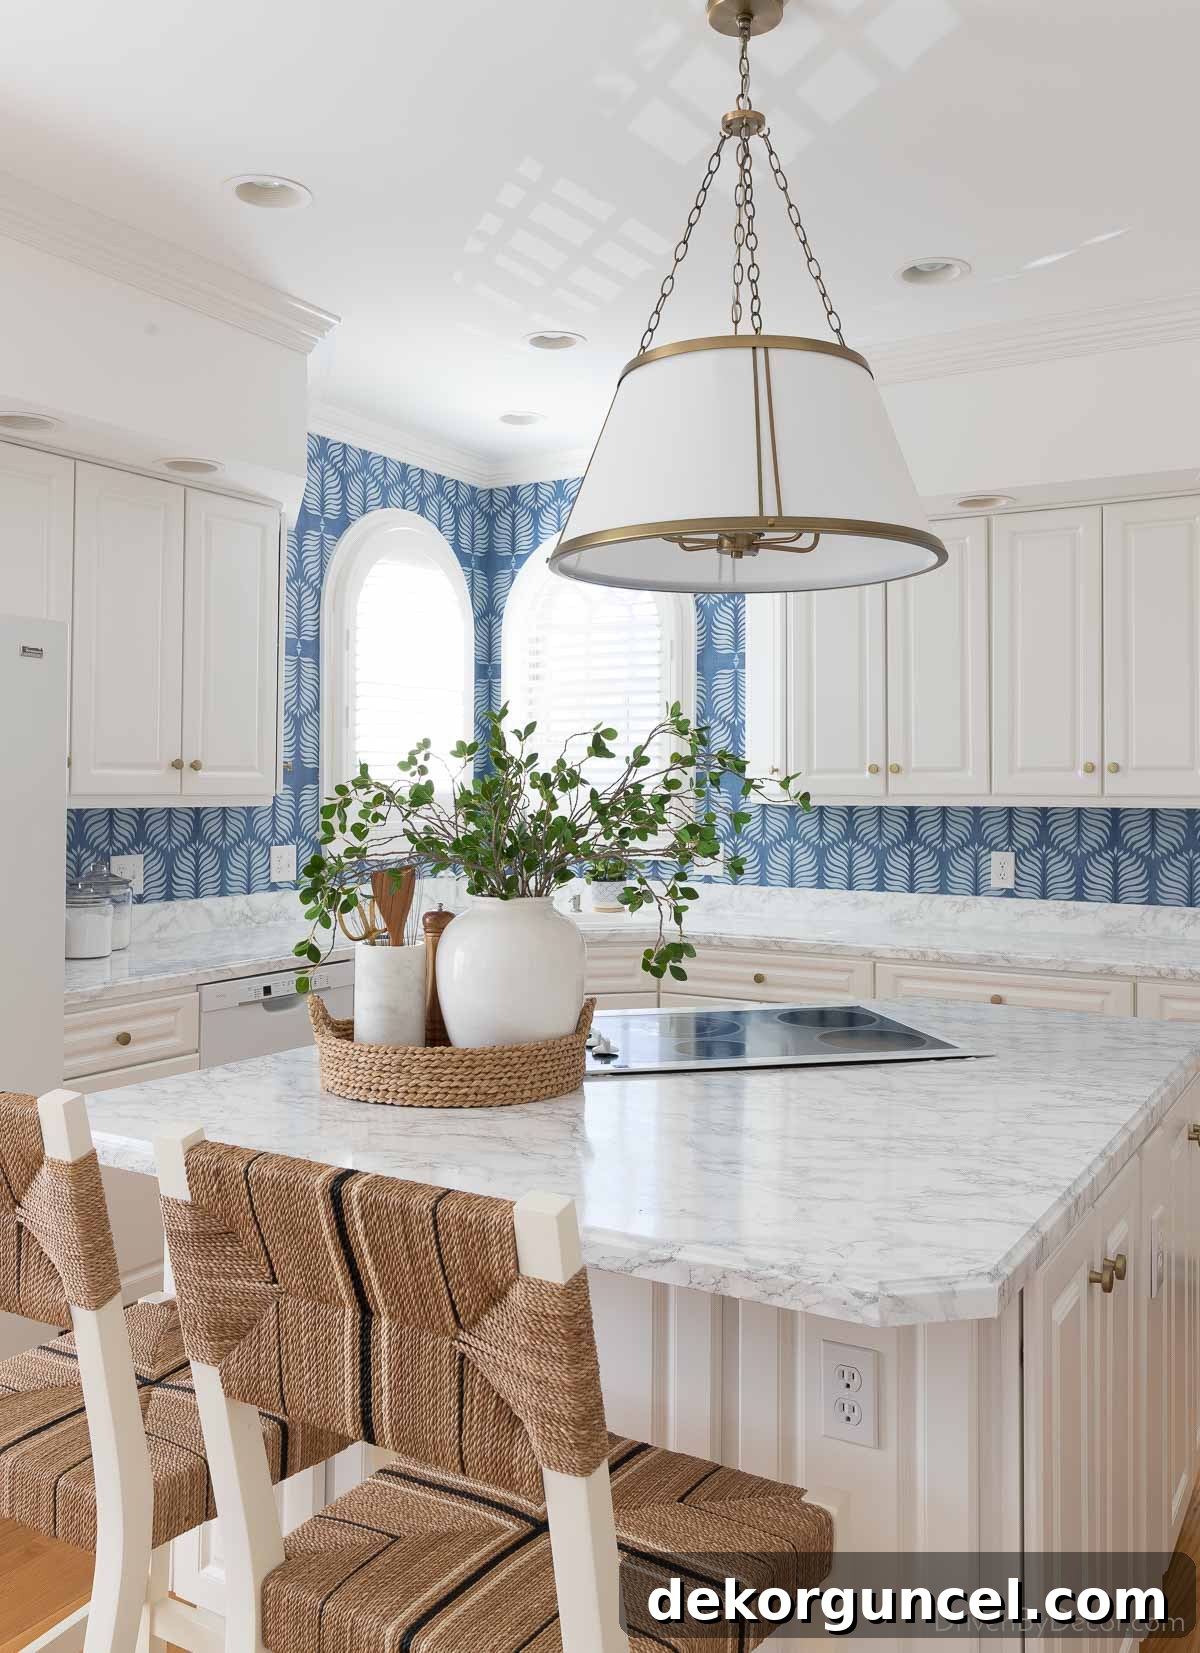
Featured Decor & Materials: Woven counter stools | Elegant wallpaper | Premium marble film for countertops | Stylish pendant over island | Chic cabinet knobs | Decorative round woven tray | White vase – no longer available | Realistic faux leafy branches | Marble utensil holder (similar style)
If you’re ready to give your countertops a fresh, upscale look without breaking the bank, read on! I’ll walk you through the precise steps for using marble contact paper on your countertops, sharing all the tips and tricks I learned along the way to ensure a professional-looking finish.
Important Update: Discover our 3-year follow-up review on how these marble contact paper countertops have performed under daily use!
1. Selecting the Perfect Marble Contact Paper for Your Countertops
The market is flooded with various faux marble contact paper options, each offering a unique aesthetic. While the visual appeal, such as the amount and style of veining, is naturally a primary consideration, several other crucial features will dictate the success and longevity of your DIY countertop project.
One of the most critical factors is the width of the contact paper. For standard kitchen countertops, which typically have a depth of 24 inches, you should always opt for paper that is at least 26 inches wide. This extra width is essential. It allows you to seamlessly cover the entire flat surface of your countertop, extend around the front edge, and tuck underneath without creating unsightly seams. The only place you might encounter a seam is if your countertop is exceptionally long and requires more than one roll.
Equally important is the material composition and water resistance, especially when installing in high-moisture areas like kitchens or bathrooms. Look for durable, easy-to-clean materials. I personally chose {this gray marble vinyl film} from Amazon, which perfectly met all my requirements. It boasts a remarkably realistic marble appearance, comes in a generous 26.5-inch width, and is crafted from vinyl/PVC film. This material choice ensures superior water resistance and makes cleaning a breeze, crucial for a busy kitchen environment.
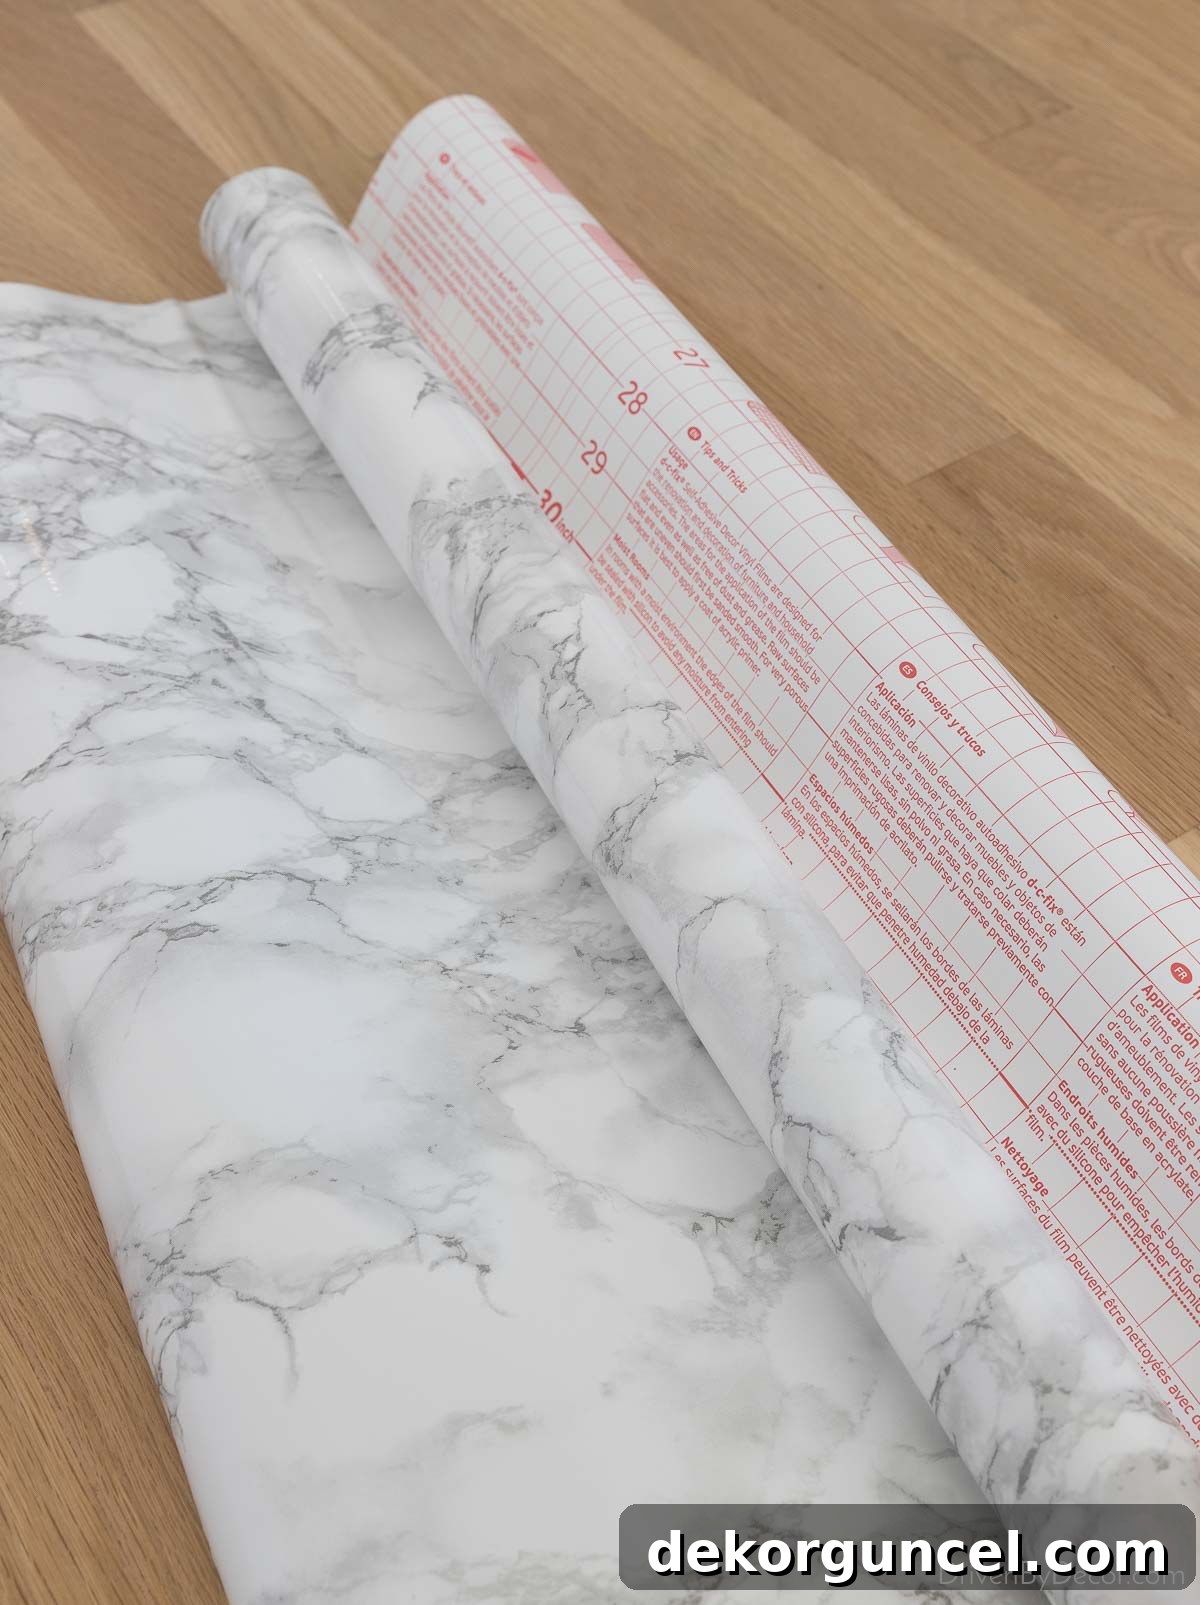
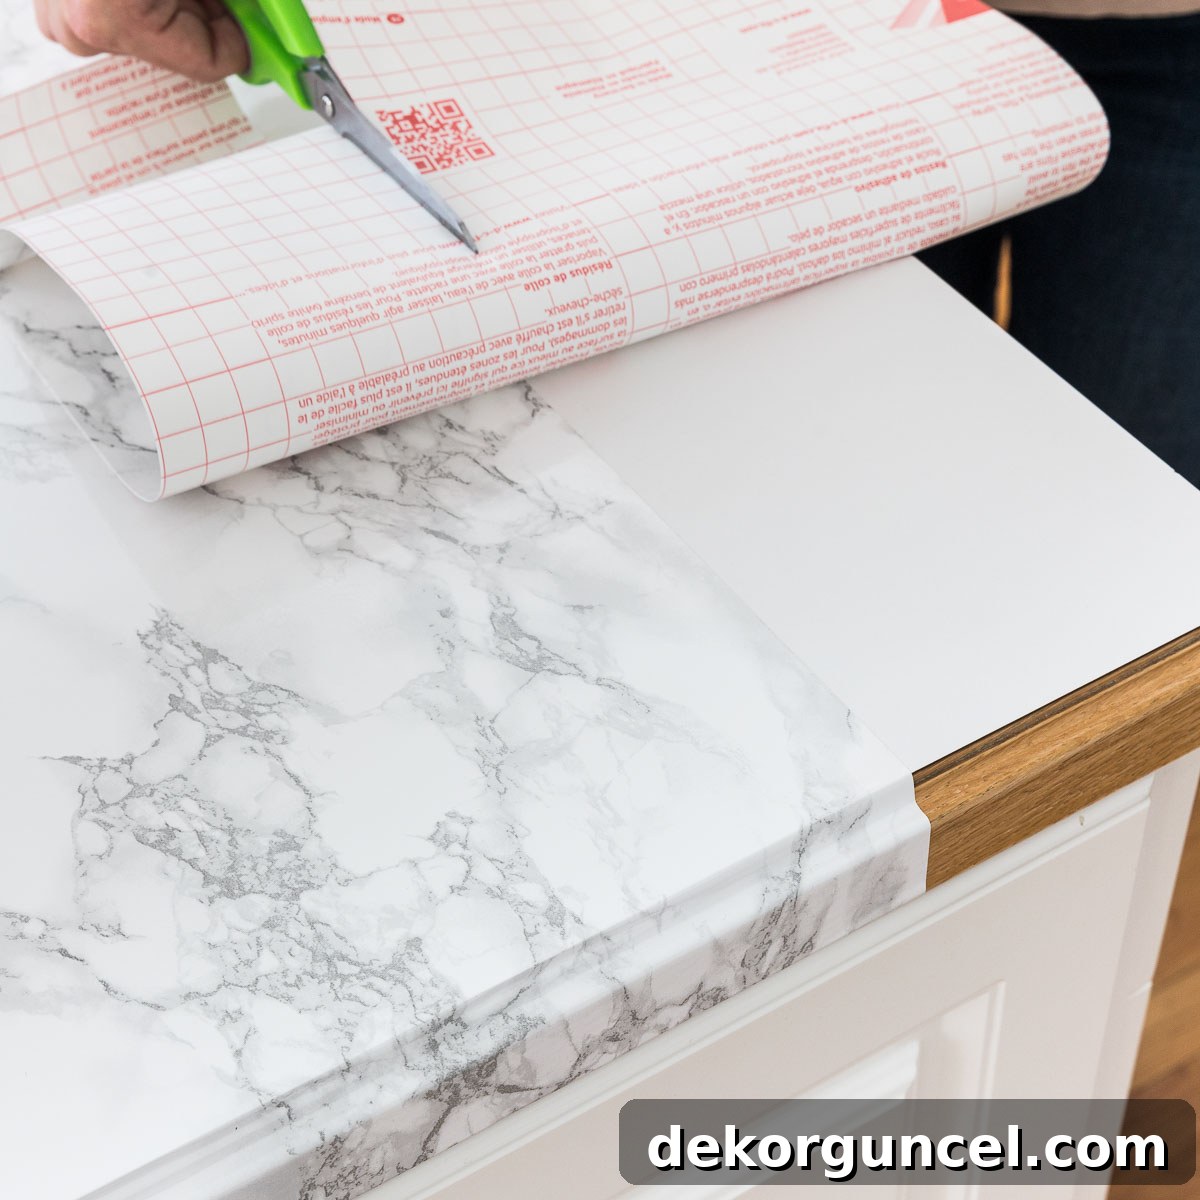
Another helpful feature to look for is grid lines printed on the backing of the contact paper. These lines serve as invaluable guides for making perfectly straight and precise cuts, significantly simplifying the installation process. When estimating your material needs, measure your countertops carefully, then add an extra 20-30% to your total. This buffer accounts for potential mistakes, miscuts, and the necessary waste involved in pattern matching, ensuring you don’t run short mid-project.
2. Gathering Your Essential DIY Supplies
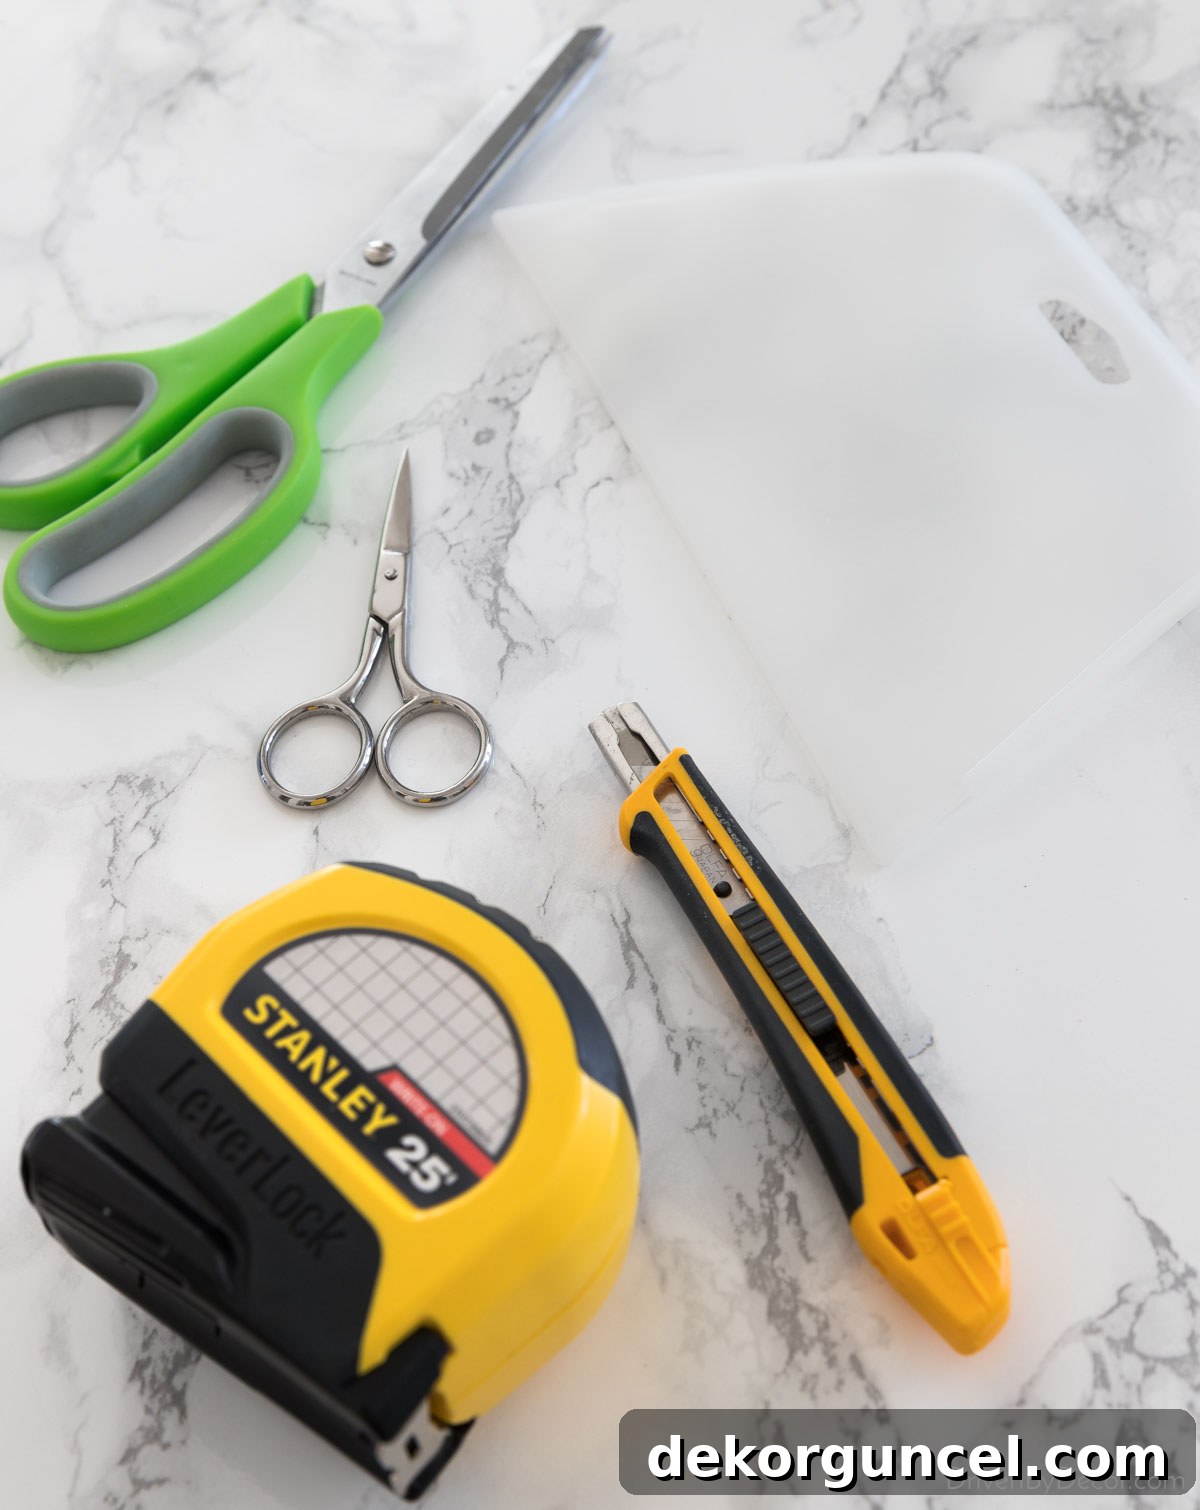
Before you embark on your countertop transformation journey, ensure you have all the necessary tools at hand. Having everything ready will streamline the process and prevent interruptions. Along with your chosen marble contact paper, here’s a list of essential supplies you’ll need to successfully complete this DIY project:
1. A reliable measuring tape & sharp pencil: For accurate measurements and marking your cuts.
2. {A specialized smoothing tool}: This is indispensable for pressing out air bubbles and ensuring a perfectly smooth, adhesion. Often made of felt or soft plastic, it prevents scratching the contact paper surface.
3. A small utility knife with snap-off blades: Precision is key when trimming edges. A utility knife, especially one with snap-off blades like {these}, allows you to always work with a razor-sharp edge for clean, crisp cuts, minimizing tearing or jagged lines.
4. High-quality scissors: A large pair will be useful for cutting larger sections off the roll. Additionally, a small, pointed pair of scissors, similar to {these}, will prove incredibly helpful for intricate cuts, especially in tight corners or around fixtures.
3. Thoroughly Clean & Prepare Your Countertop Surface
Proper surface preparation is paramount for successful and long-lasting contact paper application. Before applying any adhesive, your countertops must be impeccably clean, dry, and free of any debris or grease. This ensures optimal adhesion and prevents bumps or imperfections from showing through the contact paper.
Start by cleaning your countertops with a gentle yet effective solution. A mixture of a little dishwashing soap – preferably one with strong degreasing properties like Dawn – diluted in warm water works wonders. Scrub the entire surface thoroughly, paying extra attention to any greasy spots or dried spills. After scrubbing, rinse the countertops completely with clean water to remove all soap residue. Then, dry the surface completely using a clean cloth. Even a small amount of moisture can compromise the adhesive bond.
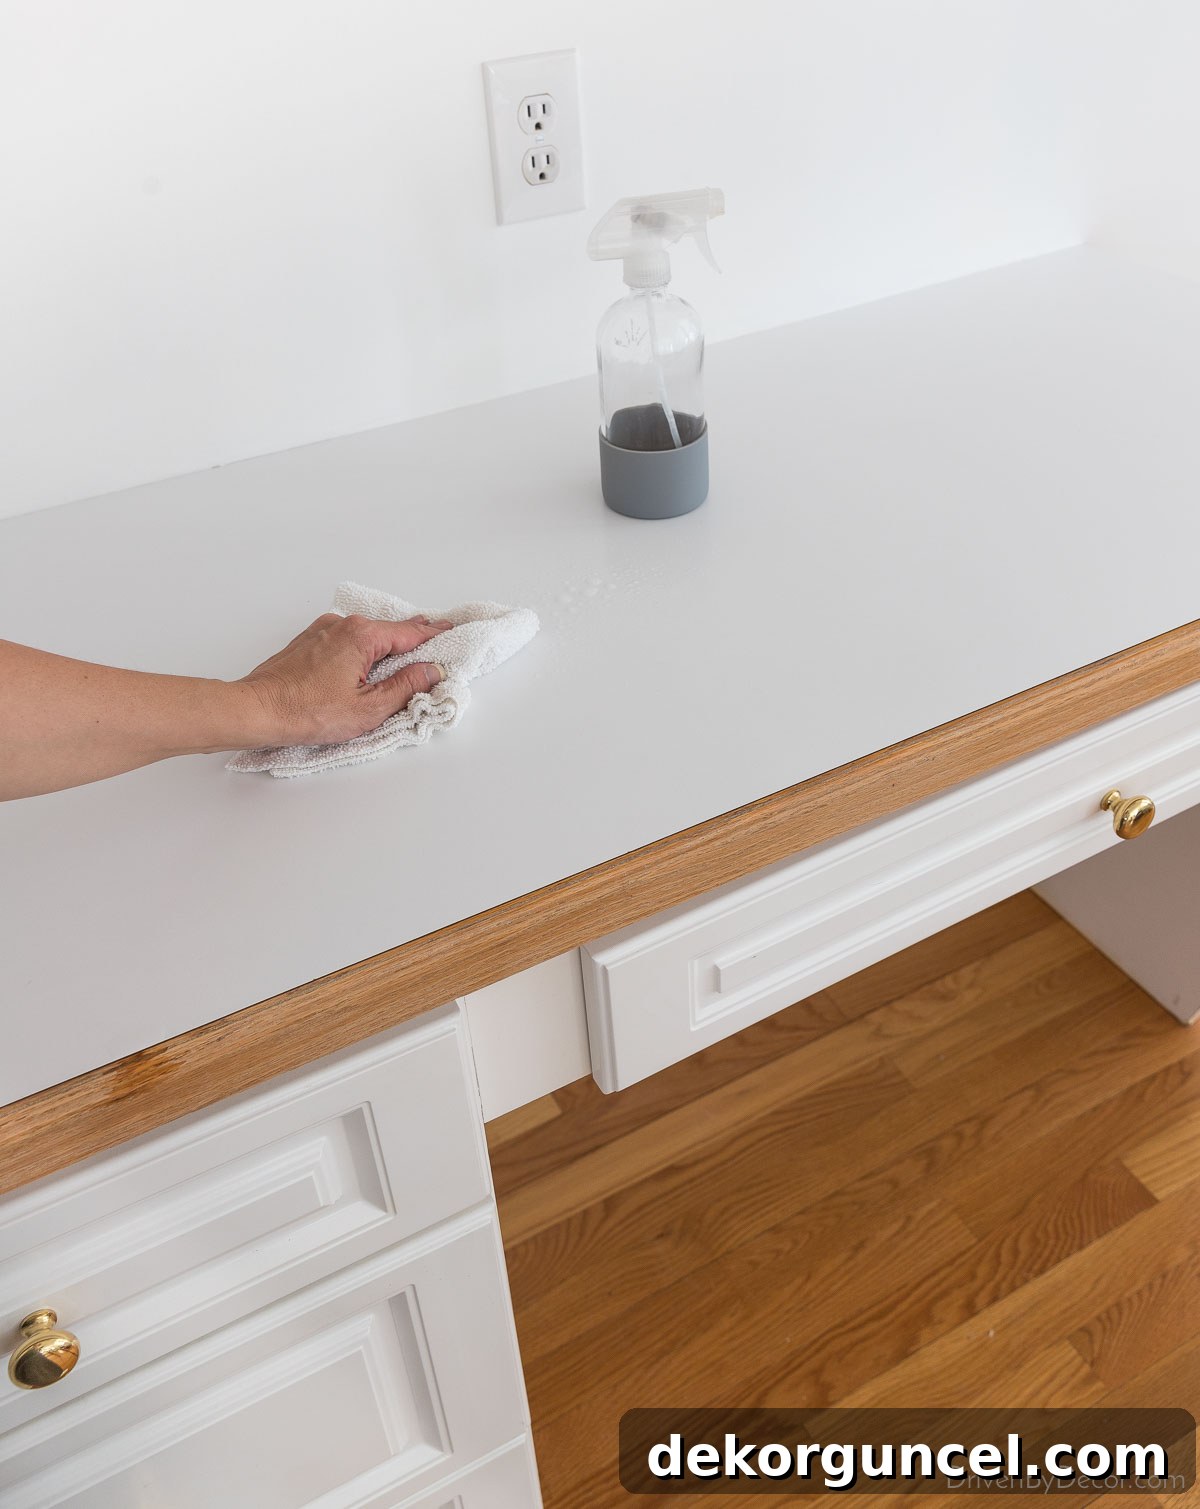
For any stubborn, stuck-on grime or residue that regular cleaning can’t remove, I highly recommend using a cooktop scraper, such as {this one}. These scrapers are designed to safely lift away hardened food or glue without scratching your countertop surface, leaving you with a perfectly smooth canvas for your new marble finish.
4. Measure & Cut Contact Paper to Size: Precision Matters
Once your countertops are pristine, it’s time to accurately measure and cut your contact paper. This step requires precision to minimize waste and ensure a seamless application. Begin by measuring the exact length of the area you intend to cover. Remember to account for the depth of the countertop, plus any edges you plan to wrap around.
For instance, if your countertop has a finished edge, like my desk surface did, you’ll need to measure the flat top surface and then add the amount required to cover the front edge and tuck underneath. In this specific example (covering my desk), the combined length of the countertop and the necessary wrap-around for the wood edge was approximately 57 inches:
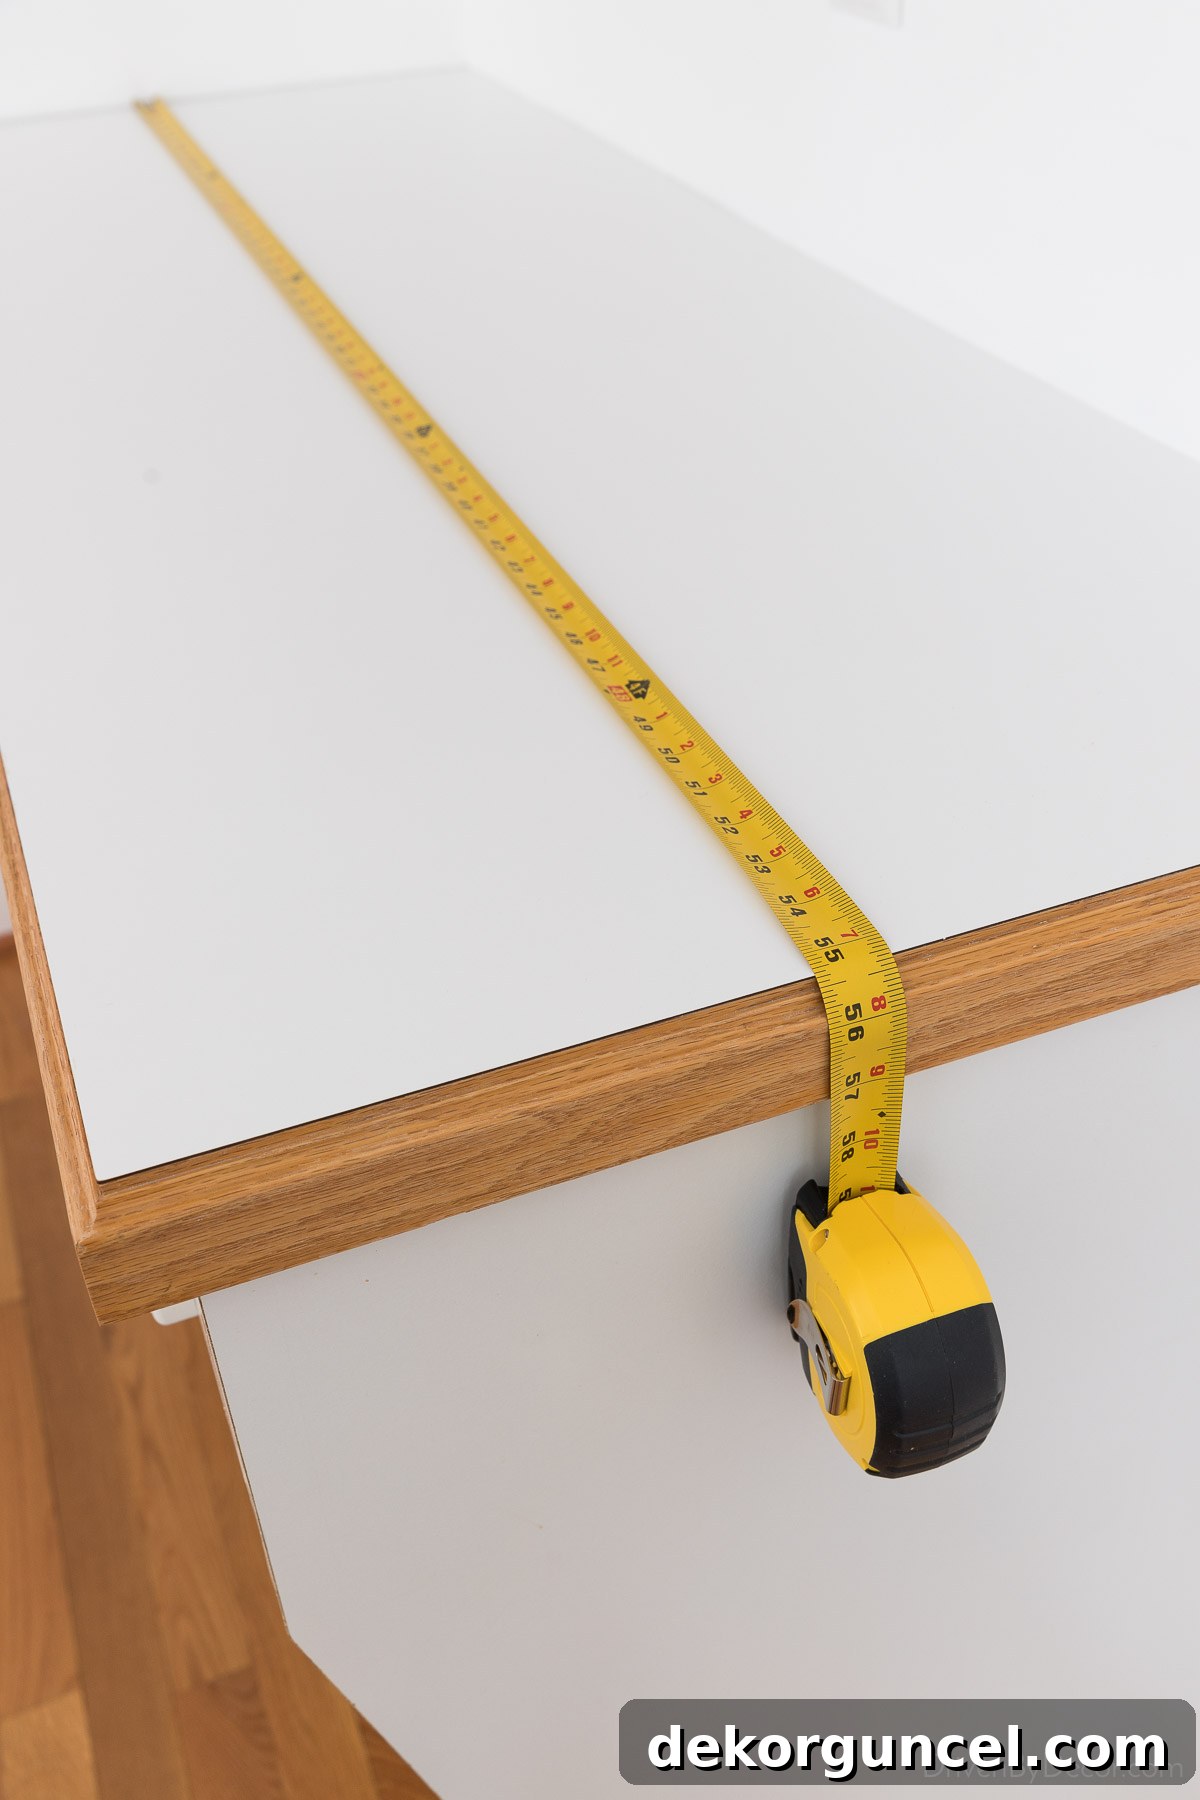
To provide ample working room and account for minor adjustments, I cut the paper slightly longer, at about 59 inches. A general rule of thumb is to cut your contact paper a few inches longer than what you initially calculate you’ll need. If your contact paper features a printed grid on its backing, utilize these lines diligently to ensure you make perfectly straight cuts. If your paper lacks a grid, use a reliable square object, such as a large sheet of paper or a carpenter’s square, as a guide to maintain straight lines.
5. Flawless Application of the Contact Paper
This stage is arguably the most critical for achieving a professional finish. The key to successful application lies in patience and precise initial alignment. Starting even slightly off-kilter can lead to significant misalignment by the time you reach the end of a long countertop, creating ripples or requiring you to restart.
To make the initial alignment easier to manage and prevent the entire sticky surface from adhering prematurely, I highly recommend starting by peeling back only a small section of the contact paper backing from the corner where you plan to begin. You can achieve this by gently lifting that corner of the backing and using scissors to snip off a small, manageable piece.
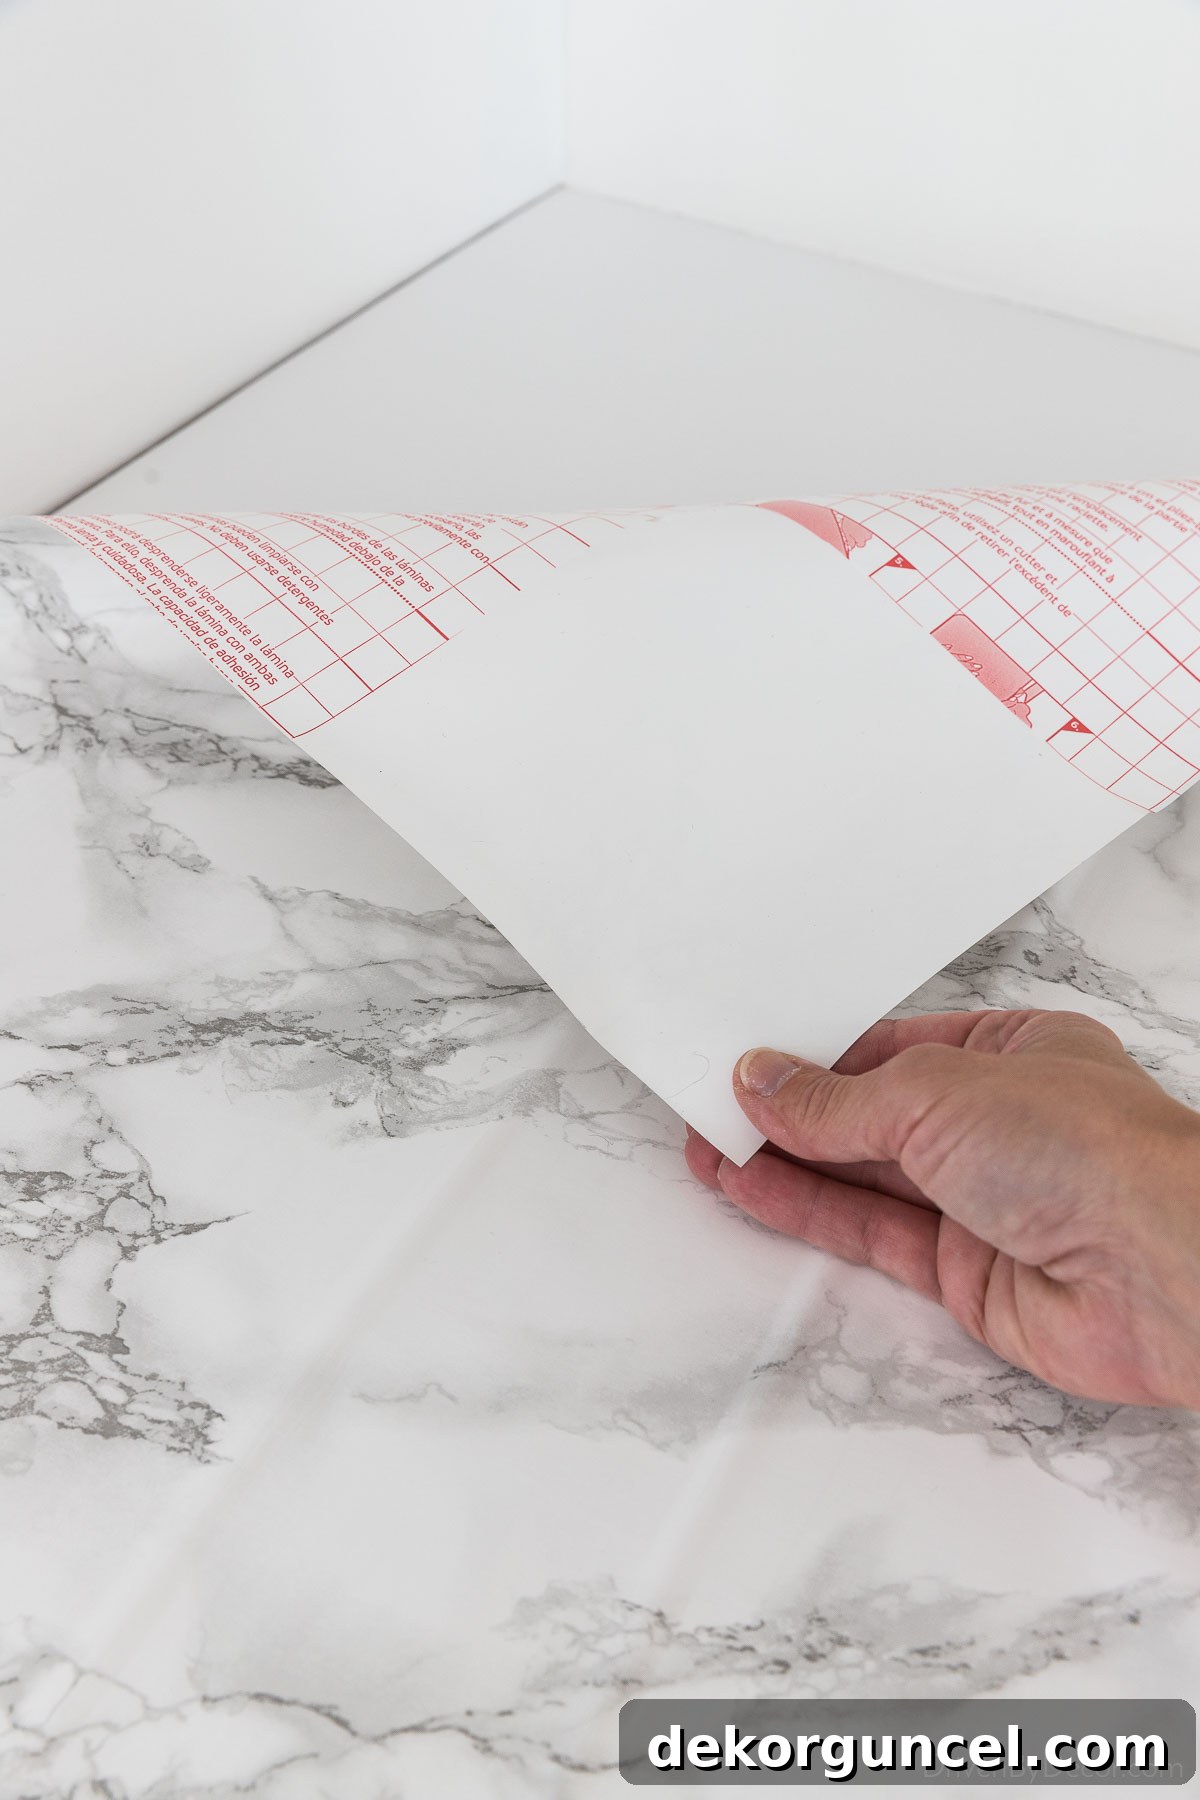
When you lay down that first corner, your objective is to align it meticulously, leaving an overhang of approximately ¼ to ½ inch of extra paper along both the back edge and the starting left end. This excess paper will be neatly trimmed away later. Don’t be afraid to lift and reposition this initial sticky section of contact paper a few times until you achieve the perfect angle and alignment. Patience here will pay off immensely.
Once you are satisfied with the initial placement, firmly press down the adhered section. Then, use {your smoothing tool} to carefully work outwards from the center of this initial square, pressing out any air bubbles and ensuring a smooth, firm bond with the countertop surface. If you spot any air bubbles, use the smoother to gently push them towards the nearest open edge until they disappear.
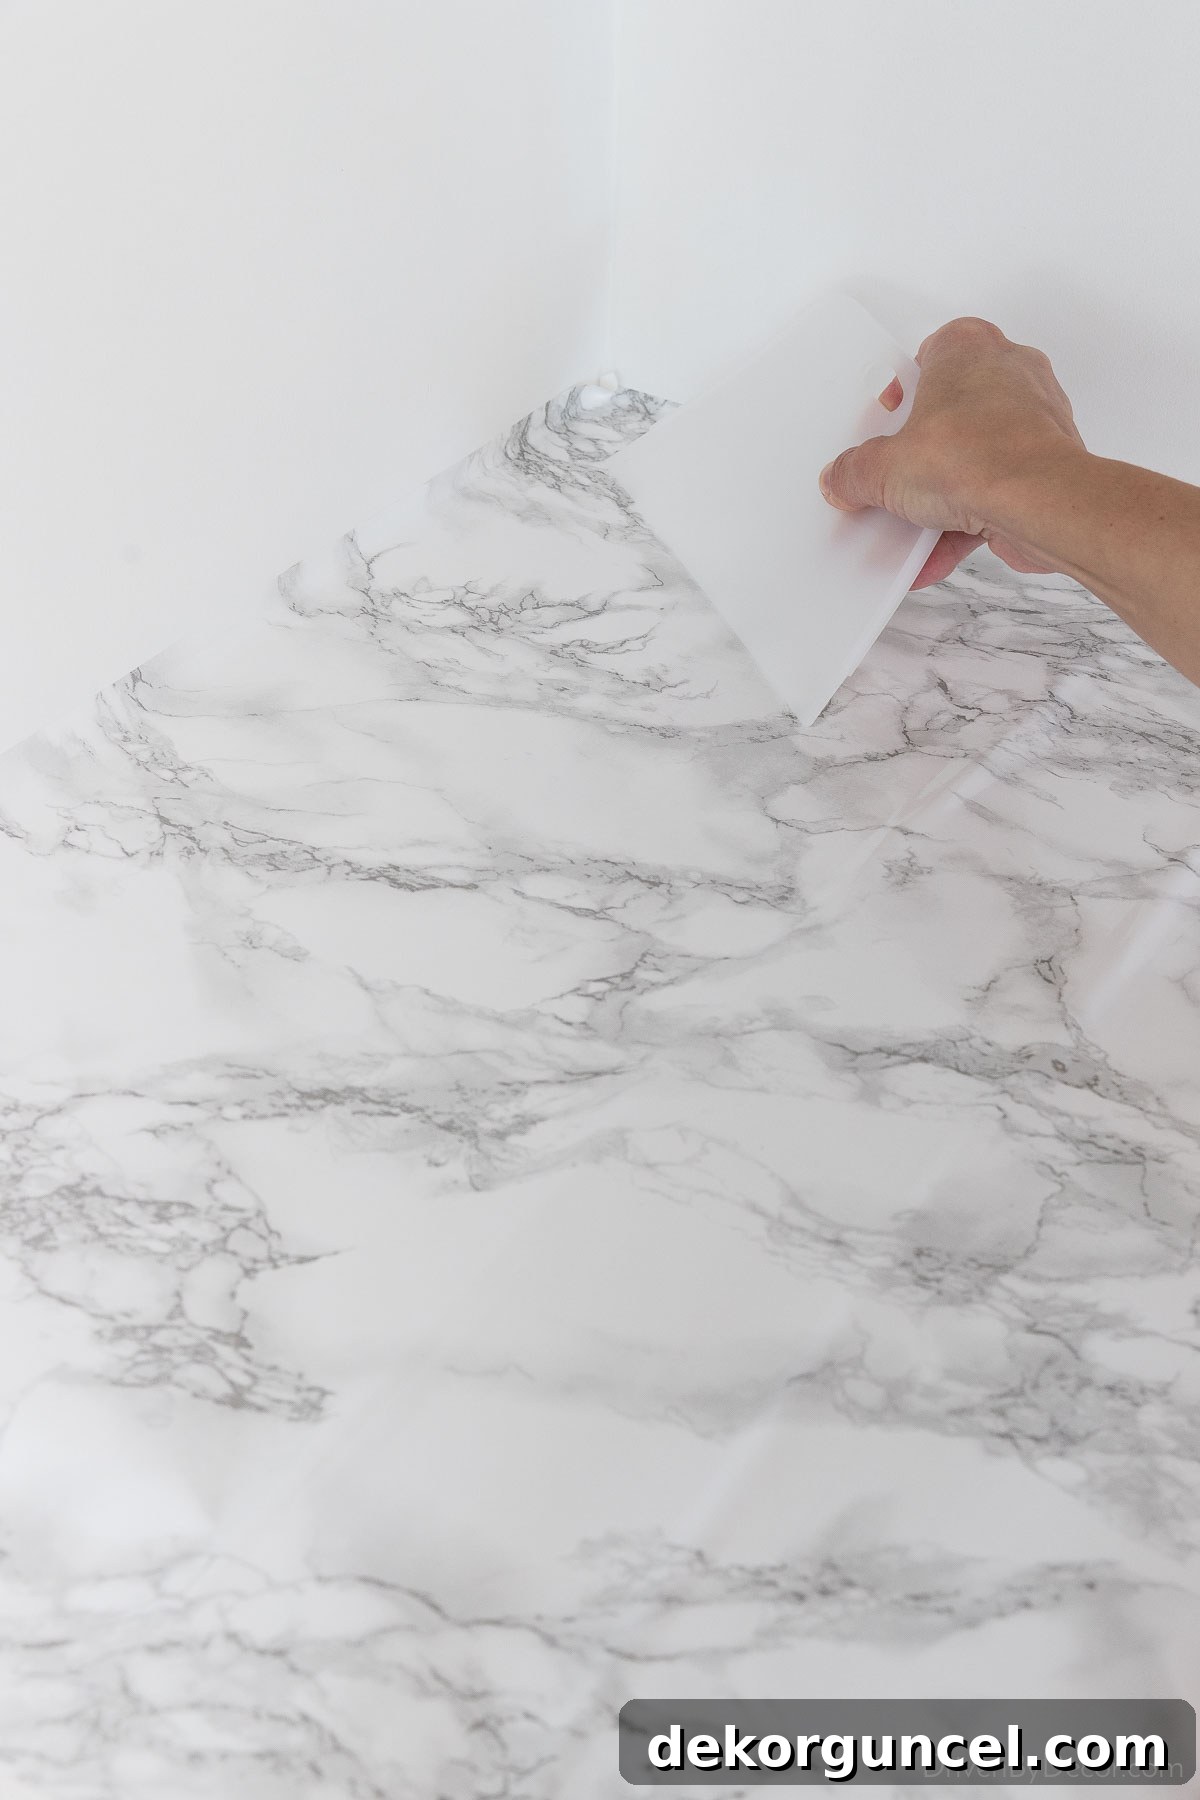
Next, continue the application process by gradually peeling off a small section of the backing at a time, moving along the length of the countertop. Avoid peeling off too much backing at once, as this can make the paper difficult to control and prone to sticking in the wrong place or trapping large air bubbles.
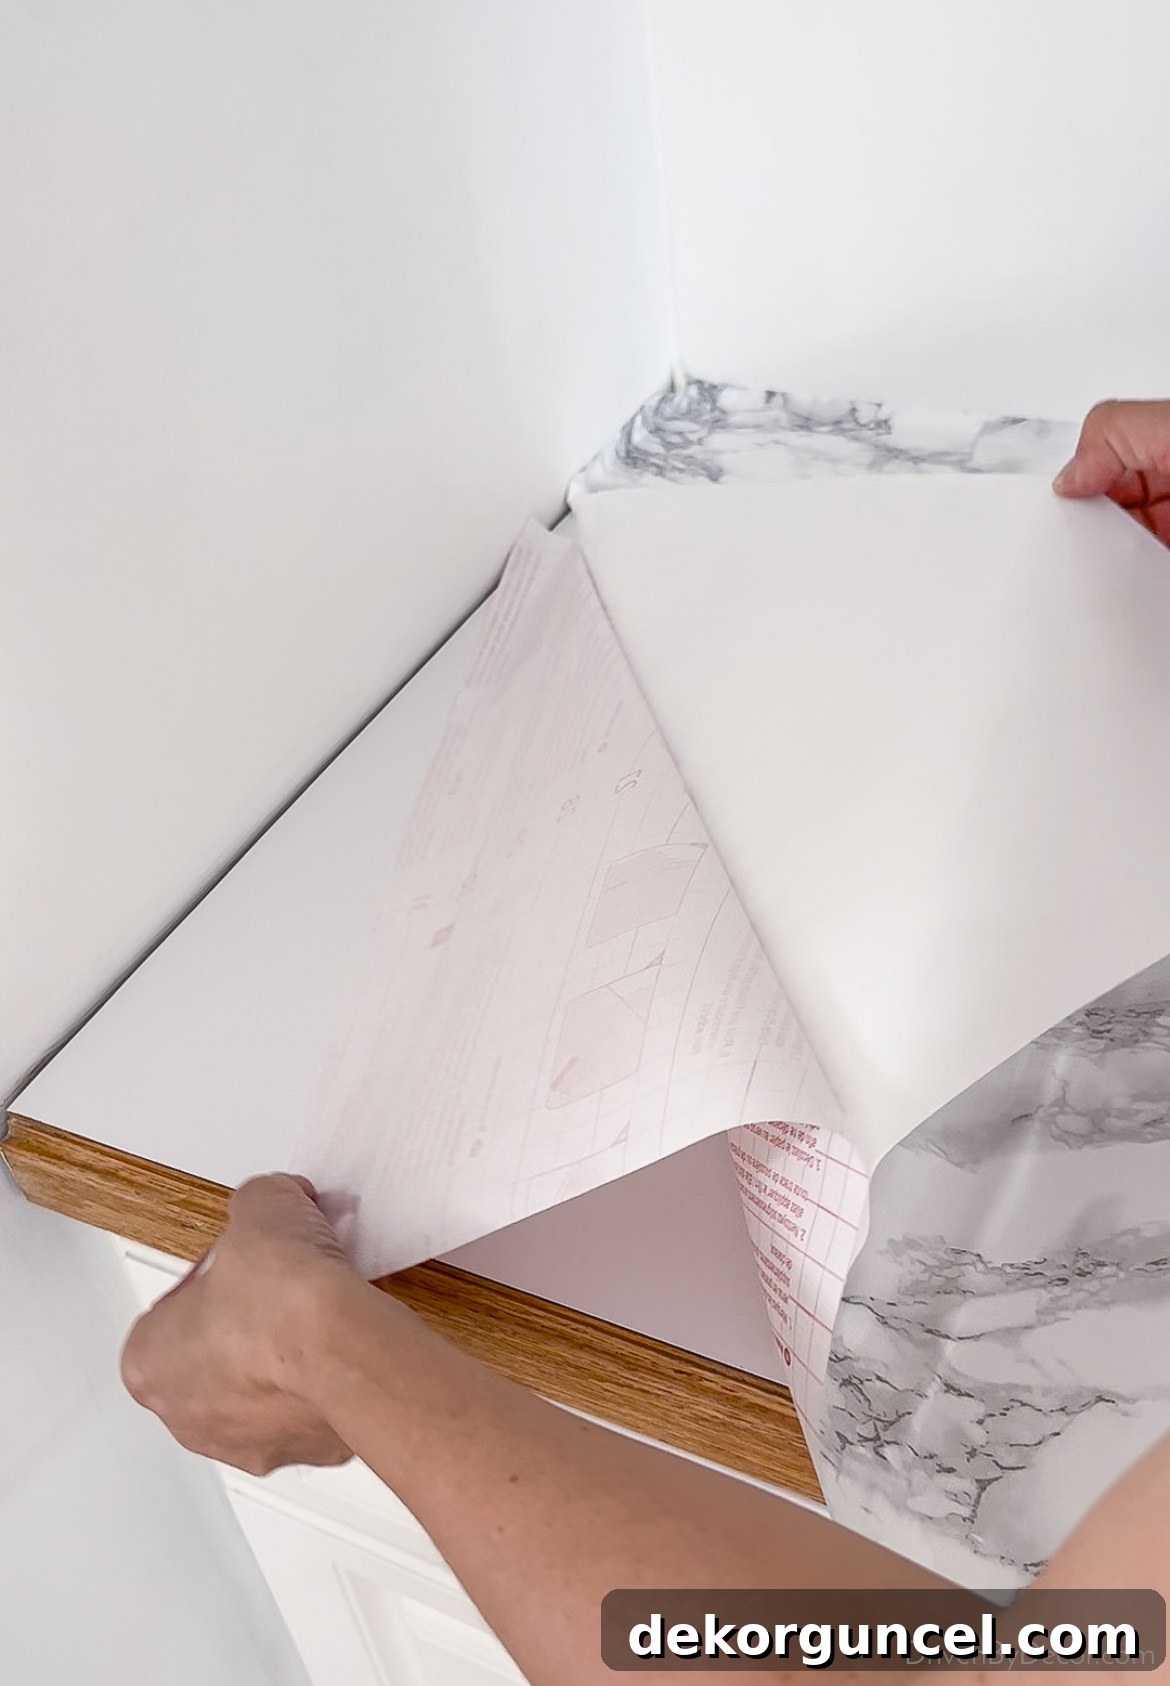
As you slowly remove the backing, continuously adhere the contact paper to the countertop, smoothing it down with your tool as you progress. Work methodically, section by section, ensuring each area is perfectly flat and bubble-free before moving on to peel the next segment of backing.
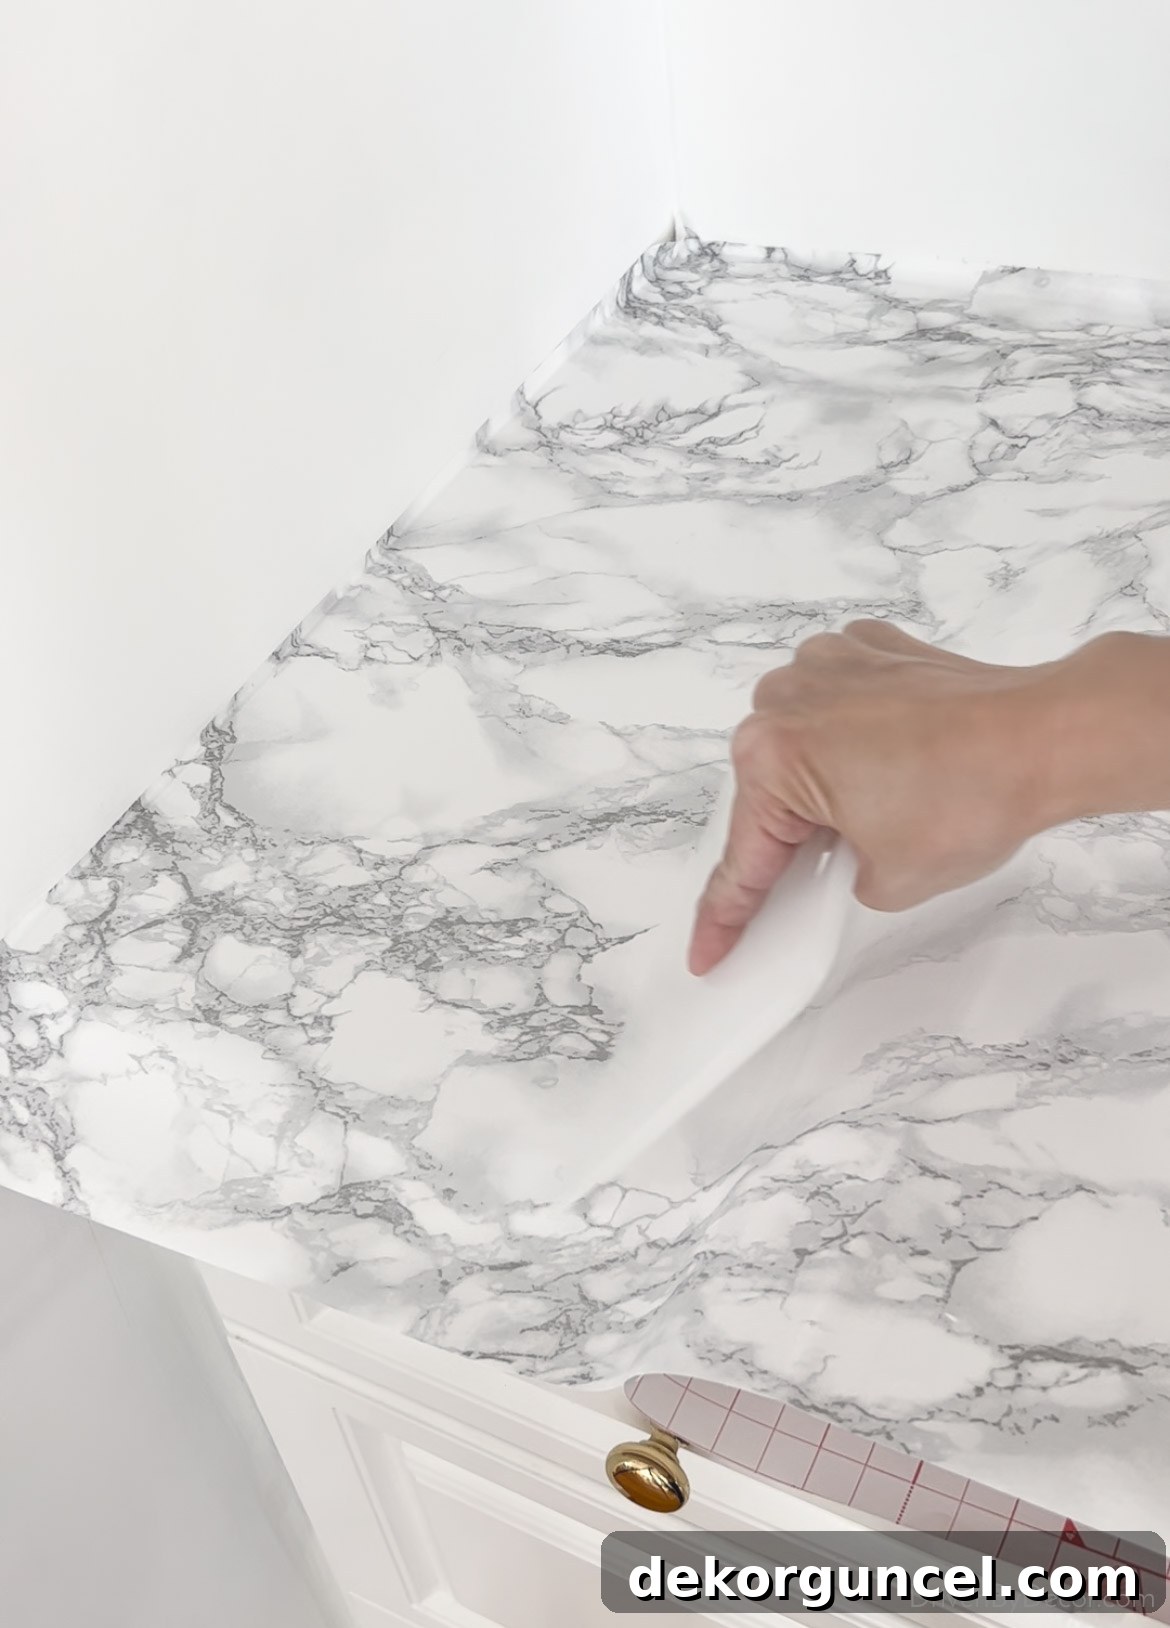
My single biggest piece of advice for this step is: Do not rush! Take your time to ensure every single area is perfectly smooth and free of bubbles. Sometimes, air bubbles can be surprisingly difficult to spot when viewed directly from above. After smoothing a section, take a moment to inspect it from various angles and under different lighting conditions to confirm that all bubbles have been successfully pushed out before you commit to the next section of the countertop. This meticulous approach will guarantee a flawless, professional-looking finish.
6. Precisely Trimming Excess Paper
Once the contact paper has been fully applied to your countertop surface, it’s time to trim away any excess material along the edges where the countertop meets the wall, or other fixtures. In my case, this involved the left side and along the back edge. The most effective and neat method I discovered for this is similar to a technique used in wallpaper installation. Begin by placing your smoothing tool firmly into the crevice where the countertop meets the wall. Then, position a utility knife – ensuring it has a brand new, sharp break-off blade like those in {this set} – directly on top of the smoothing tool. This setup provides a stable guide for a straight cut. Move both the smoothing tool and the utility knife in unison down the length of the wall, applying steady pressure. Crucially, do not lift your razor during this motion; maintain continuous contact to achieve a beautifully smooth and even cut:
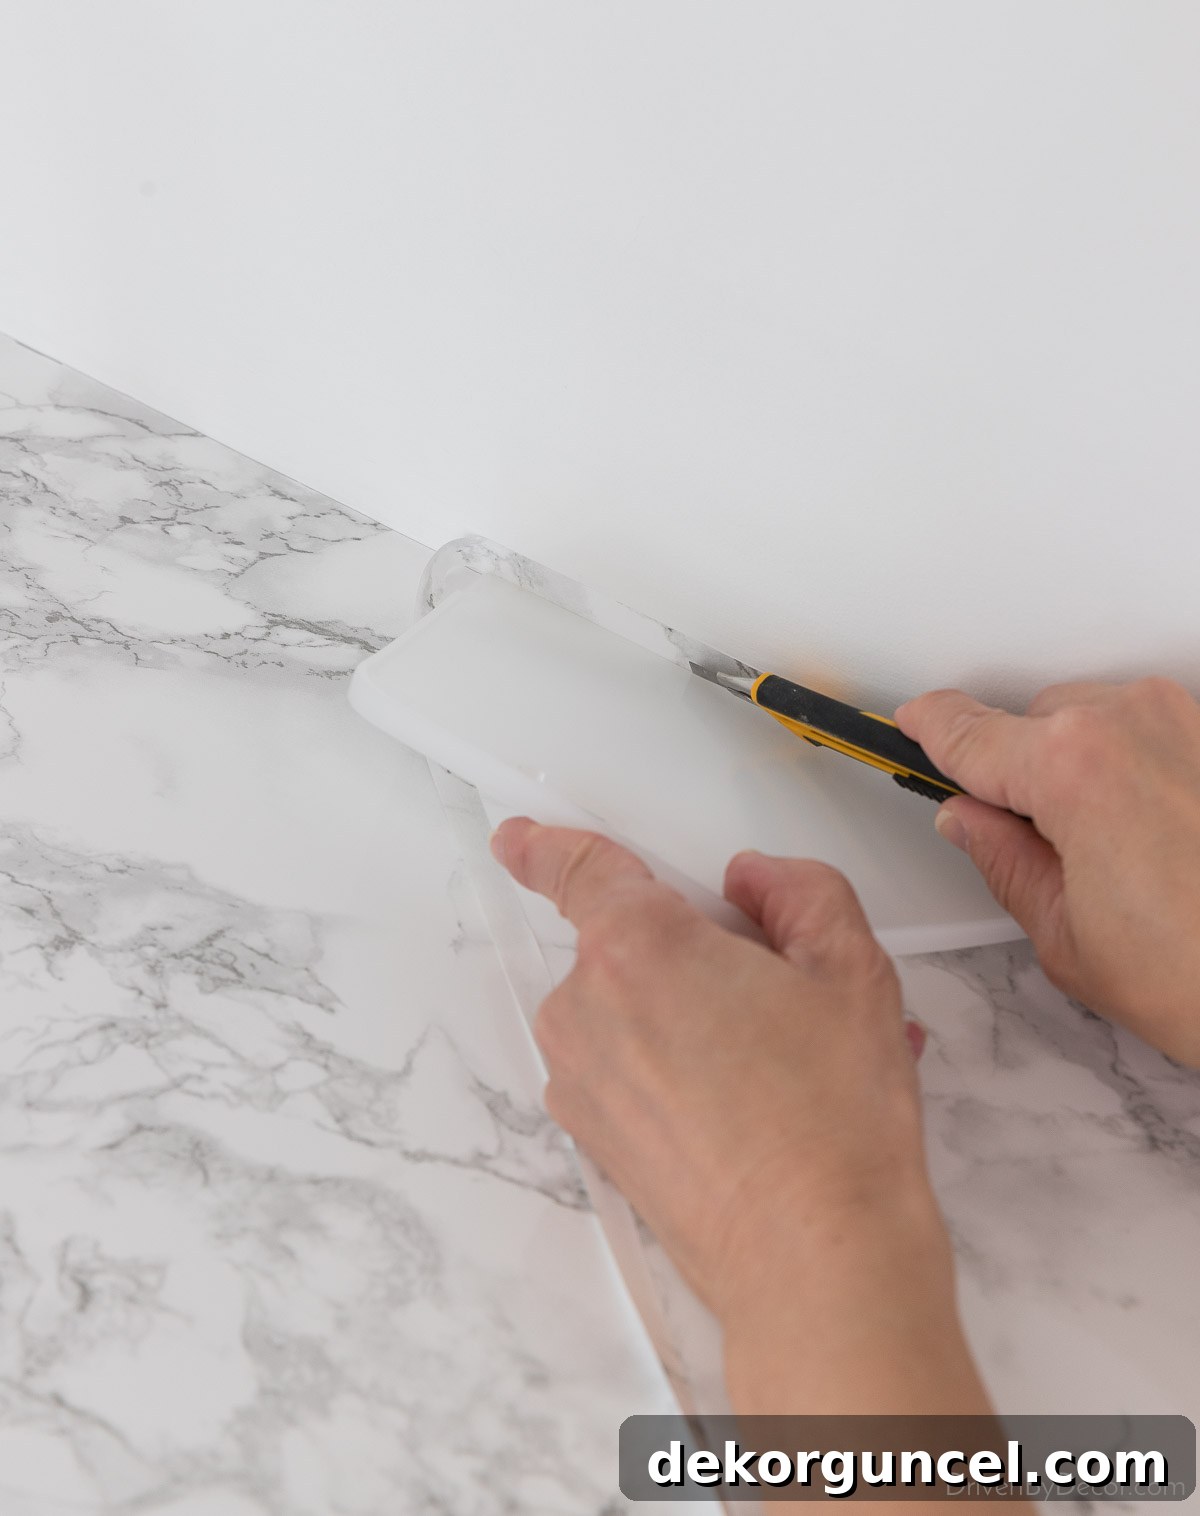
With the cut complete, you can then simply lift up and discard the trimmed excess strip of contact paper:
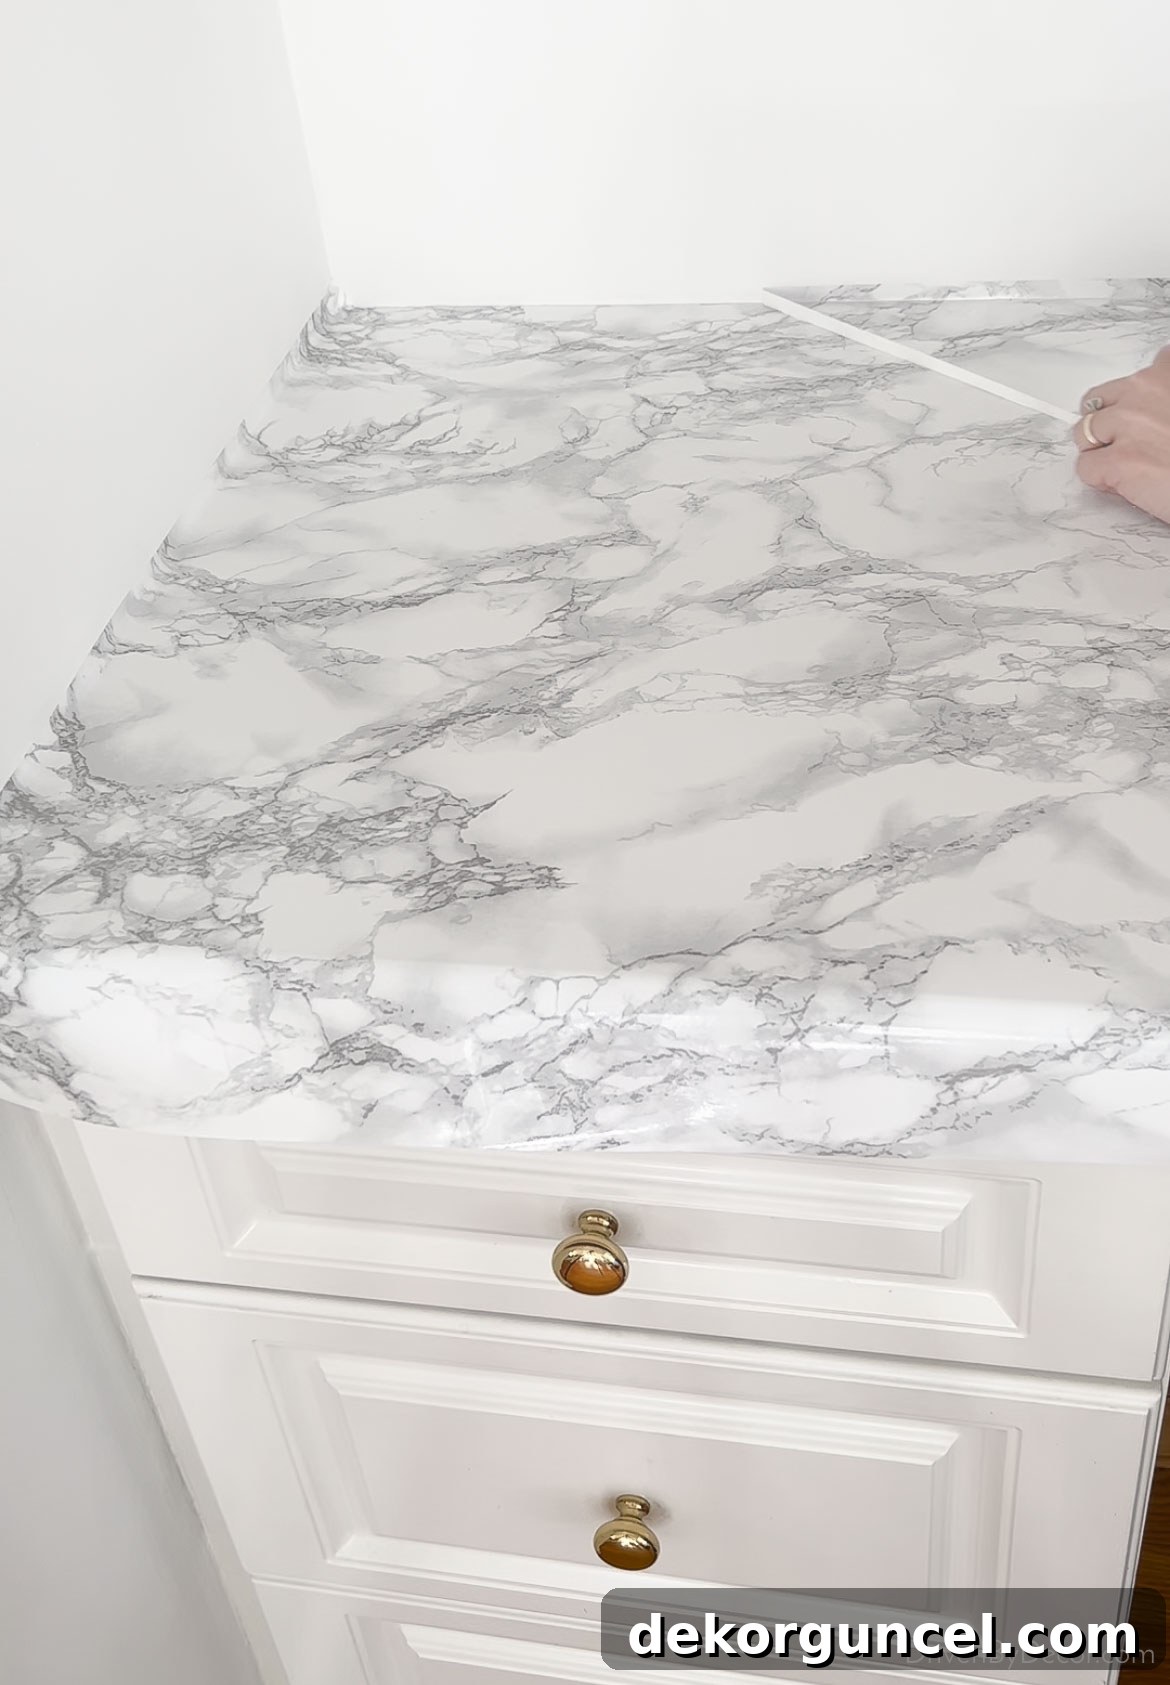
Accessing very tight corners with a utility knife can be challenging. For these areas, you may need to gently lift the corner of the contact paper and use a small, sharp pair of scissors (the small scissors mentioned earlier are perfect for this) to make the precise cut. This method of using the smoother as a guide with a utility knife is also the ideal technique for cutting accurately around fixtures like sinks when covering bathroom or kitchen countertops, ensuring a clean, custom fit.
7. Mastering Corners & Edges for a Seamless Finish
Handling external corners and edges requires a careful approach to ensure a neat, professional-looking wrap. Before you fully secure the contact paper around the front edge of your countertop, it’s essential to address any outside corners. Here’s the technique I found to work best:
First, make a straight cut upwards from the bottom edge of the paper, about ⅛ inch in from the actual corner of the countertop:
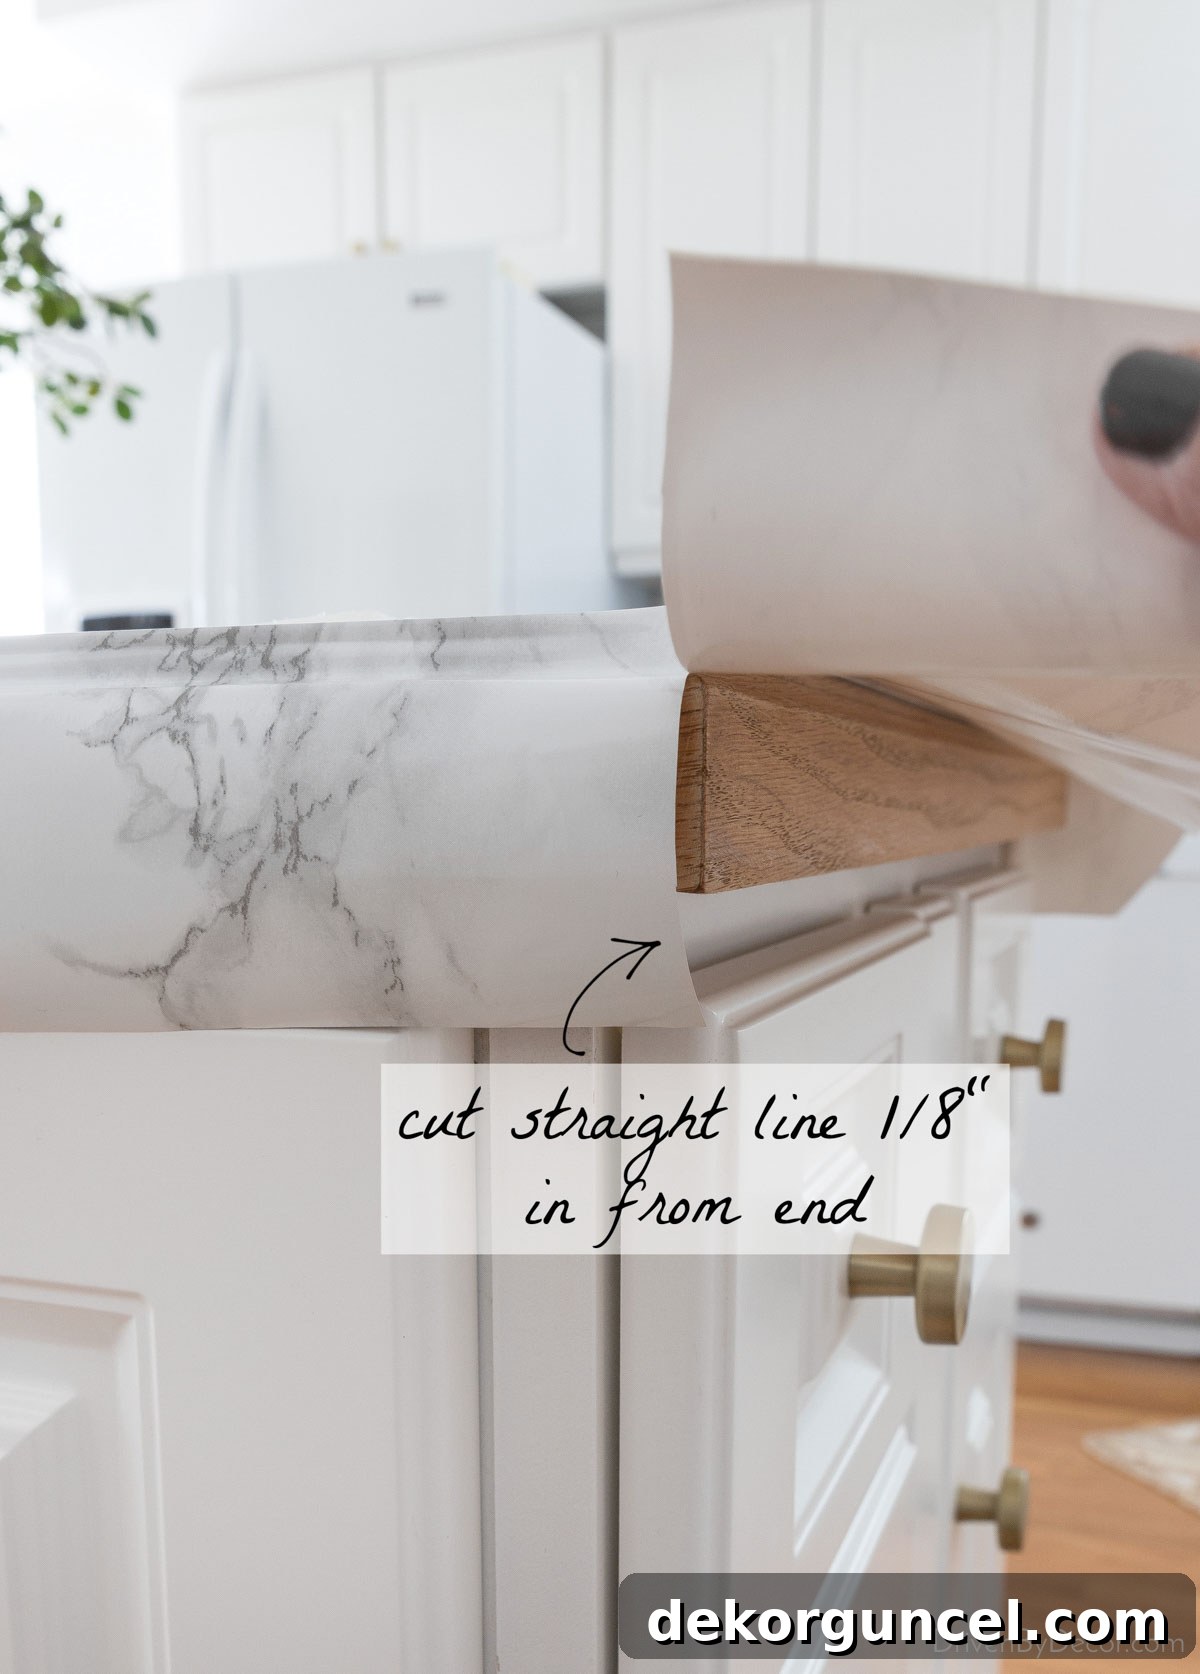
If your countertop edge features intricate detailing or a specific profile, stop your initial straight cut precisely at the point where the corner begins to angle inwards or curve. Following this, make a second, diagonal cut. This cut should start where your first cut ended and extend upwards, finishing at the very top of the corner. These relief cuts allow the paper to flex and conform better around the corner without bunching:
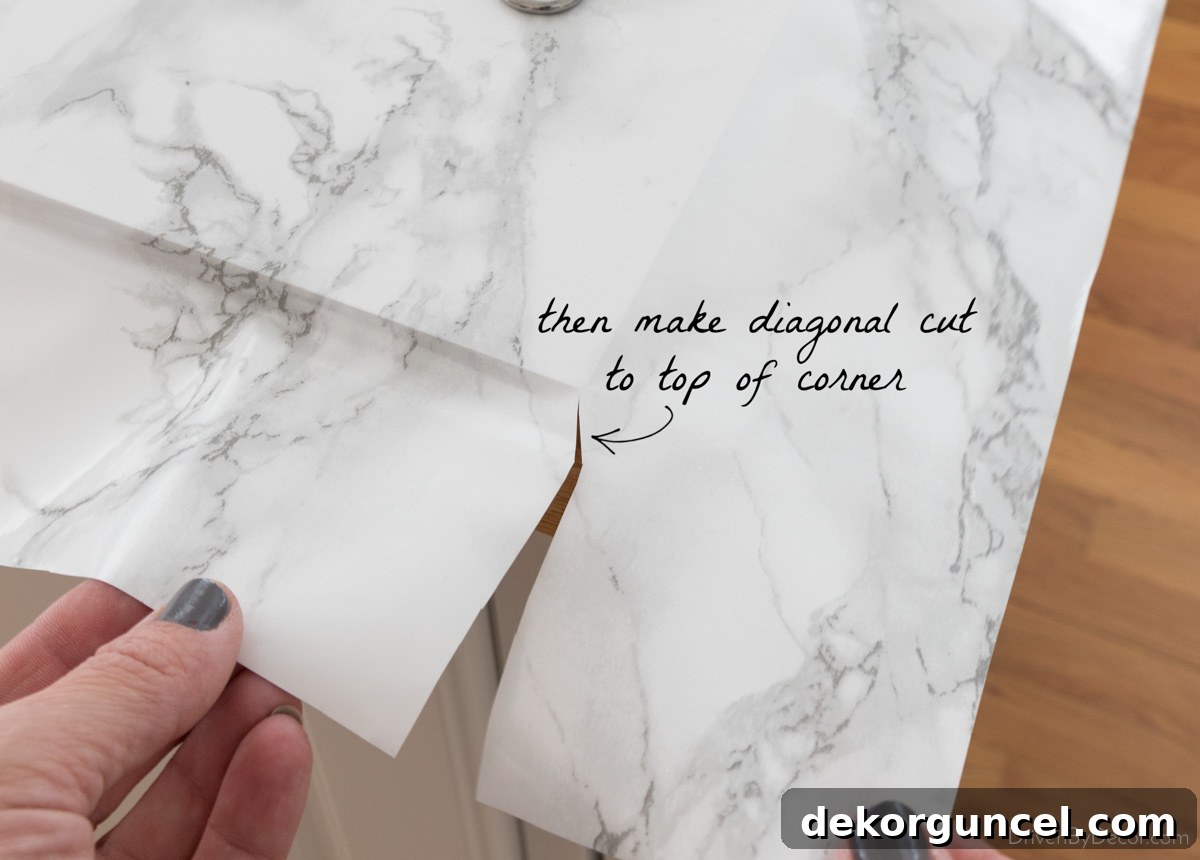
Now, carefully wrap the contact paper over the edge of the second side – meaning the side *adjacent* to where you made your initial straight cut. (We’ll delve into more general tips for wrapping edges later in this post, but for now, let’s focus on finishing this specific corner.)
Once you’ve wrapped the paper over the length of that countertop edge, extend it around the corner, ensuring about ¼ to ½ inch of paper wraps around. Trim off any significant excess. If your countertop edge, like mine, has specific detailing or a rounded profile, you might find it necessary to make one or two small, discreet slits in the paper. These small cuts will help the contact paper conform smoothly around the curve and lay perfectly flat against the corner. Don’t worry if these small cuts don’t look perfectly pretty at this stage; they will be covered:
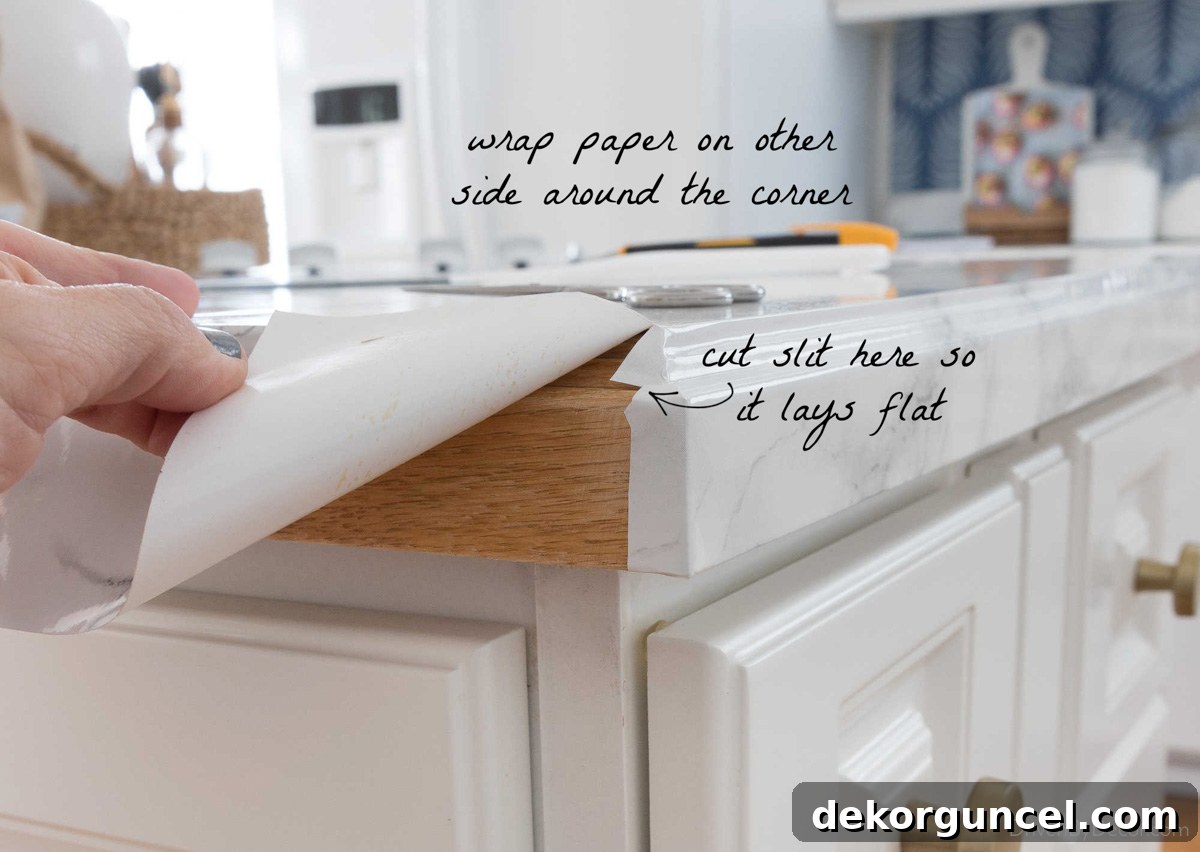
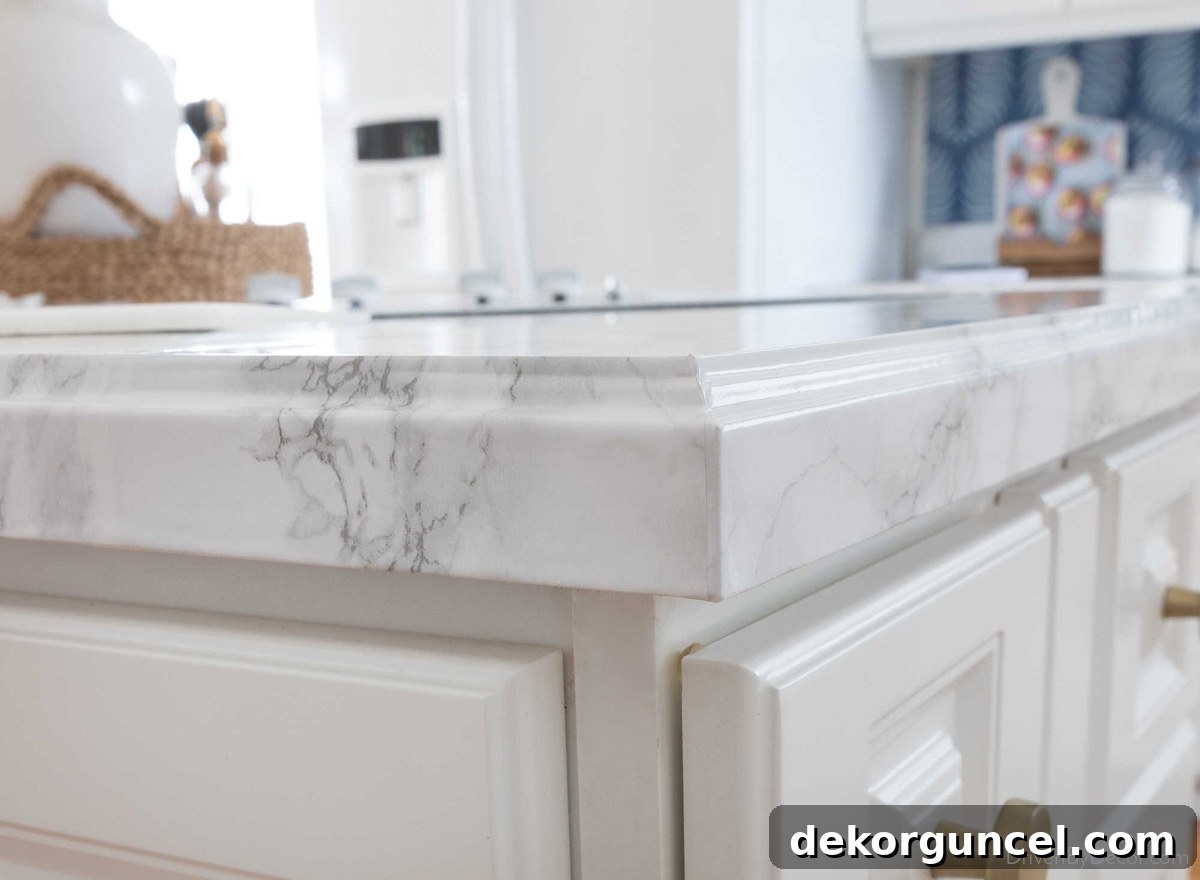
Finally, wrap the remaining contact paper around the other countertop edge. This final piece will neatly overlap and fully cover the portion of paper that you initially rounded the corner with, creating a clean, integrated finish:
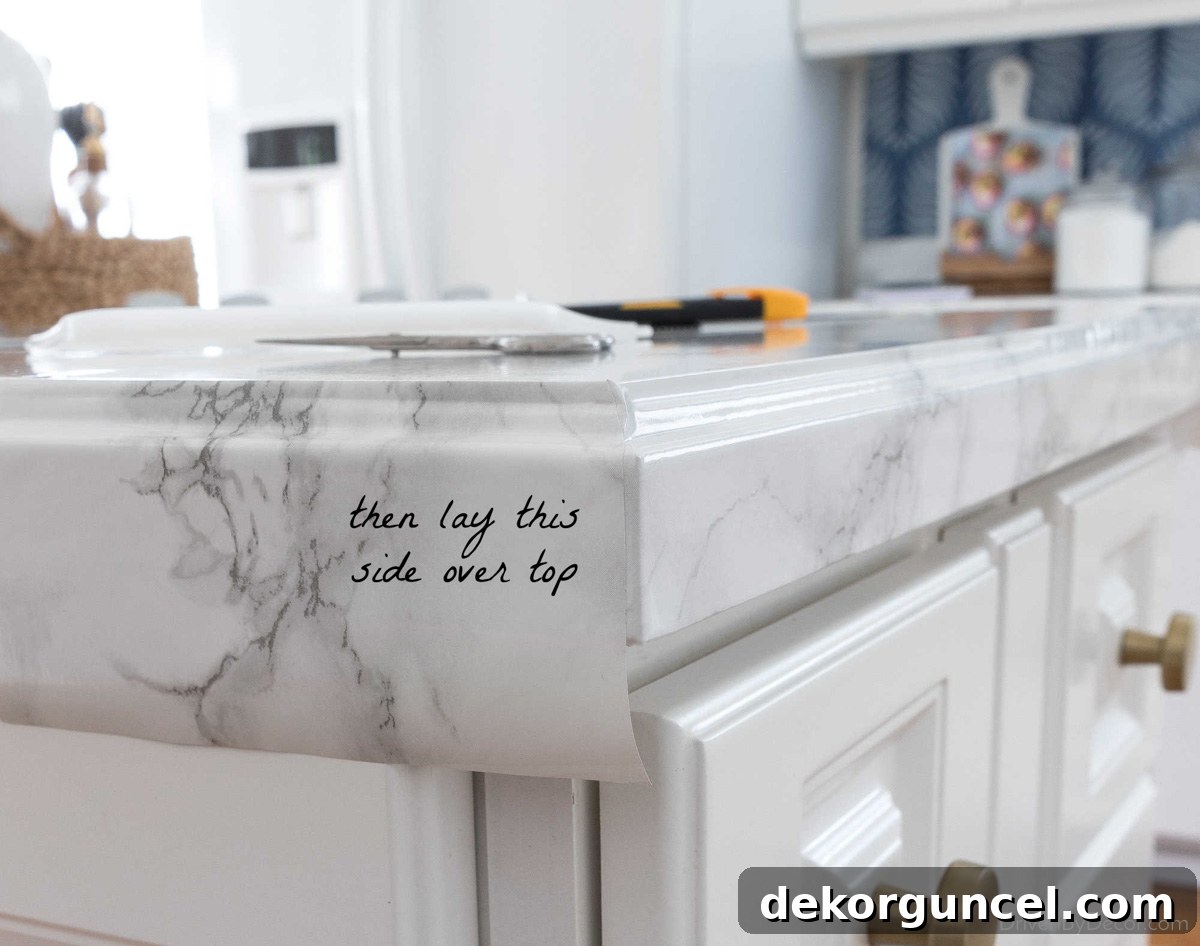
And just like that, you’ve successfully tackled a challenging corner!
Pro Tips for Wrapping Countertop Edges
Wrapping the contact paper over the front edges of your countertop is crucial for a durable and aesthetic finish. Here are some detailed tips to ensure a smooth, secure wrap:
As you carefully guide the contact paper over the countertop edge, actively use your smoothing tool to press the paper into any dips, curves, or crevices that are part of your countertop’s edge design. Work slowly and meticulously, ensuring the paper adheres well at every point. This thorough smoothing prevents air pockets and ensures the pattern follows the contour of the edge perfectly:
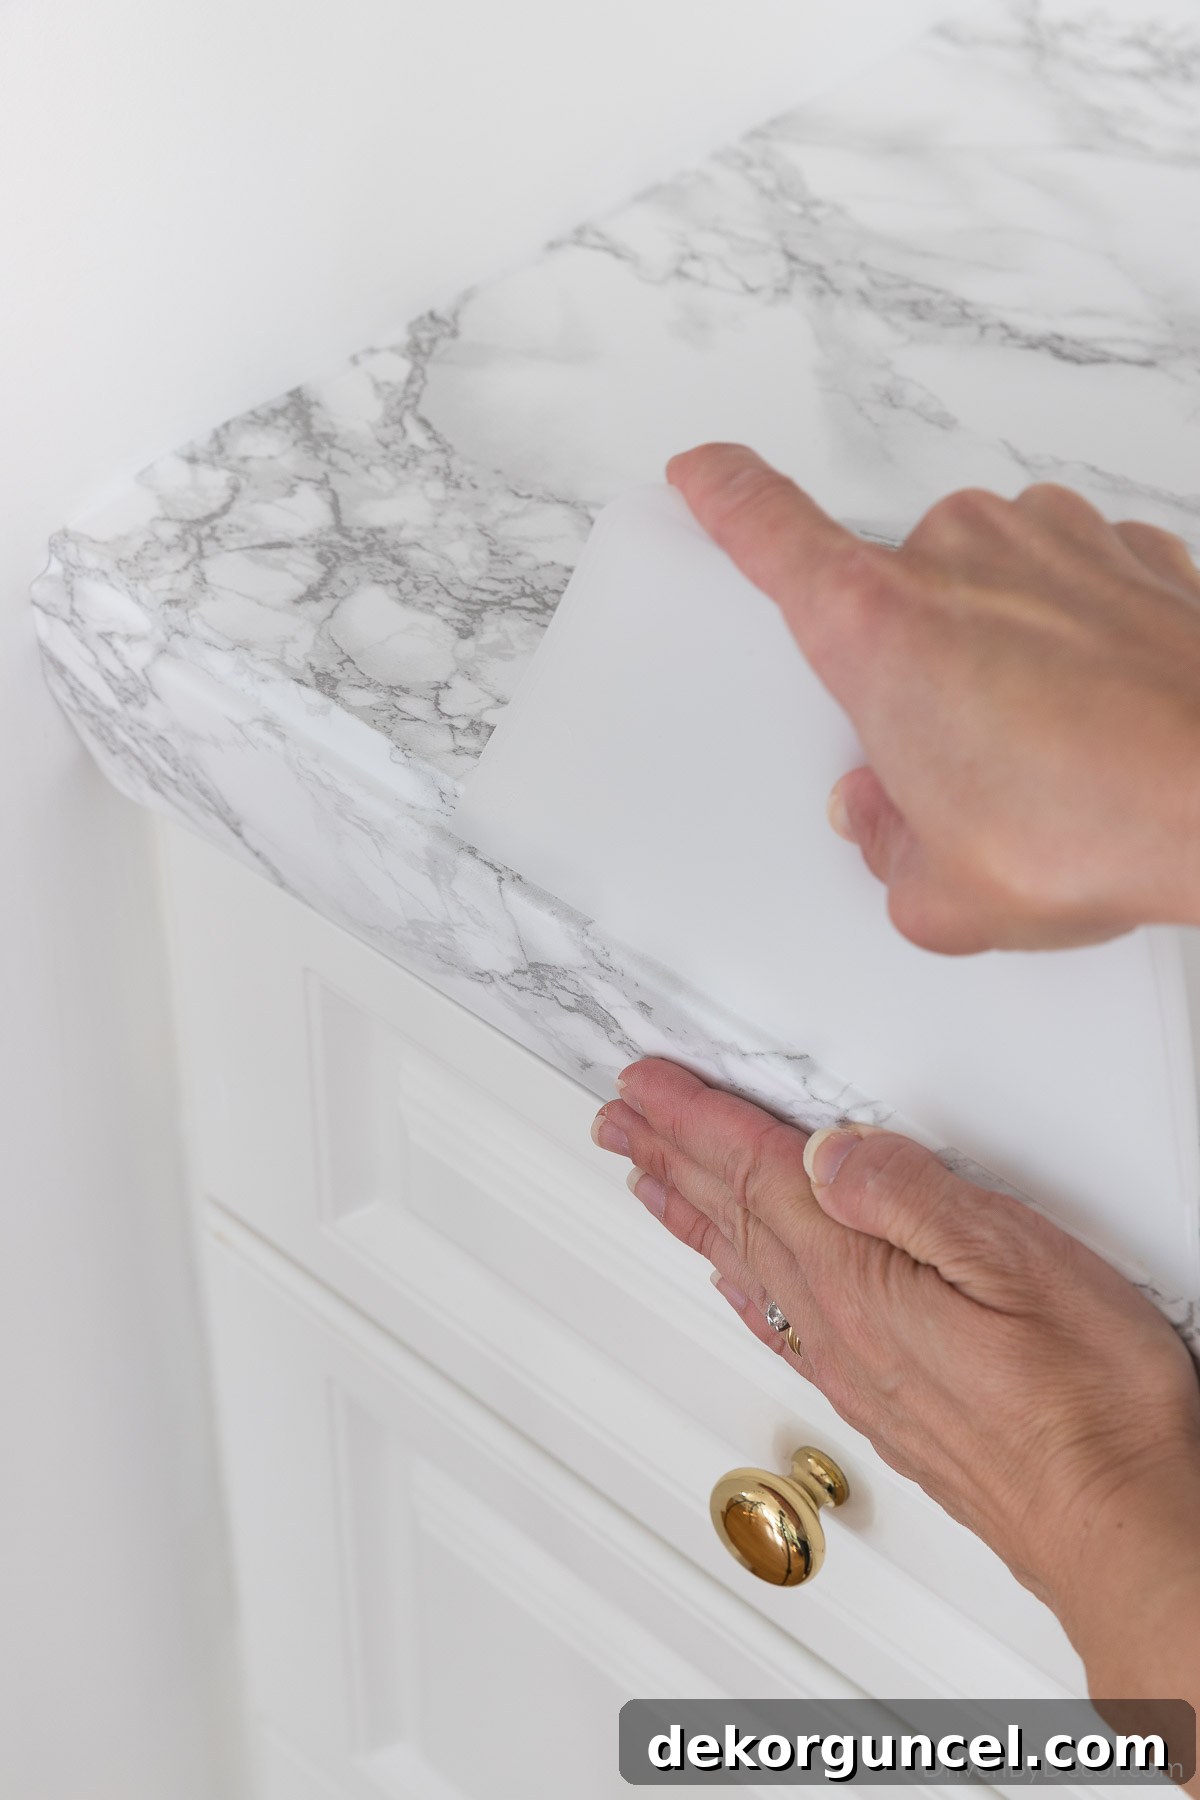
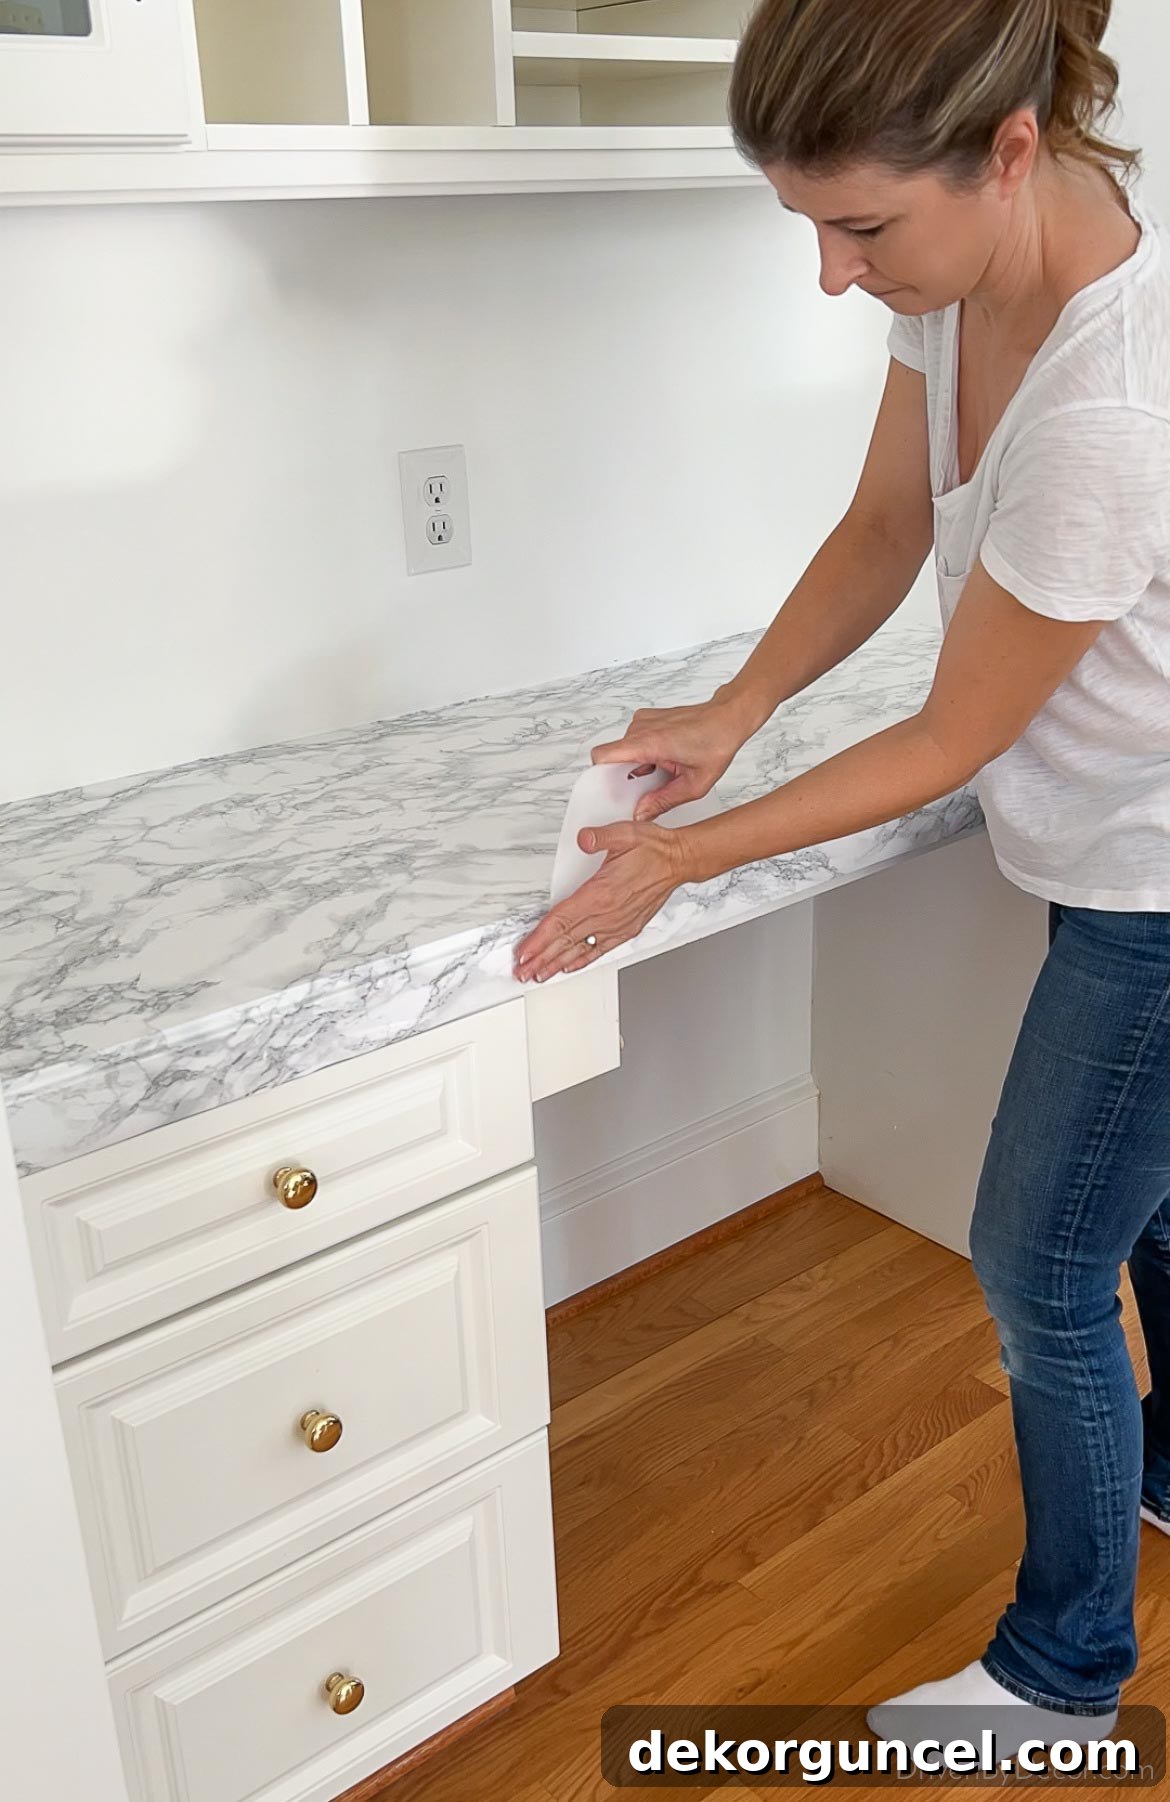
Once the contact paper is flawlessly smooth along the entire length of the top and front edge, gently tuck the remaining portion of the contact paper underneath the lip of the countertop. Press it firmly into place, working from one end to the other, to secure it. This under-wrap provides an extra layer of protection against peeling and gives a truly finished look:
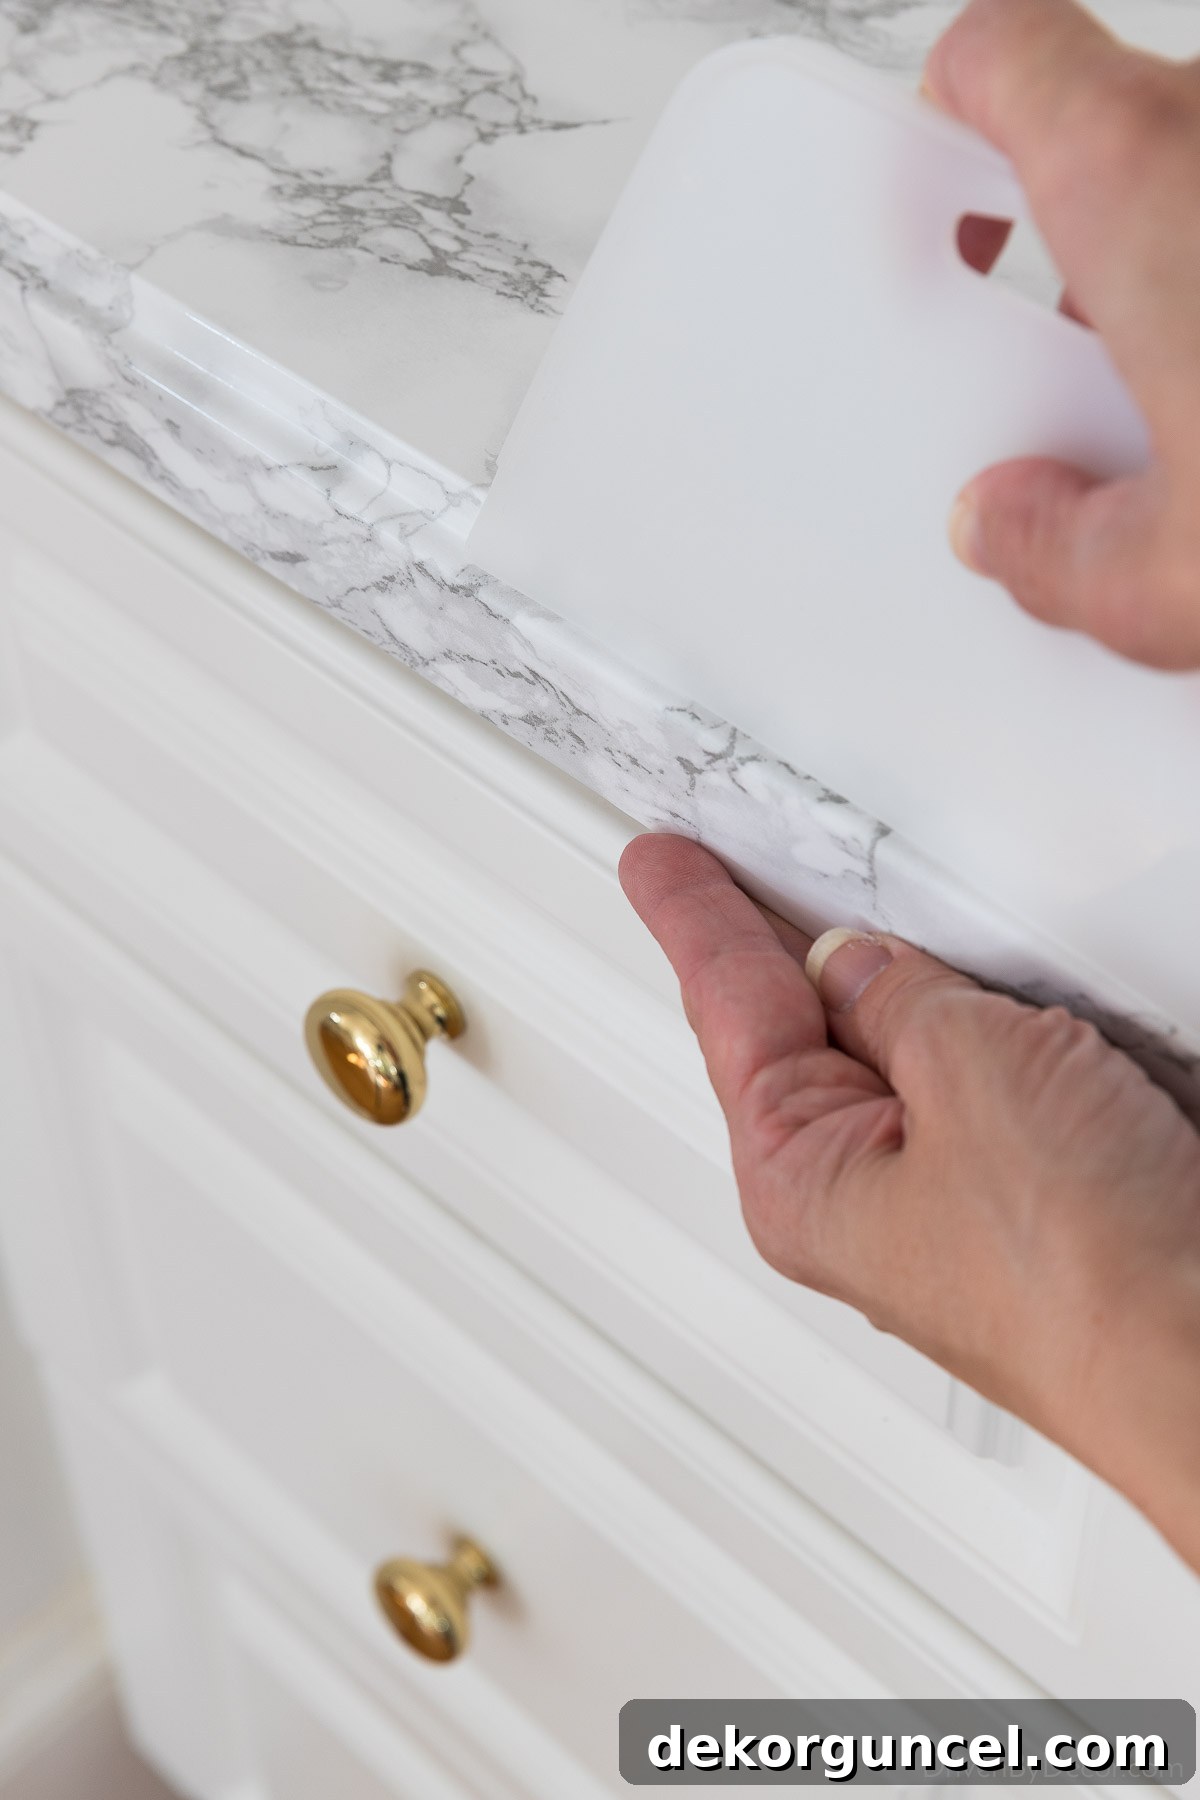
If you find that your contact paper is wide enough to cover the entire underside of your edge and continues beyond, trim the excess. Use your utility knife, guided by your smoothing tool, to cut off any superfluous paper from underneath the countertop. This ensures a clean, hidden edge and prevents any unintended adhesion or interference:
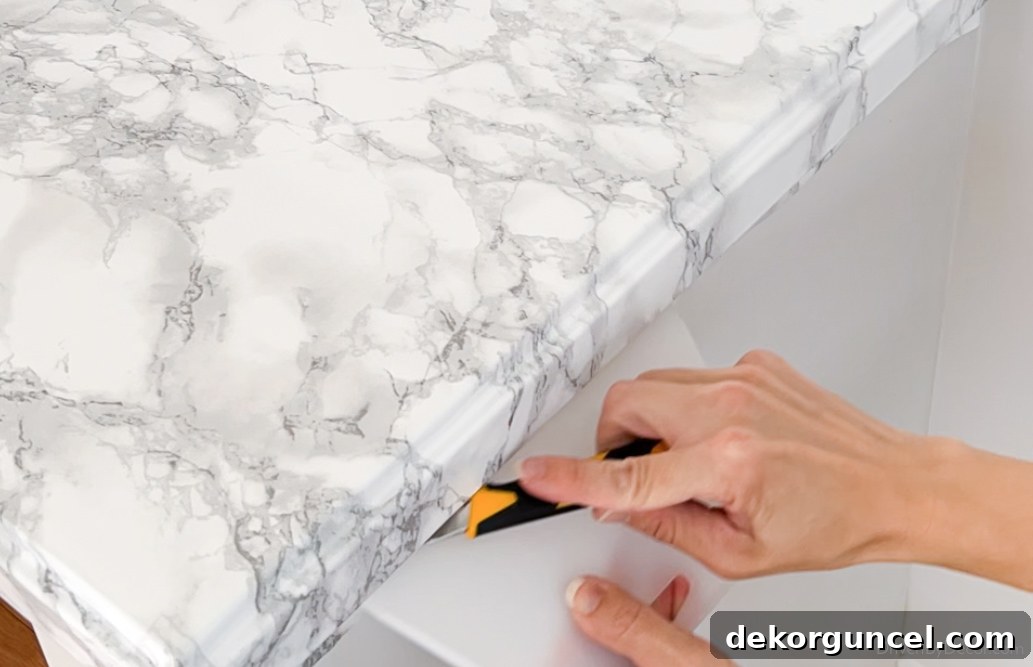
8. Final Smoothing: Eliminating Any Lingering Bubbles
While continuous smoothing during application is crucial, it’s common to find a few persistent air bubbles or small imperfections once the entire surface is covered. Don’t fret – these can usually be remedied with a few simple techniques.
For isolated bubbles, the simplest solution is to gently prick them with a fine needle or the tip of your utility knife. Make a tiny incision, then immediately use your smoothing tool to press the air out and flatten the area. The small hole will be virtually invisible, especially with the marble pattern masking it.
For more stubborn or widespread areas of minor bubbling, try applying a little heat. Use a hairdryer on a low setting to gently warm up the bubbled area. The warmth makes the vinyl a bit more pliable and the adhesive slightly softer, allowing you to more easily smooth down the contact paper with your tool. Work slowly and apply gentle, even pressure until the area is flat. Be careful not to overheat the vinyl, as excessive heat could warp or damage it.
Seamless Integration: How to Handle Contact Paper Seams
Depending on the layout and length of your kitchen countertops, you may need to join multiple pieces of contact paper, creating seams. While the goal is to make these as inconspicuous as possible, some visibility is often unavoidable. I experimented with various methods for managing the seams on our large kitchen island and found that pattern matching yielded the most aesthetically pleasing results.
The primary drawback of pattern matching is that it can lead to a significant amount of paper waste, so always ensure you purchase extra rolls. To begin, unroll your new sheet and carefully find the spot on the roll where its pattern perfectly aligns with the pattern on the strip you’ve just installed. As you can see, this often involves a considerable overlap, sometimes as much as 6 inches, to achieve a precise match:
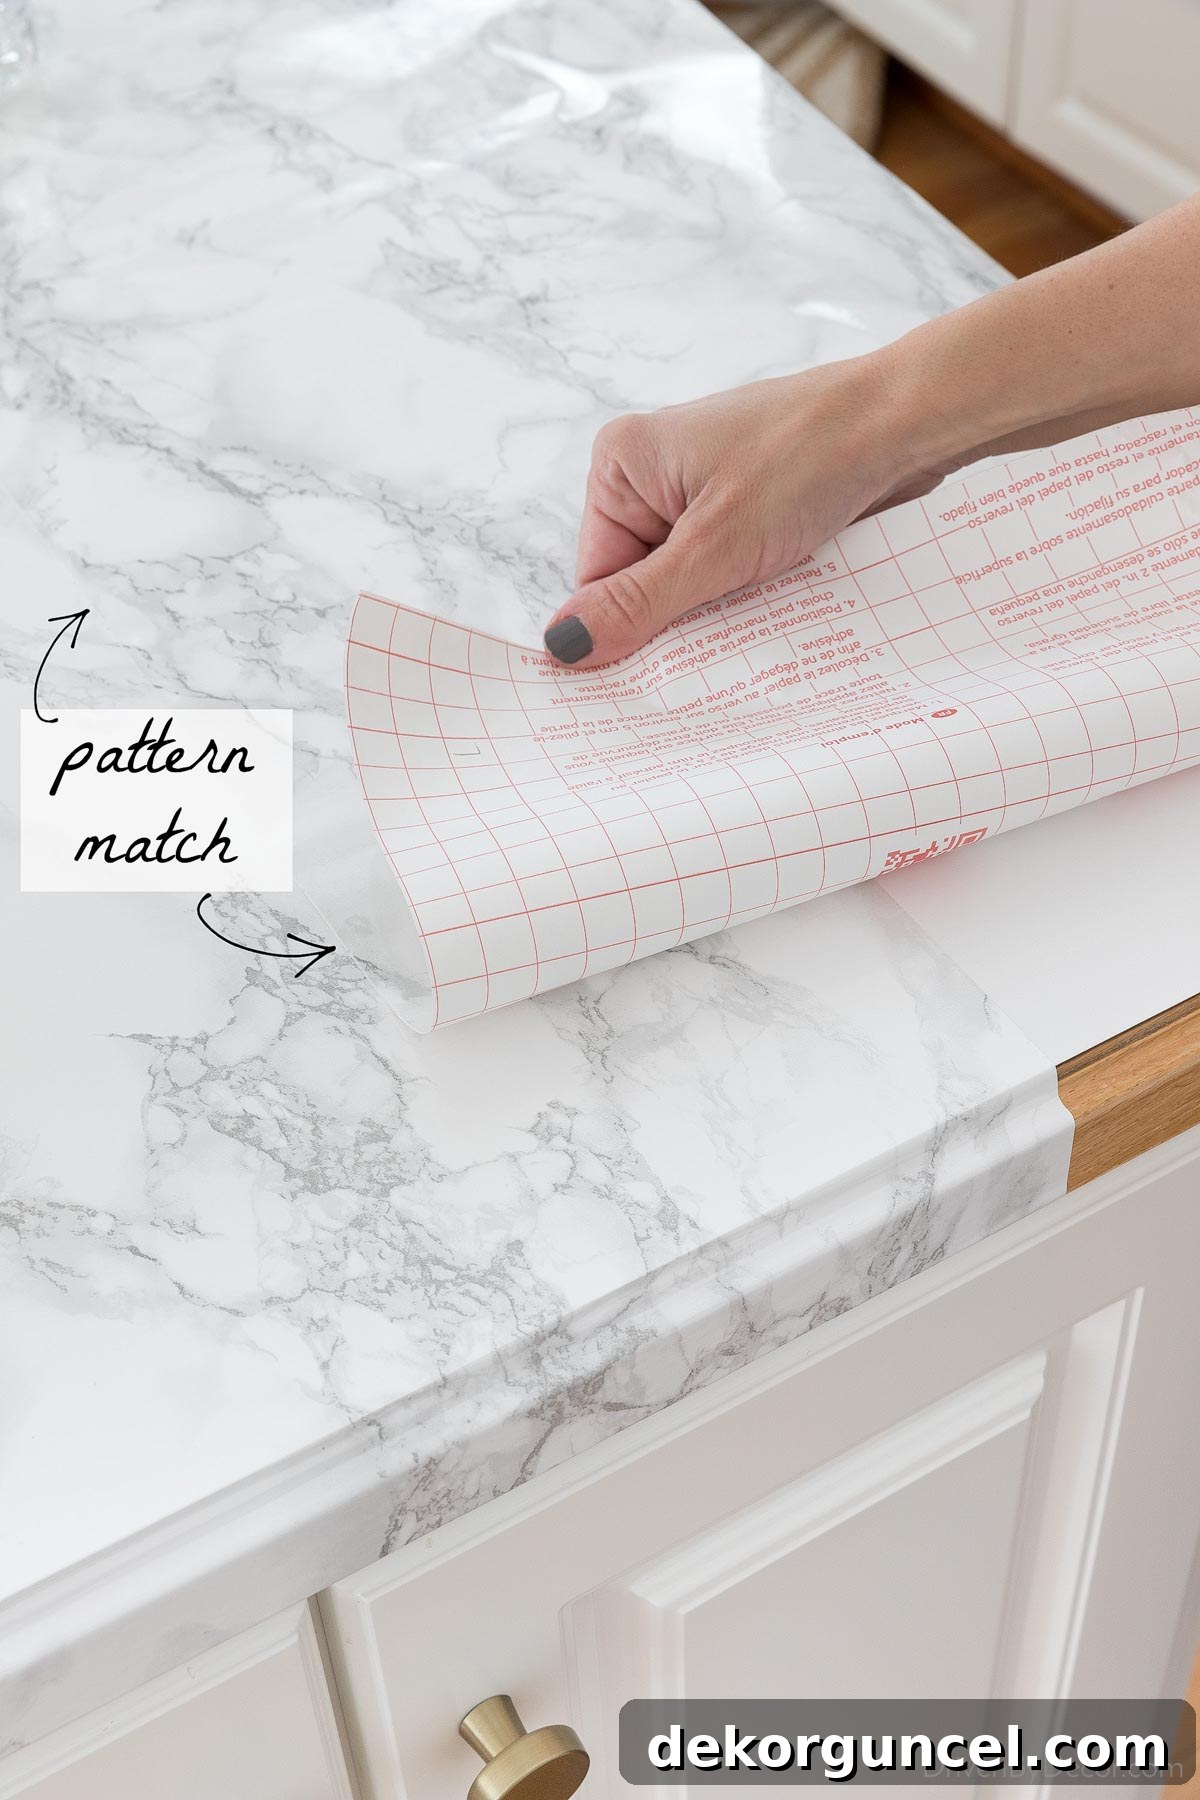
Once the pattern is aligned, make a straight cut along the length of the new sheet. The goal is to trim it such that the overlap between the two strips is only about ¼ inch. This narrow overlap minimizes the visual impact of the seam while providing enough material for a secure bond:
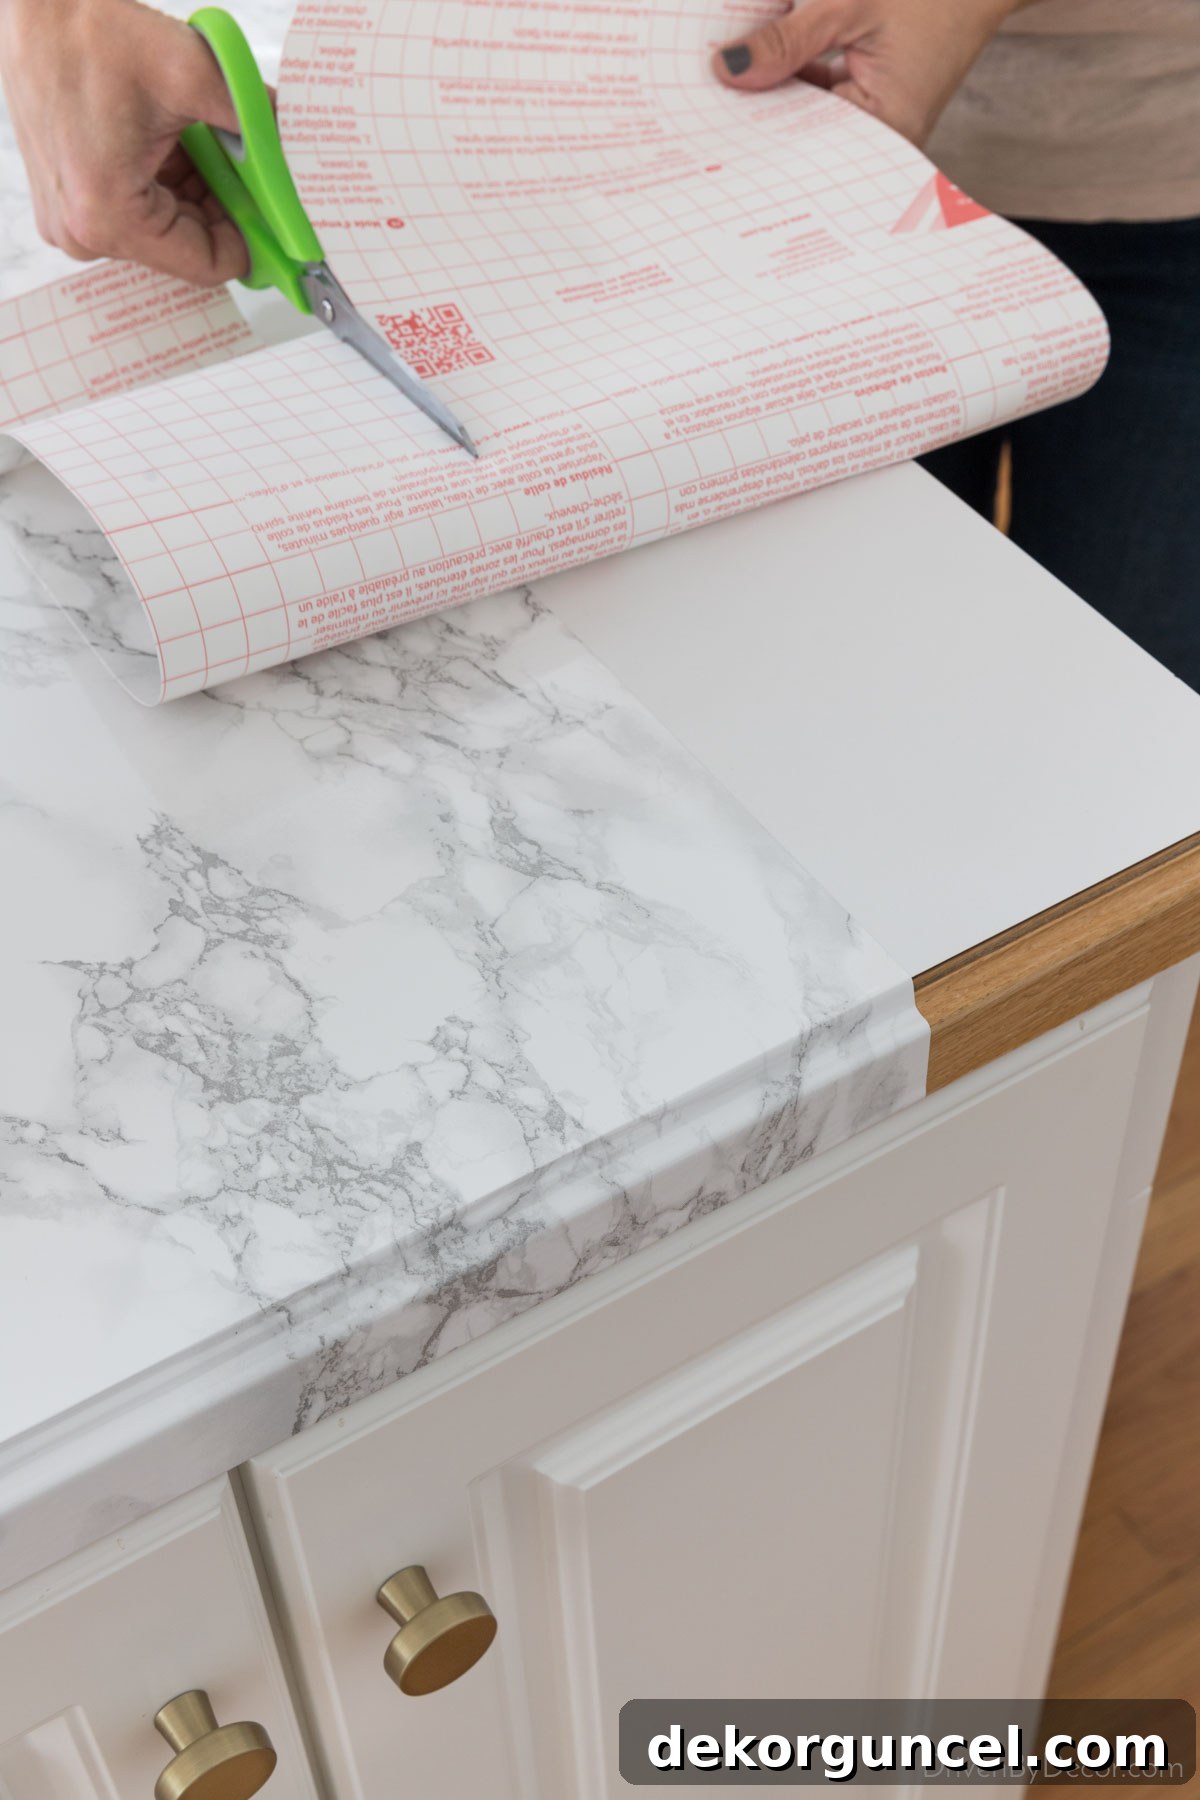
To facilitate precise pattern matching and prevent the entire sheet from sticking prematurely, remove only a very narrow strip of the backing along the entire edge that will be pattern-matched. This controlled removal allows you greater flexibility to adjust and align the pattern perfectly without the frustration of the whole sheet adhering too soon, making repositioning much easier:
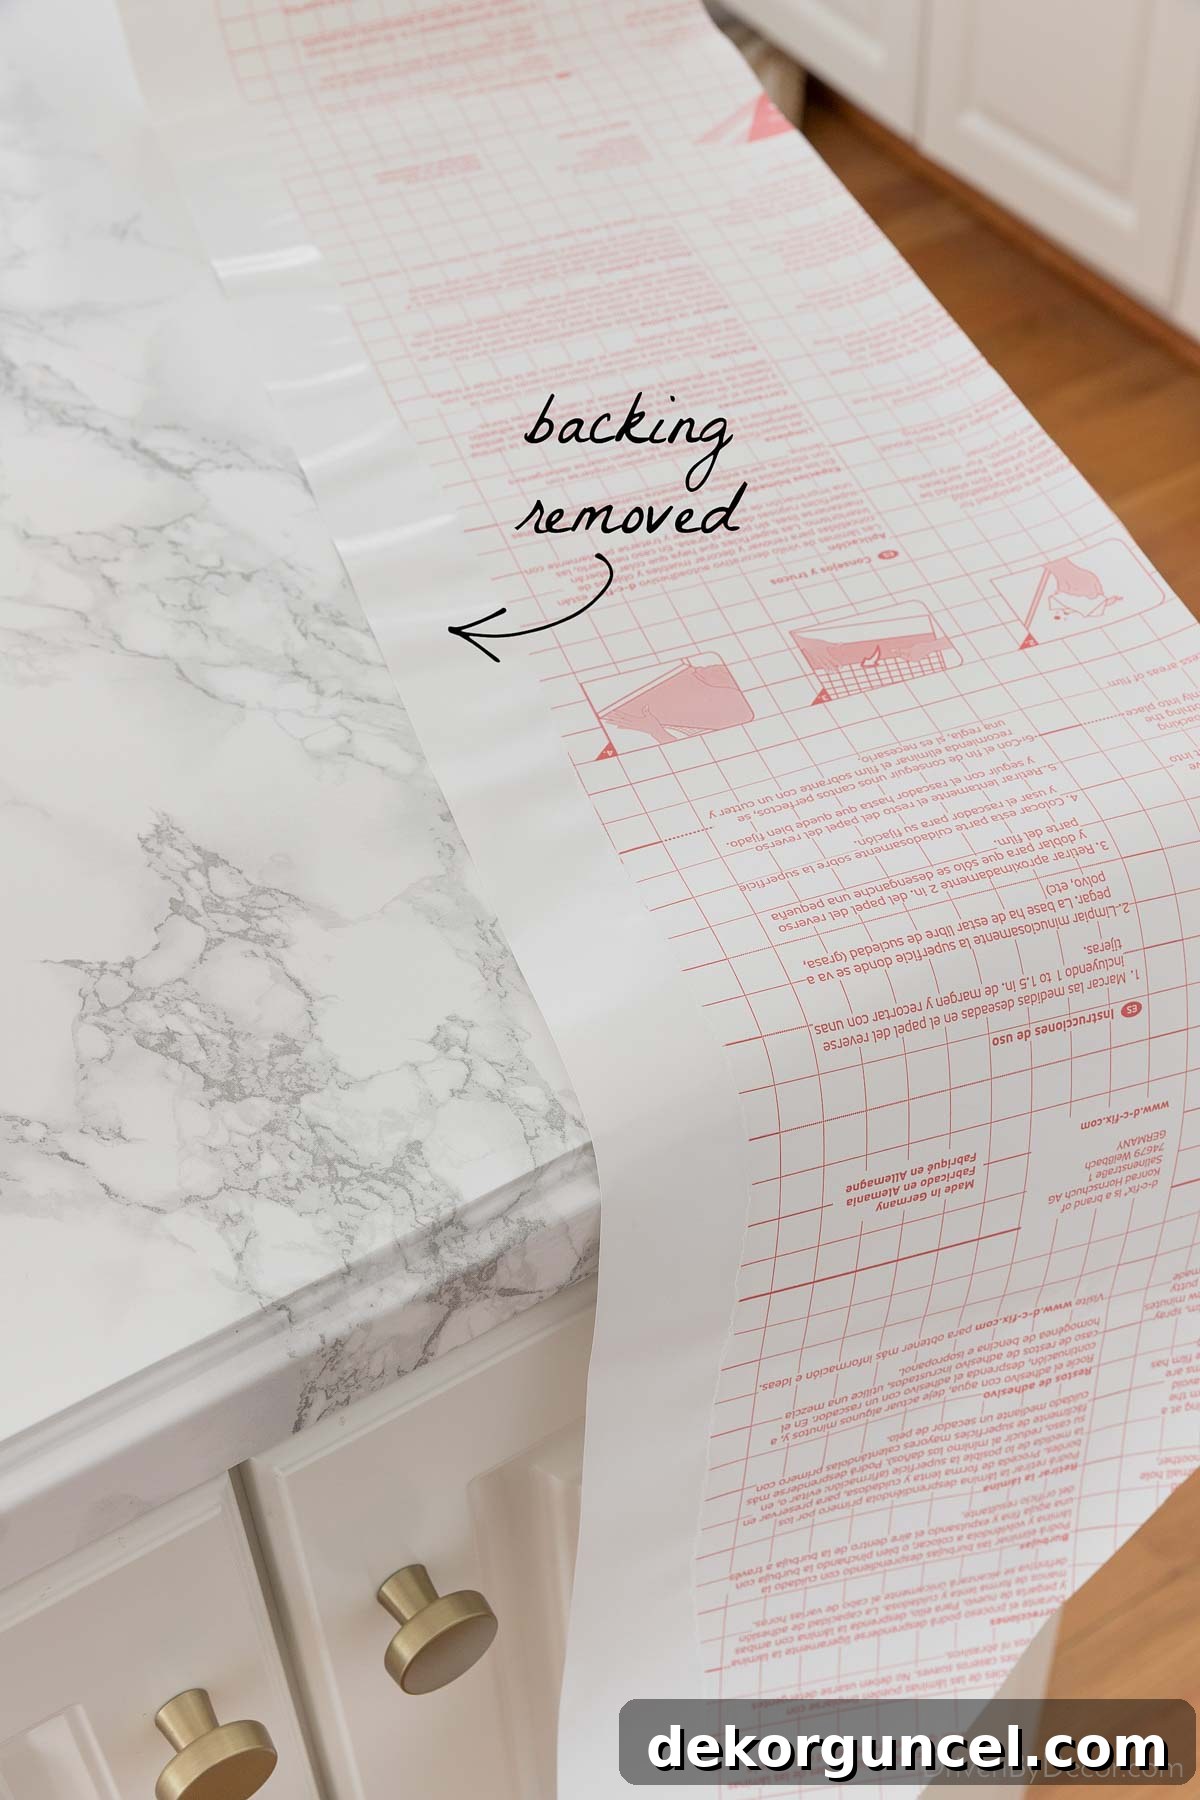
Once you are confident the pattern is perfectly matched and the narrow overlap is set, smooth down the entire overlapping edge firmly with your smoothing tool to create a strong initial bond. Then, slowly and carefully remove the remaining backing from the rest of the contact paper, simultaneously smoothing it down as you go, just as you did with the first sheet:
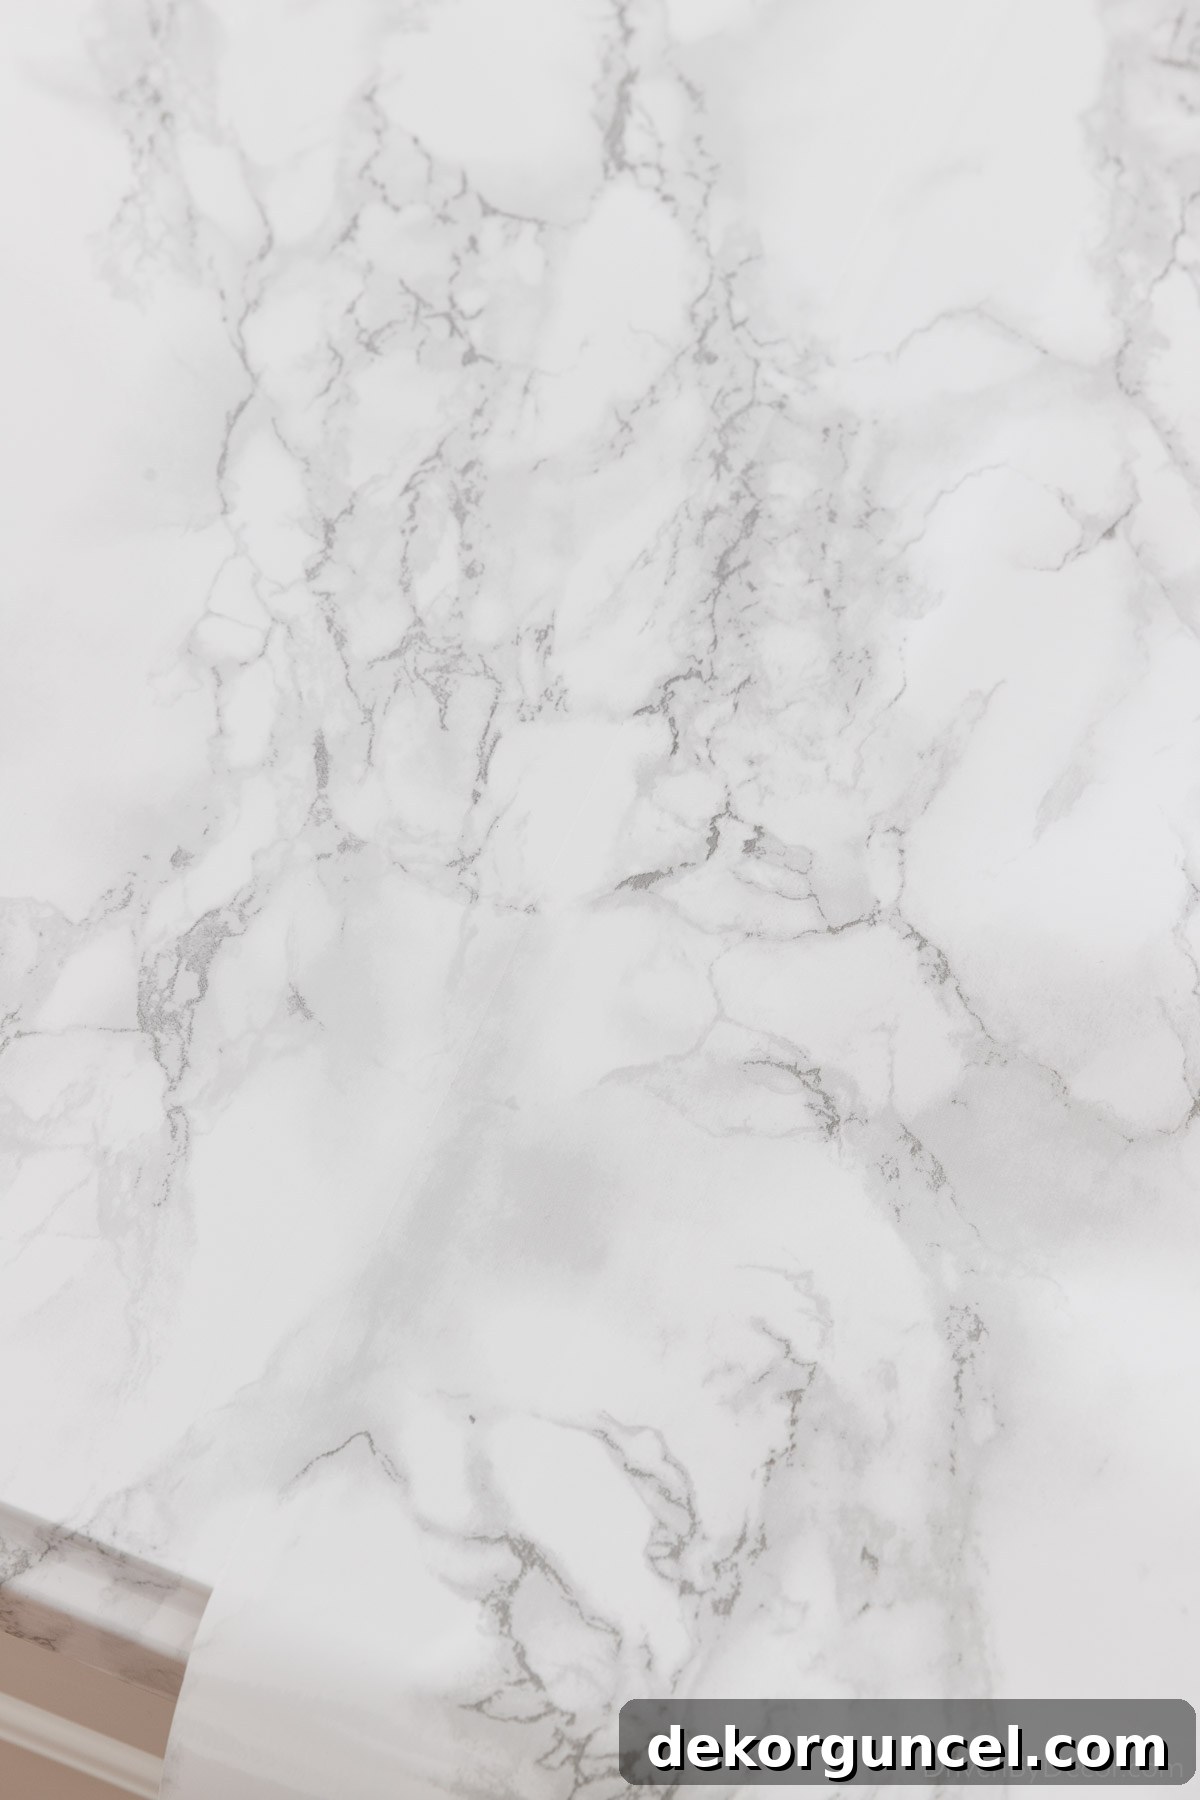
When completed, the seam line will be visible if you actively search for it, and its prominence can vary depending on the viewing angle and lighting. However, the beauty of pattern matching is that the seam generally blends in quite well and doesn’t immediately “jump out” at casual observation, creating a much more cohesive and high-end appearance than misaligned pieces.
If your kitchen includes a short backsplash made of the same countertop material, as ours does, this presents another area where you will likely encounter a seam. I applied the contact paper to the backsplash separately from the main countertops. I used the exact same technique here: meticulous pattern matching and an overlap of approximately ⅛ to ¼ inch between the two pieces. The result was equally discreet; the seam where the backsplash and countertop meet is hardly noticeable from a distance:
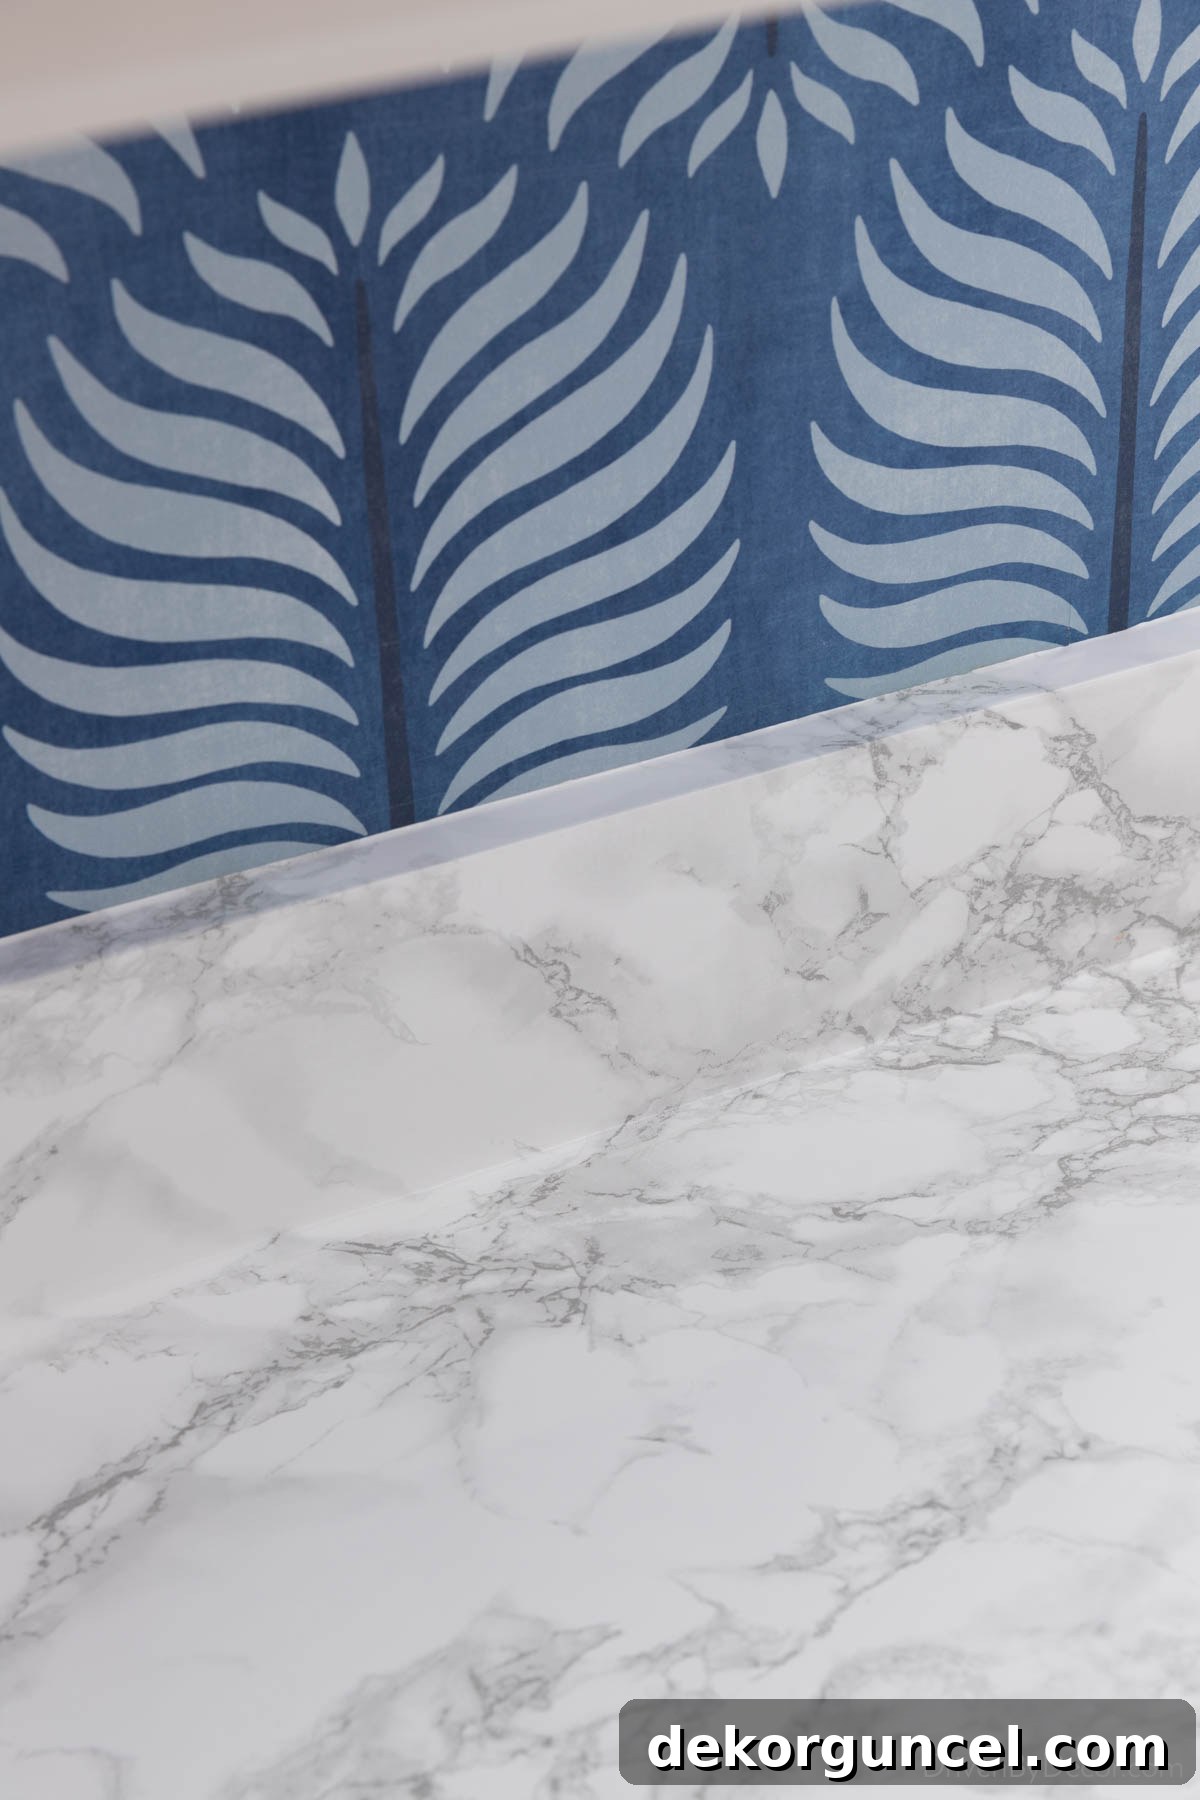
However, upon close inspection, particularly when you know where to look, you can indeed discern the fine line of the seam:
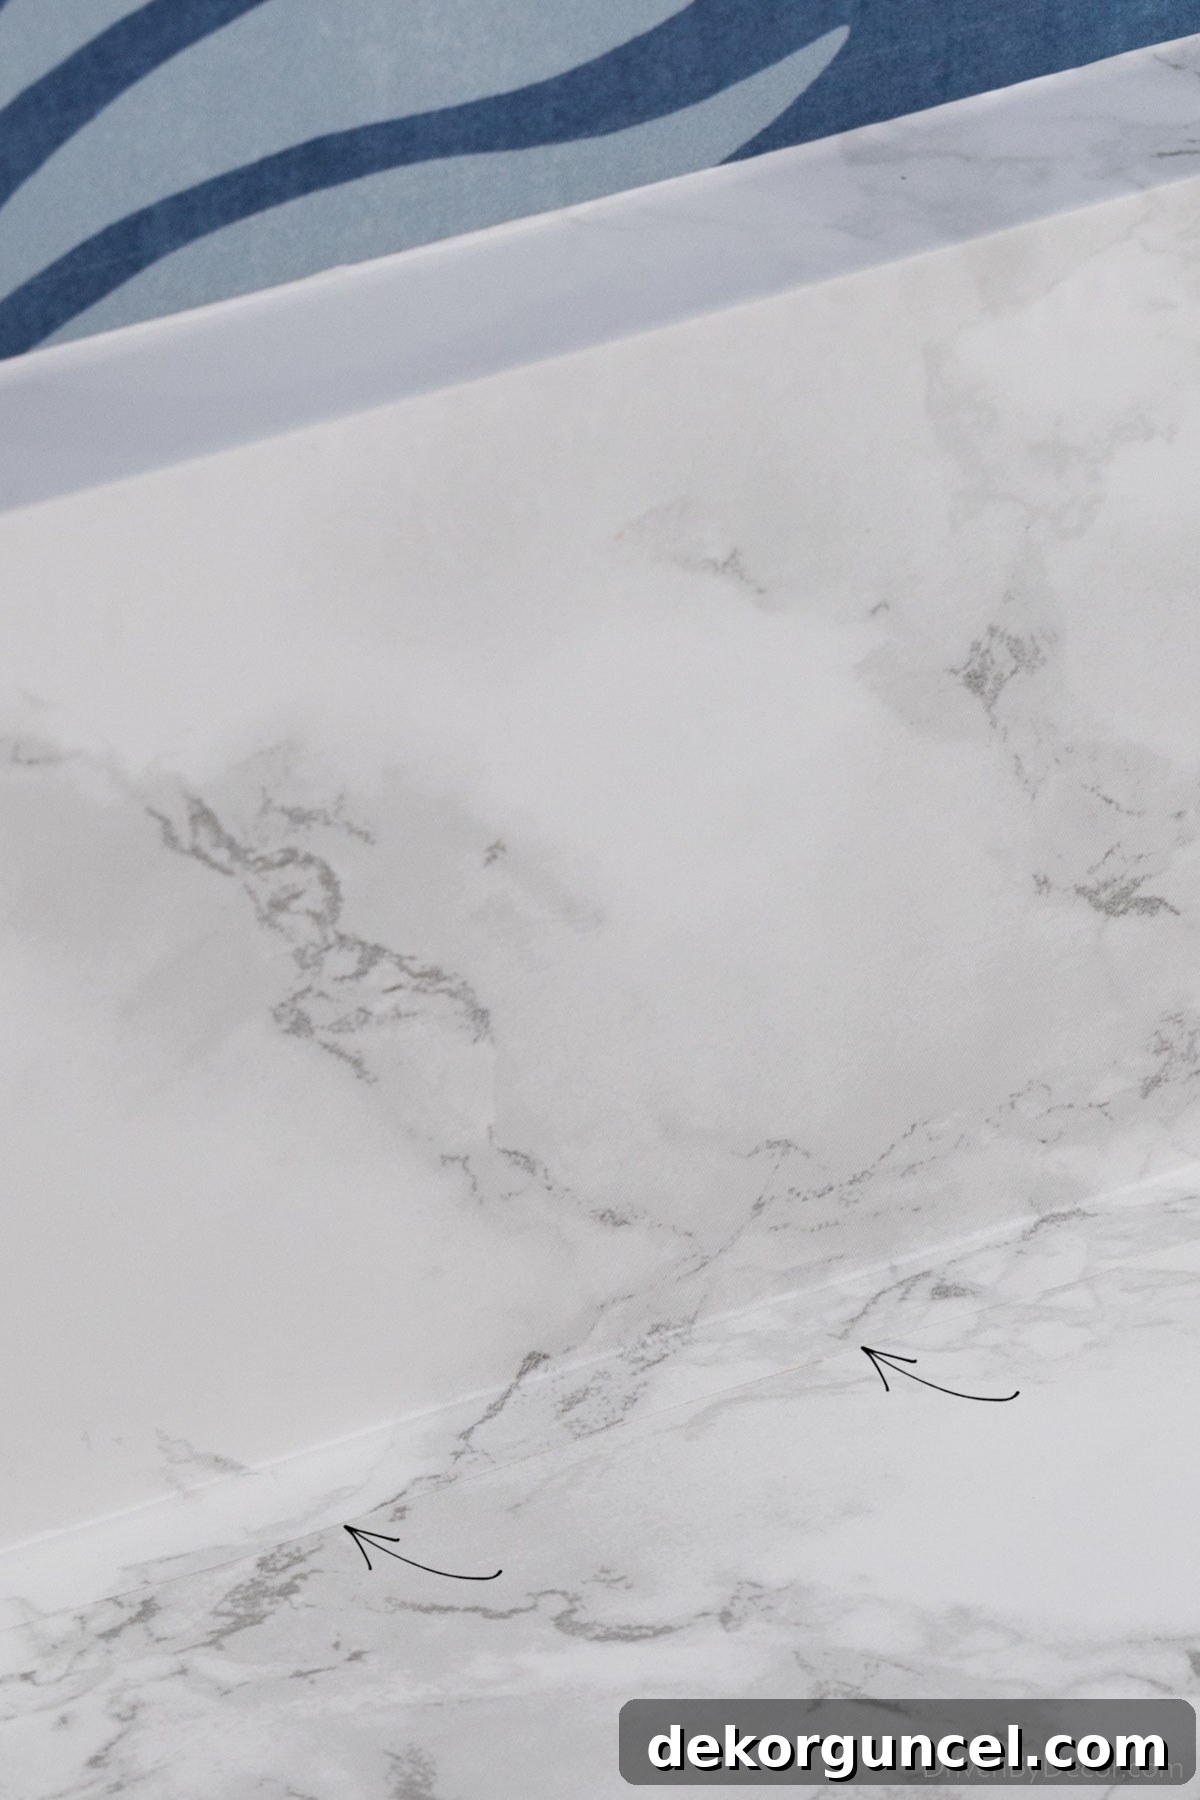
How to Seamlessly Apply Around the Sink Area
Applying contact paper around a sink can seem daunting, but it’s entirely manageable with the right strategy. The most effective approach is to use two separate pieces of contact paper, one originating from the left side of the sink and another from the right, with both meeting seamlessly in the middle. This method is often employed even with traditional countertop materials like laminate or granite, where seams are commonly found at the front of the sink.
Just as you meticulously used your smoothing tool and utility knife to trace and cut along the back edge of your countertops, you will apply the same precision around the edges of your sink basin. Begin with one of the side edges of the sink. Carefully push your smoothing tool into the narrow space where the sink meets the countertop, creating a precise crease in the contact paper. Then, use your utility knife to trim off the excess contact paper along this crease, ensuring a snug and clean fit. Proceed to work your way around the front and back edges of the sink, repeating this process for each section.
Once one side is complete, repeat the entire process from the opposite side of the sink. The two pieces of contact paper will eventually meet, and you can create a subtle seam at the front and back of the sink. By carefully aligning the patterns and trimming precisely, these seams can be made very discreet, ensuring your sink area looks polished and professionally finished.
Before & After Photos: Witness the Transformation!
And with all those careful steps completed… our beautiful marble contact paper countertops are finally done! This incredibly simple DIY project completely revitalized our kitchen desk area, transforming it from its original look:
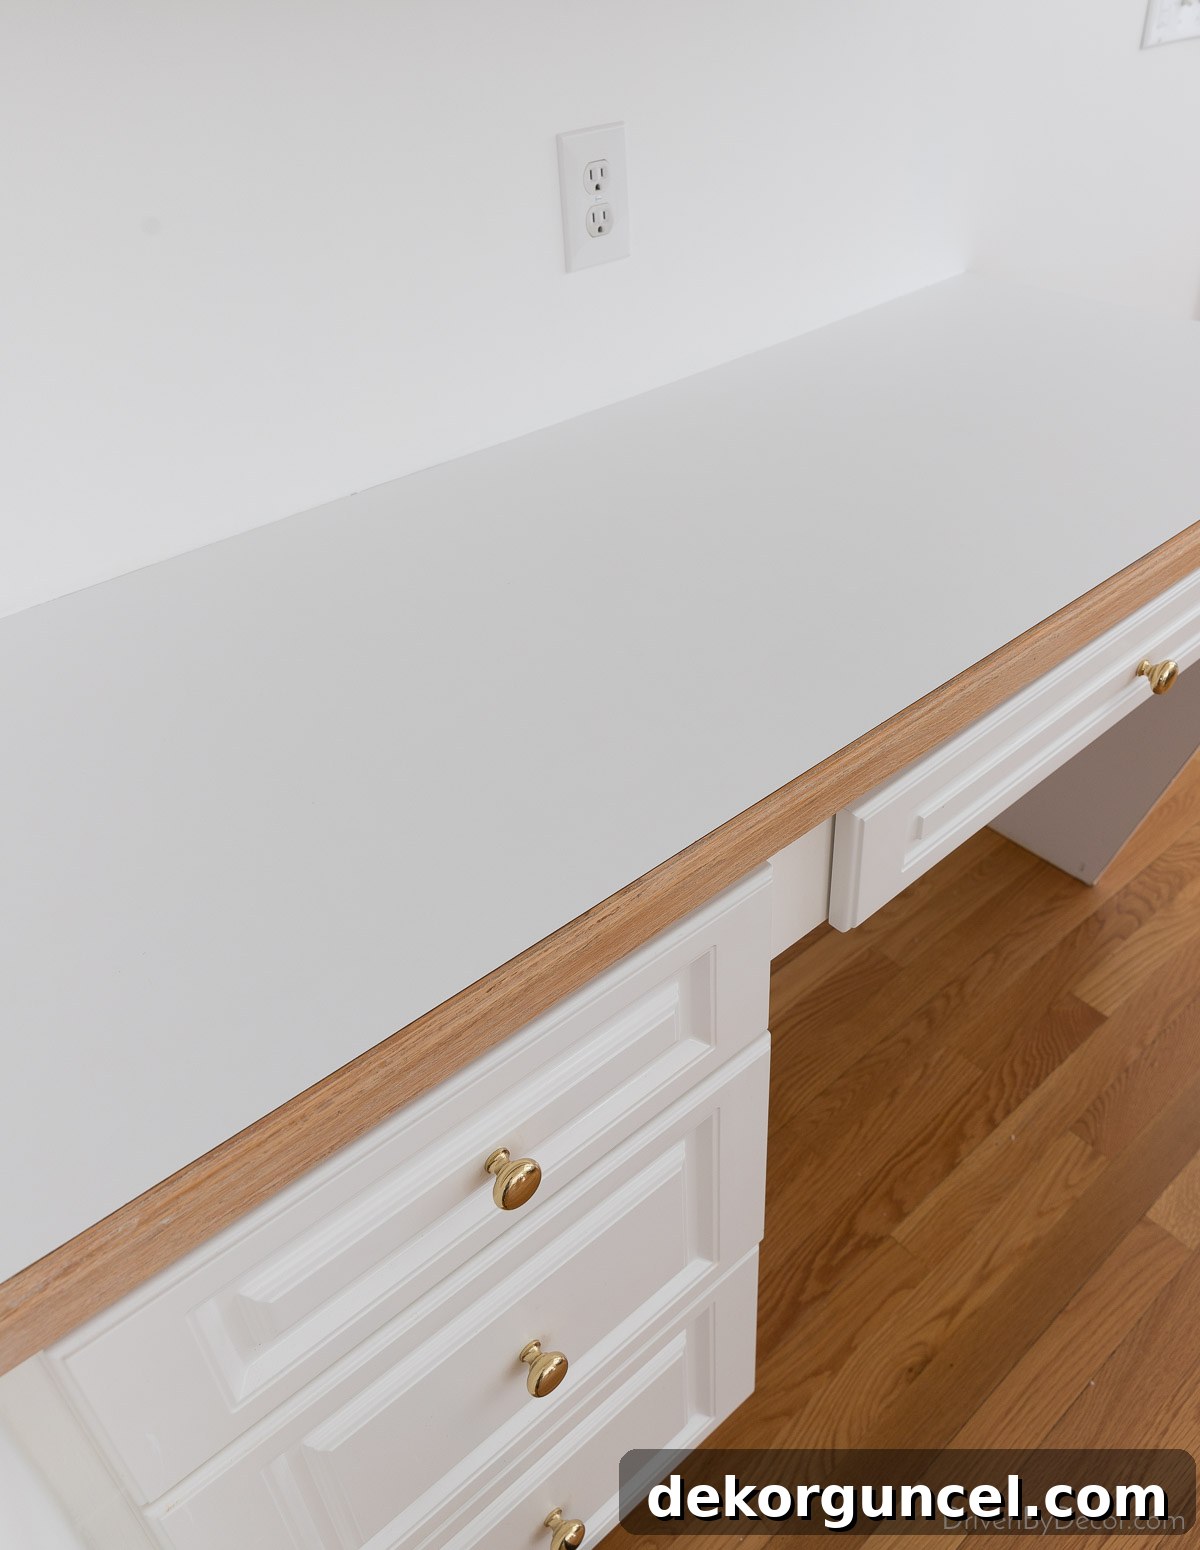
to this stunning, refreshed space, all accomplished with approximately just an hour of dedicated work! It’s incredible what a difference a simple material can make:
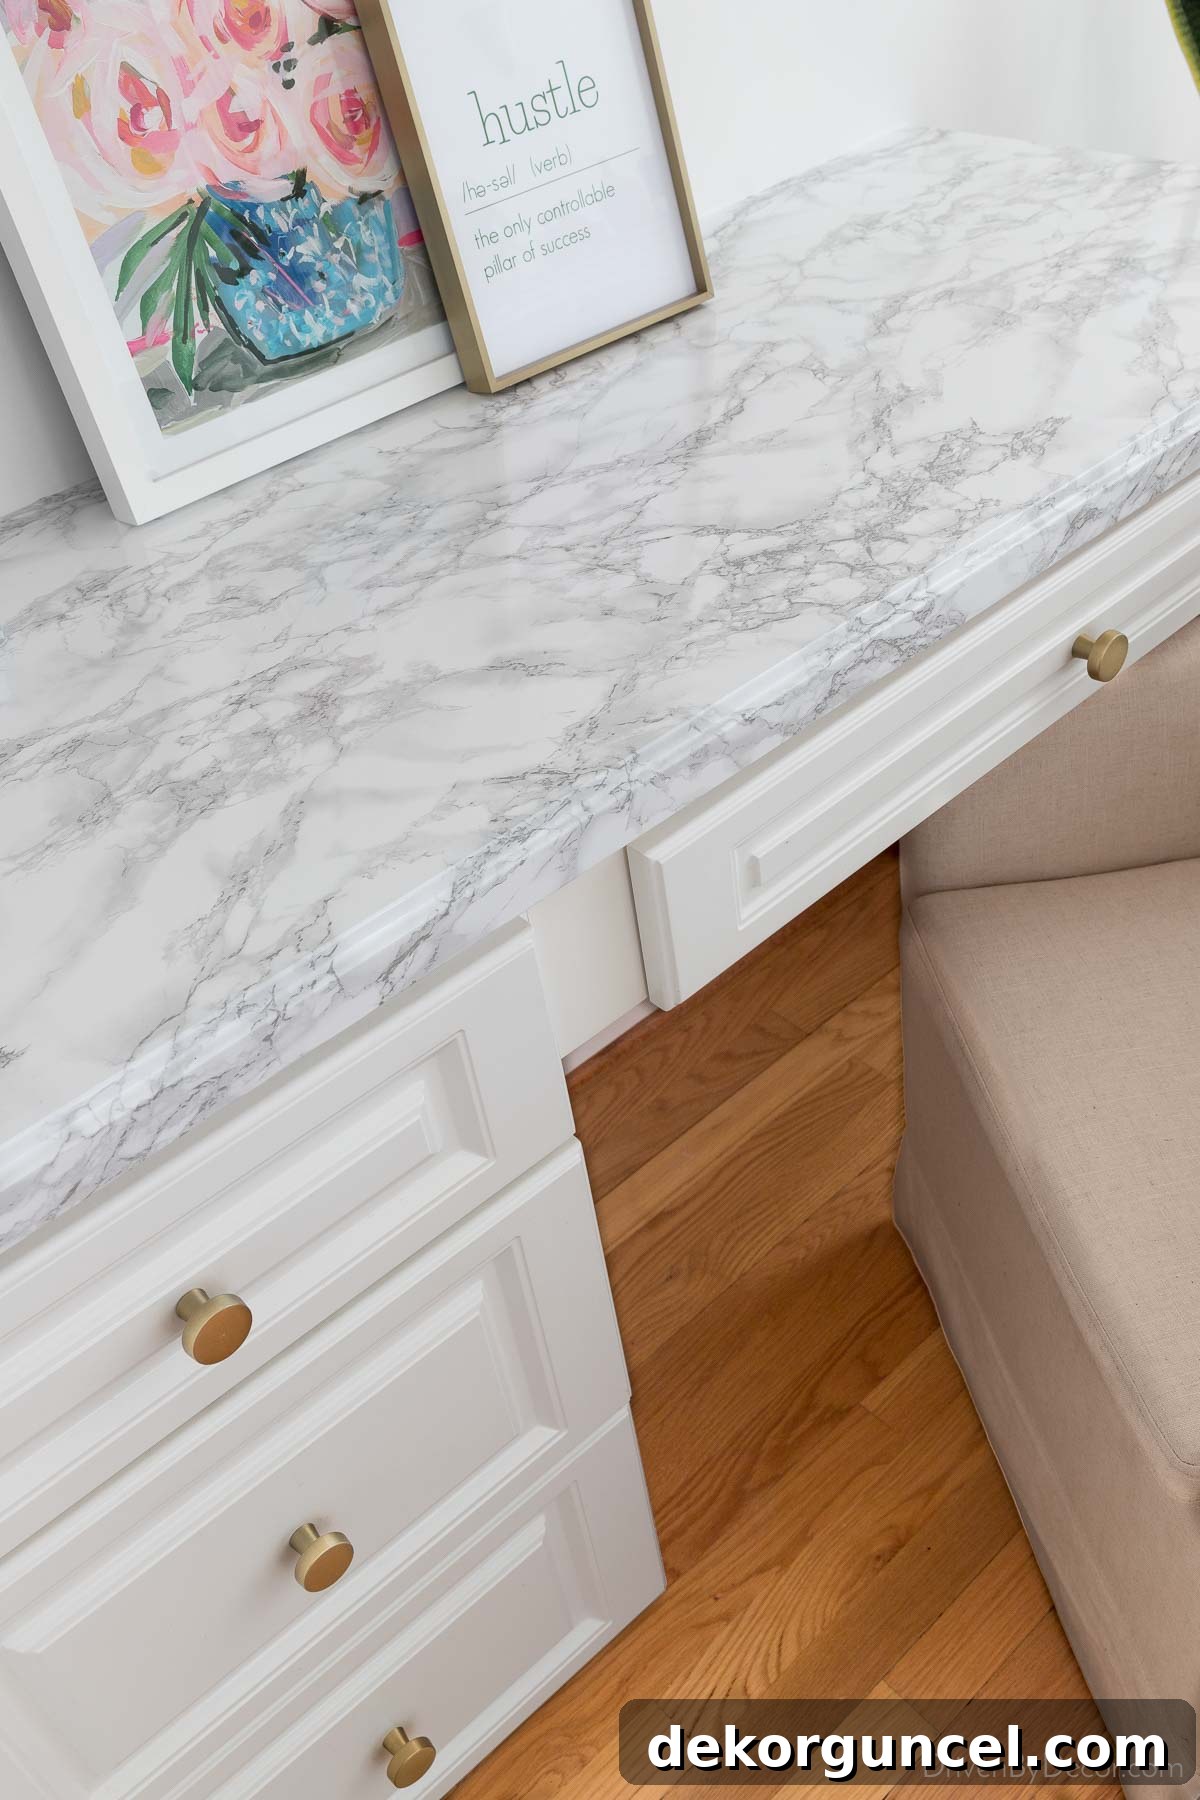
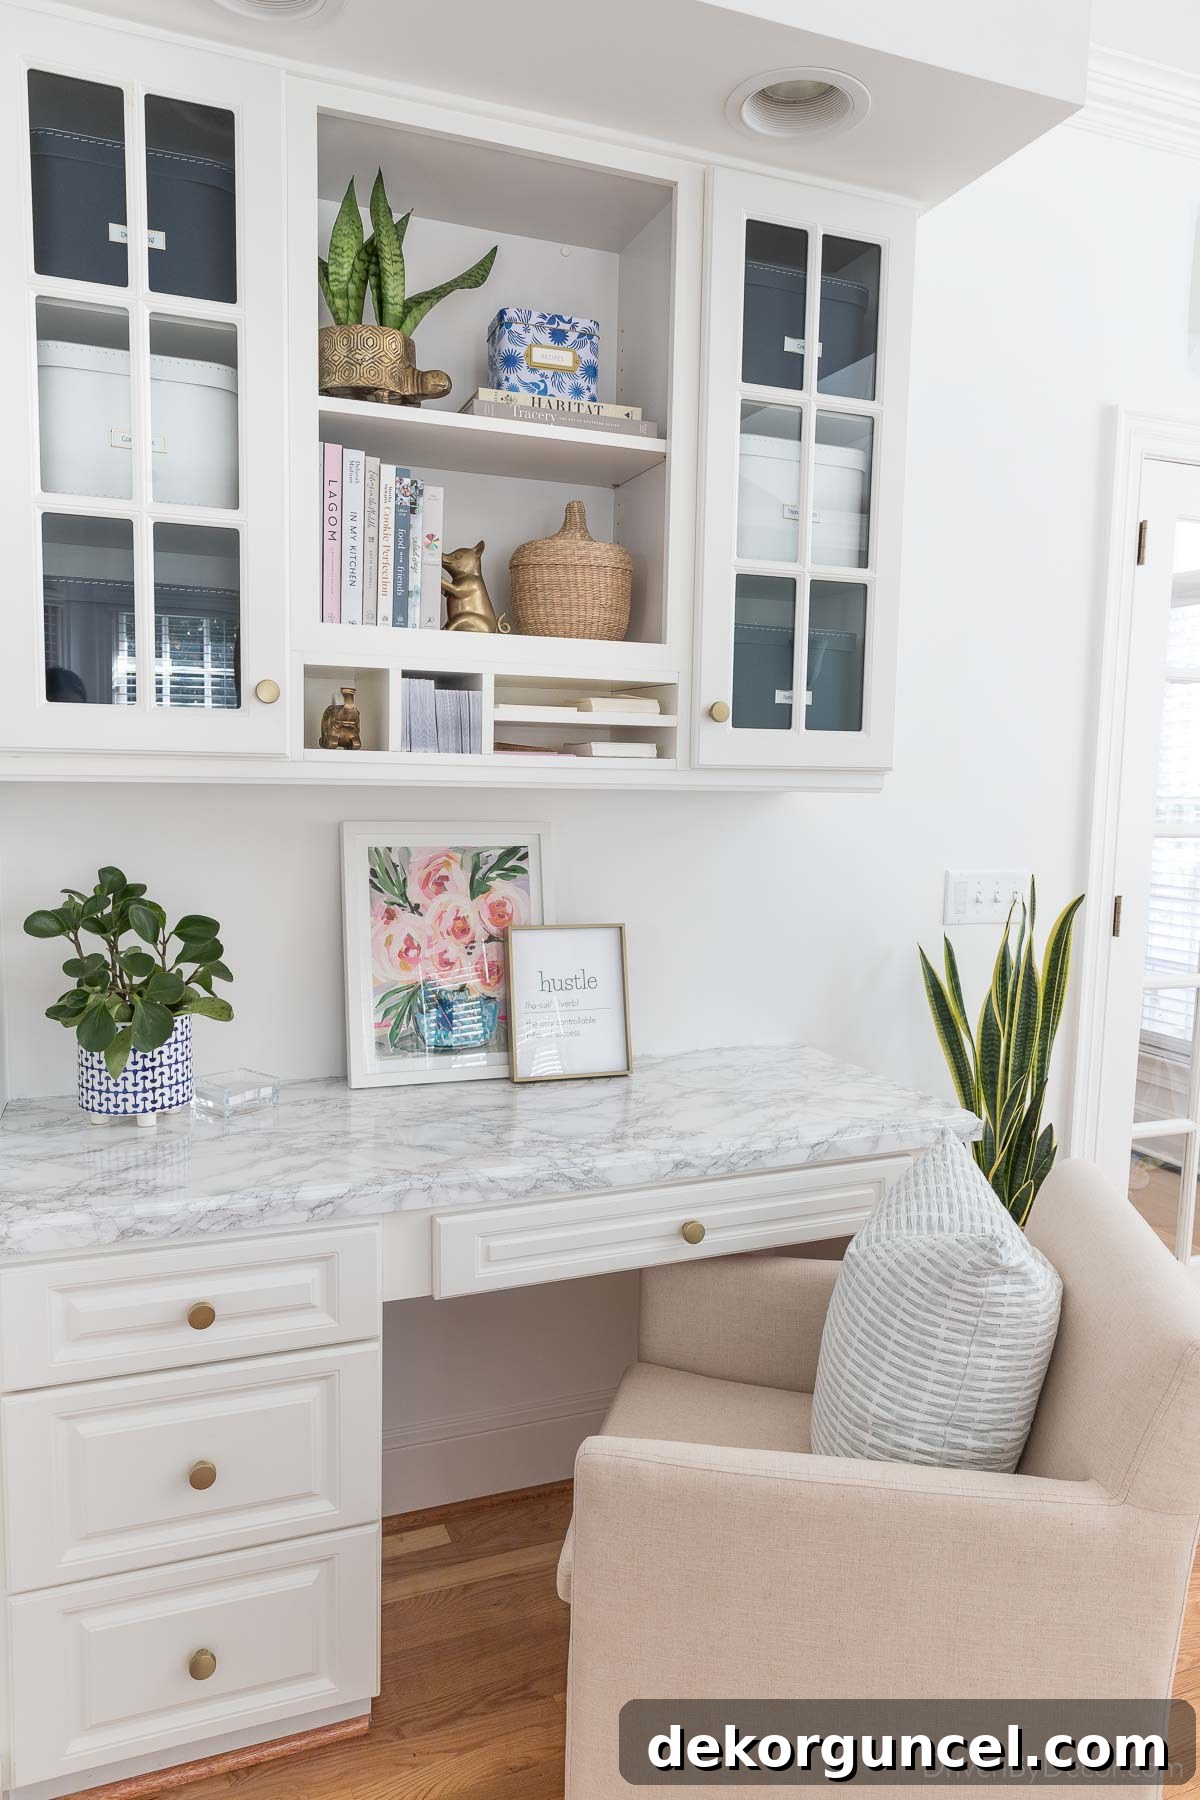
Desk Area Decor Sources: Charming brass turtle planter | Stylish recipe tin (similar) | Elegant brass pig bookend | Decorative woven basket set (similar) | Functional navy storage boxes | Crisp white storage boxes | Blue & white ceramic planter (similar) | Clear acrylic post-it holder | Vibrant floral art print | “Hustle” print – self-made | Comfortable upholstered rolling armchair | Textured pleated pillow cover | Sleek drawer knobs
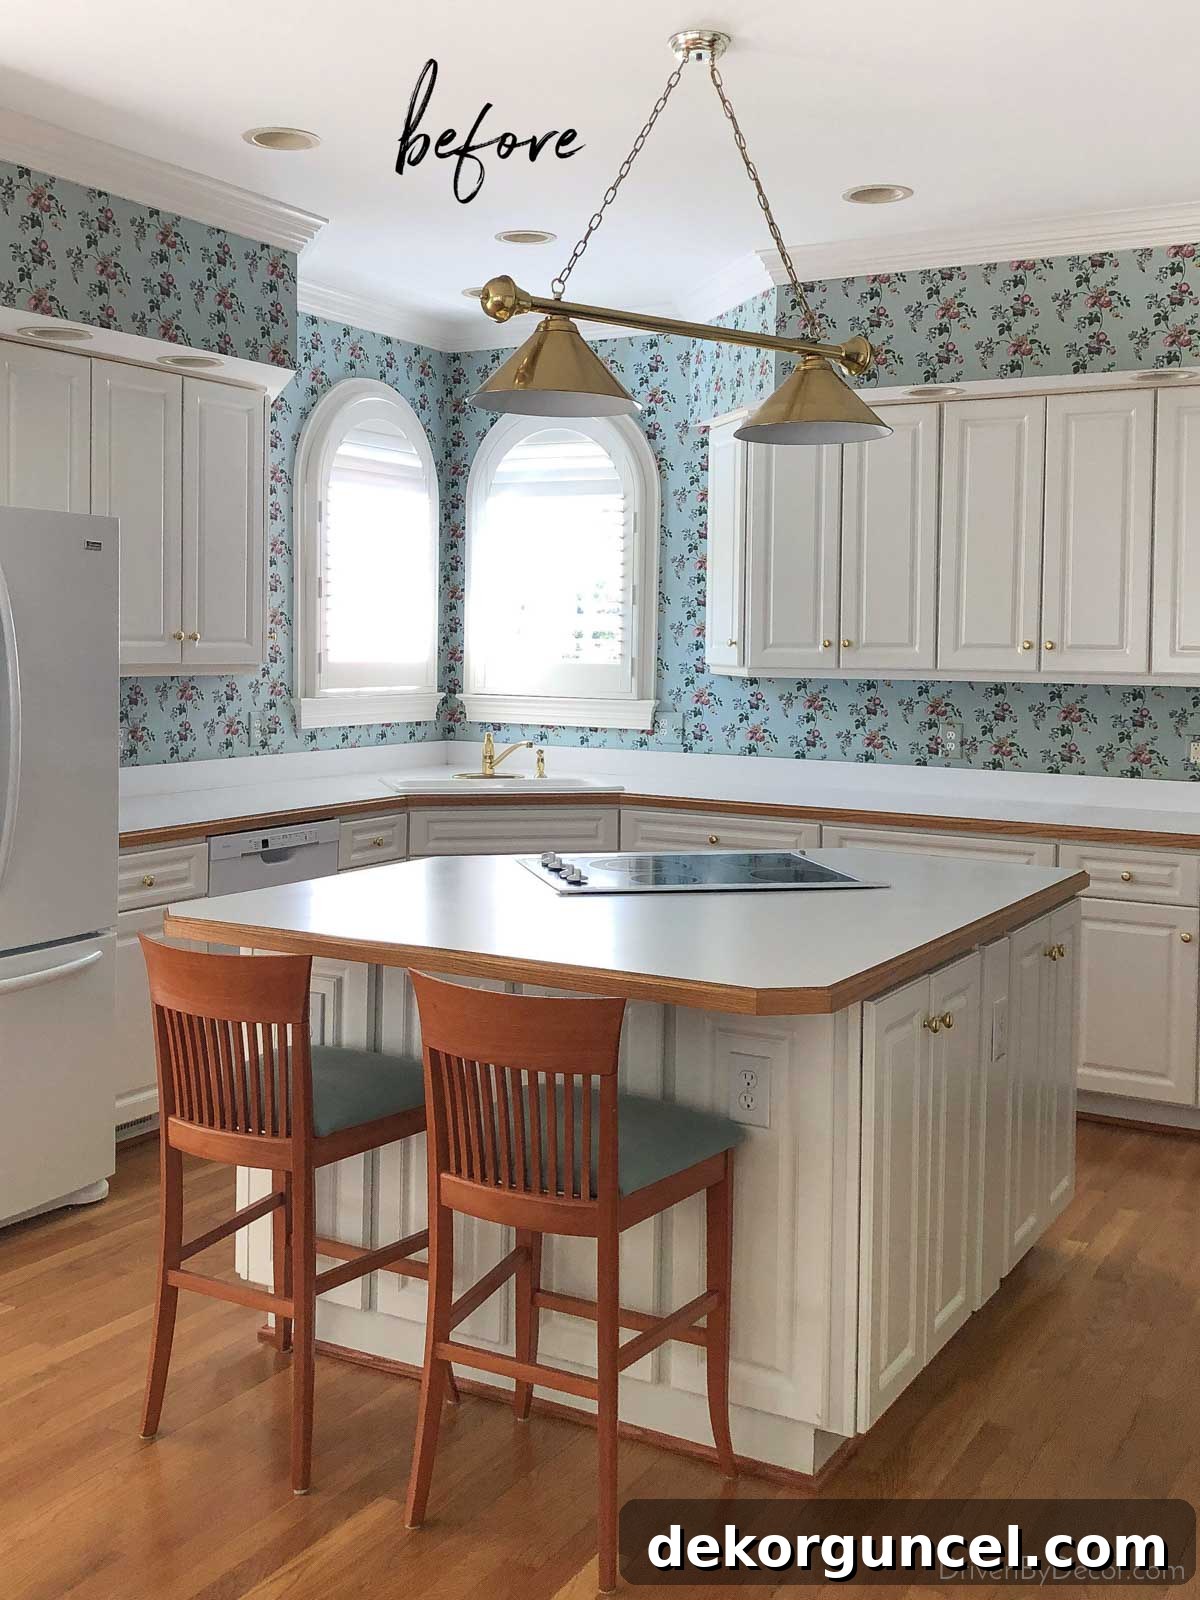
And our entire kitchen, once looking quite tired:
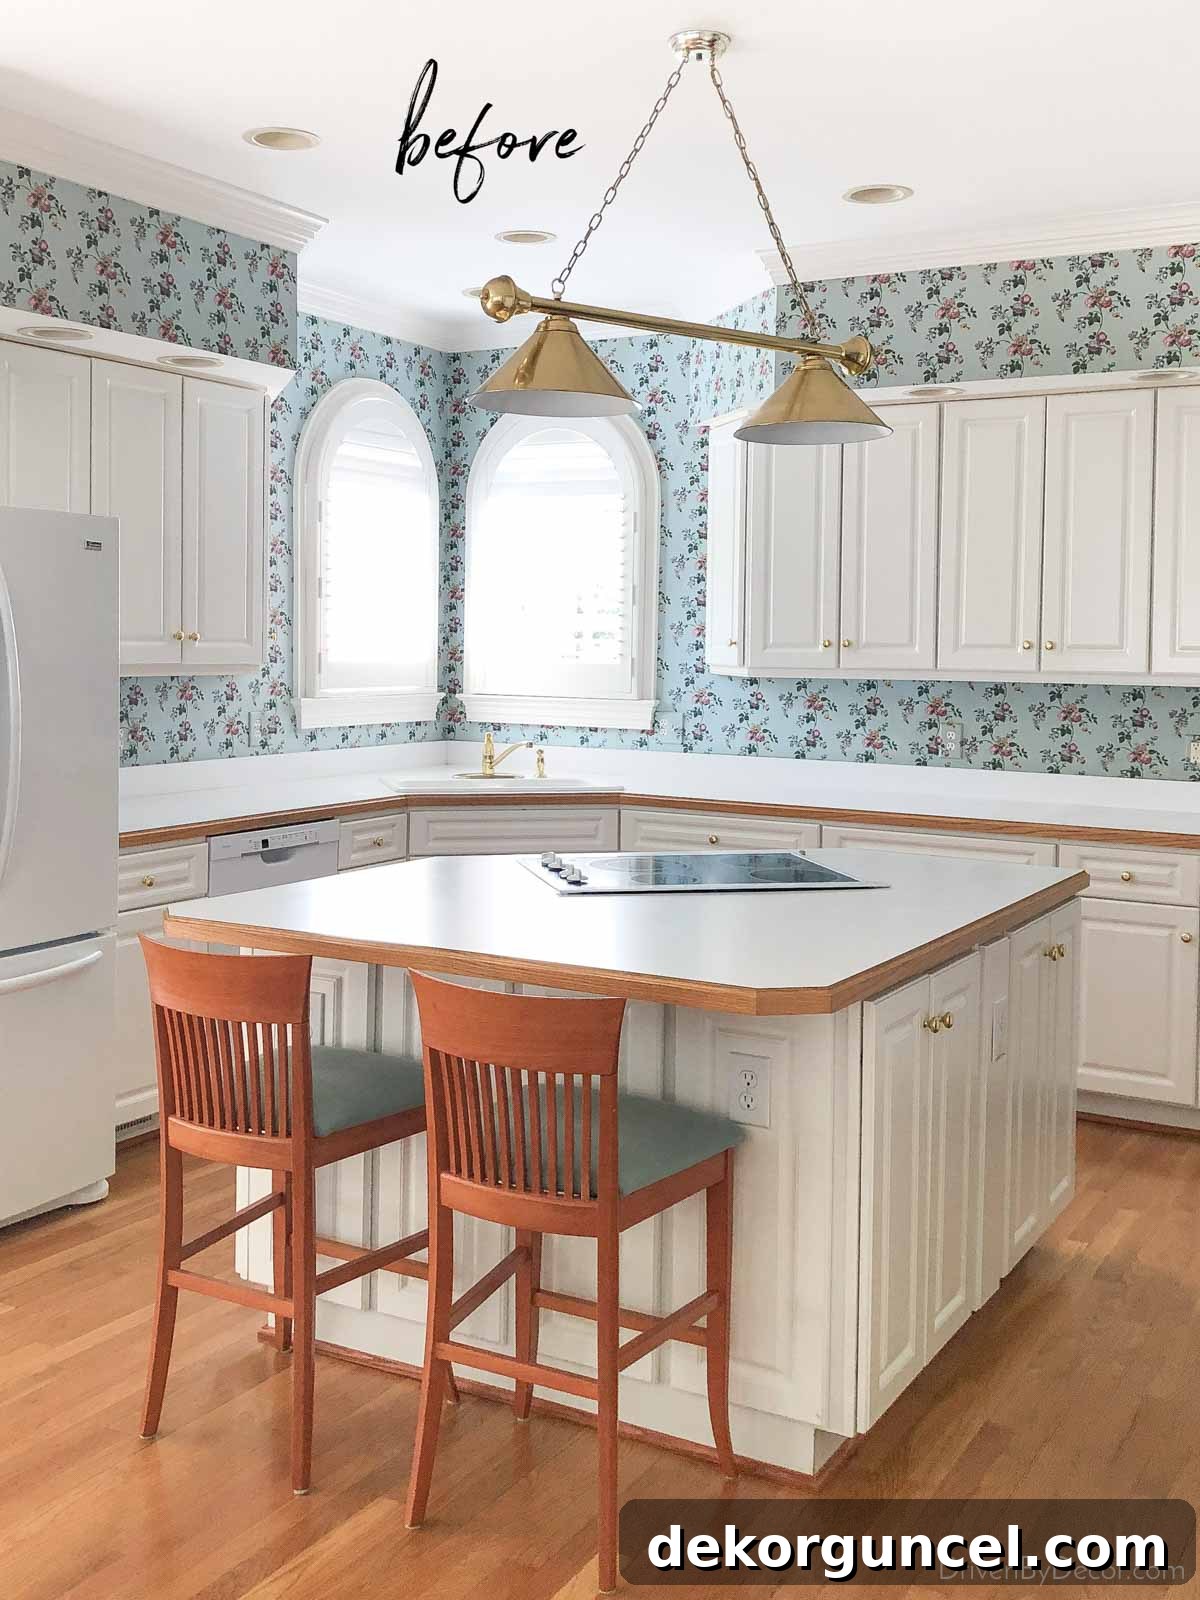
now boasts this revitalized appearance, achieved with approximately 7-8 hours of total work across all areas:
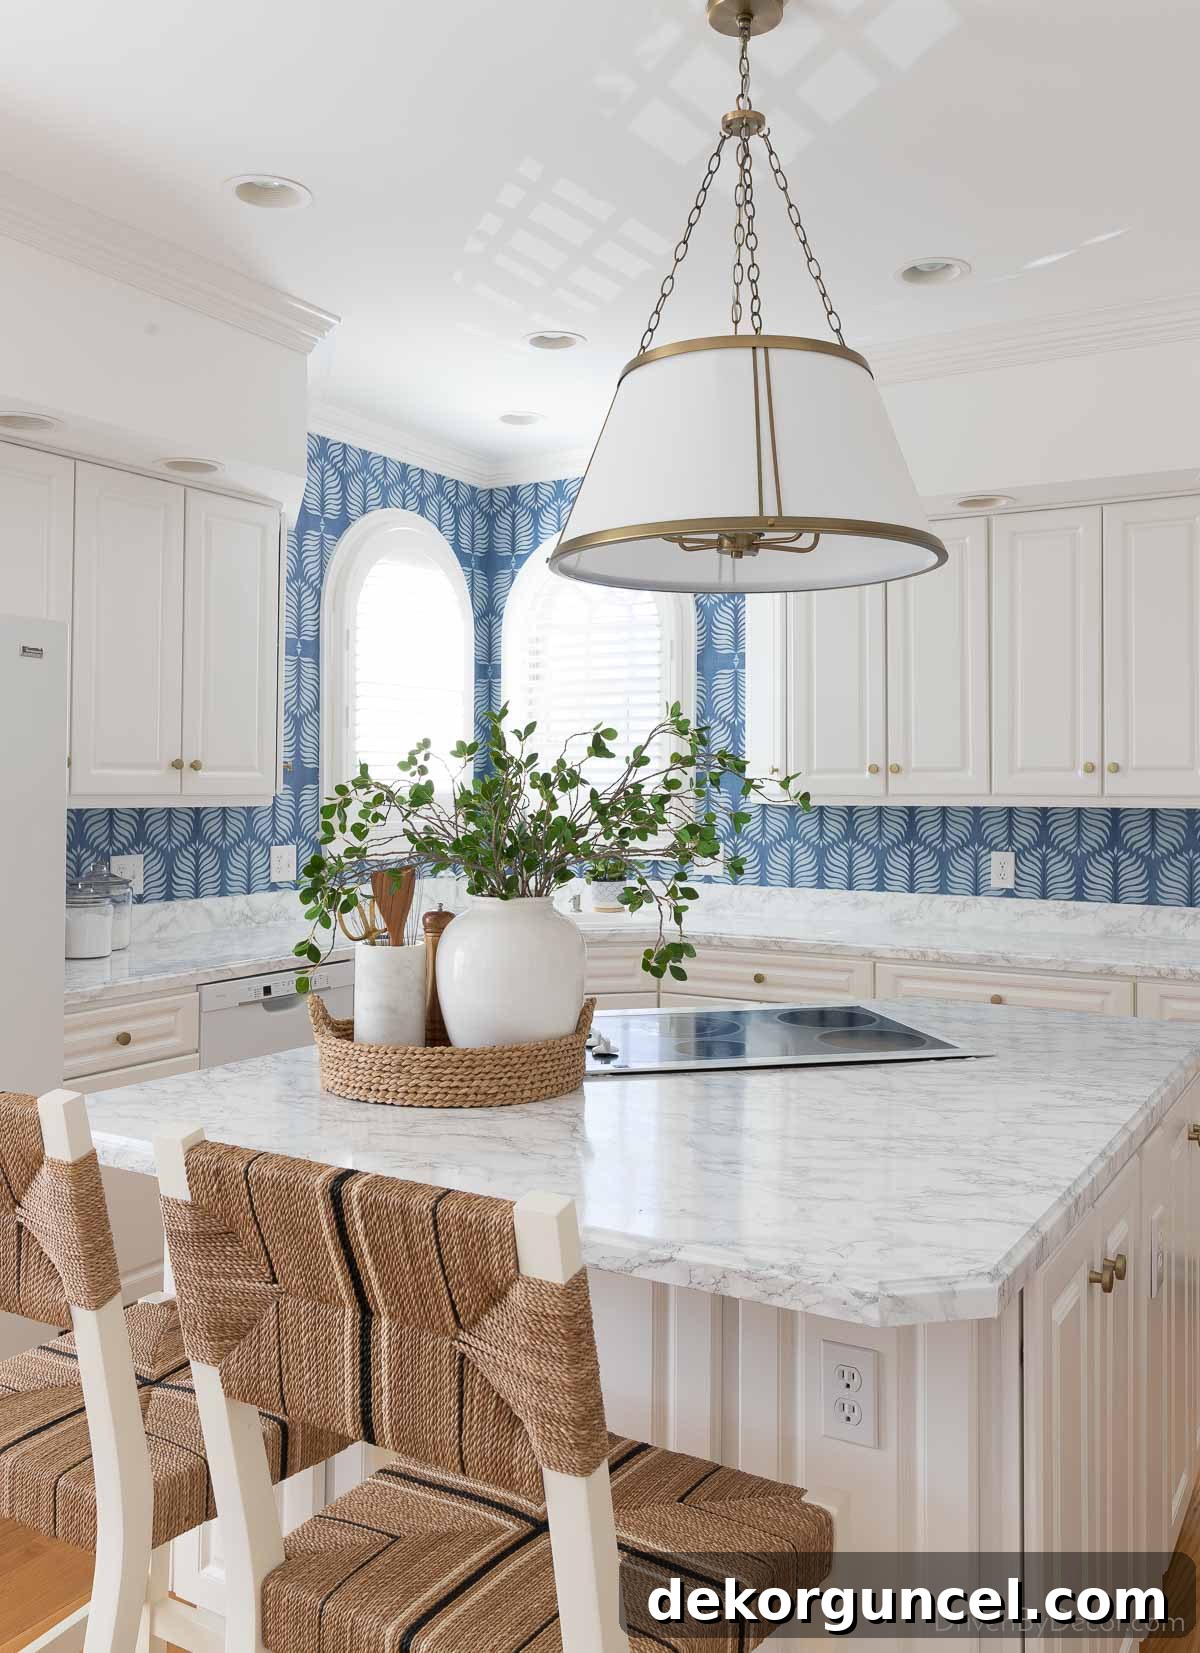
I am absolutely thrilled with how both these spaces turned out. I only wish I could extend this magic to our outdated bathroom countertops as well. Unfortunately, both bathrooms feature integrated sinks made of the same material as the countertops, making contact paper application unsuitable. However, our bathrooms are high on this year’s renovation priority list, so I won’t have to endure their current look for much longer!
Care & Maintenance of Marble Contact Paper Countertops: A 3-Year Review
Update: I’ve now had my marble contact paper countertops for approximately three years, and I’m excited to share a comprehensive update on their durability and performance!
Overall, I can confidently say they have held up absolutely beautifully! Prior to installation, I mentally prepared myself for some inevitable peeling or wear-and-tear over time, anticipating that after a year or two, they might start to look a bit shabby. To my astonishment and immense satisfaction, there has been absolutely zero peeling, and no tears or significant damage whatsoever! I remain incredibly impressed and genuinely happy with how resilient and stunning they’ve proven to be.
Beyond their durability, maintenance has been surprisingly simple. In fact, my old white laminate countertops were a constant battle to keep clean, prone to staining at the slightest spill. In contrast, our contact paper countertops have actually been easier to maintain. Almost every spill or mark I’ve encountered has wiped away effortlessly with a damp cloth and mild cleaner. The primary exception has been certain highly pigmented, red or orangey sauces, such as spaghetti sauce or a particularly vibrant cumin-based sauce I once made. These could leave faint traces if not addressed quickly. For these tougher “stains,” I found that a combination of a little elbow grease, a Magic Eraser, and a dab of liquid Bar Keepers Friend worked wonders, completely removing the discoloration without harming the paper.
It’s important to remember, as I knew before covering my countertops, that these are vinyl surfaces. Therefore, you cannot place hot pans directly on them, as the intense heat would undoubtedly melt the vinyl. Similarly, cutting directly on the contact paper surface is a no-go; always use a cutting board to protect your beautiful new finish. For me, these precautions didn’t alter my kitchen routine, as I had the same restrictions with my previous laminate countertops. However, if you’re upgrading from a heat-resistant surface like granite or natural marble, this might require a slight adjustment to your habits.
When Marble Contact Paper Might Not Be the Ideal Solution
While marble contact paper offers an incredible budget-friendly transformation, it’s not a universal solution for every countertop scenario. Understanding its limitations will help you decide if it’s the right choice for your specific project.
Firstly, covering any truly rounded areas, such as an island with a significantly curved end or a circular table, would likely not yield satisfactory results. The rigid nature of the contact paper makes it extremely difficult to conform smoothly to tight, continuous curves without creasing, bubbling, or visible seams. If you have such features, a different renovation approach would be advisable.
Secondly, if you’re considering this for a bathroom countertop, it is generally unsuitable for surfaces that feature an integrated sink. An integrated sink is one where the countertop and sink basin are molded as a single, continuous piece of the same material. The complex curves and seamless transitions of such a design make it virtually impossible to apply contact paper without noticeable seams, wrinkles, or compromised adhesion around the basin.
Lastly, and as previously mentioned, contact paper is fundamentally made of vinyl and therefore lacks the inherent heat resistance of natural stone like granite or actual marble. If your kitchen habits involve frequently taking hot pots and pans directly from the stove or oven and placing them onto your countertop surface, this solution is not for you. You must always use trivets or hot pads to protect the vinyl from heat damage.
Removing Contact Paper from Your Countertops: A Simple Process
One of the significant advantages of using contact paper for a temporary countertop refresh is its reversibility. When you’re ready for a change, or if a full renovation is on the horizon, removing the contact paper is a straightforward process that typically causes no damage to the underlying surface.
The trick to easy removal is to gently heat the contact paper as you peel it off. Using a hairdryer on a medium setting, direct warm air onto a section of the paper for about 10-20 seconds. The warmth helps to soften the adhesive, making it less tenacious and allowing the paper to peel away much more smoothly and cleanly. Start at a corner and slowly peel back the paper, continuously applying heat just ahead of where you are peeling. If you encounter any sticky residue left behind, a gentle adhesive remover or a cleaner like Goo Gone can effectively clean the surface without causing harm to most laminate or stone countertops.
As our kitchen remodel is now just a few weeks away, I plan to remove a section of the contact paper soon to confirm the removal process and will certainly report back with my findings and any additional tips! I genuinely hope you found today’s post inspiring and informative. I always appreciate you stopping by! For more fantastic ideas, be sure to check out my post featuring several other kitchen remodel ideas on a budget, or explore some of my other past DIY projects for more home improvement inspiration.
Have a wonderful week, and happy decorating!
