
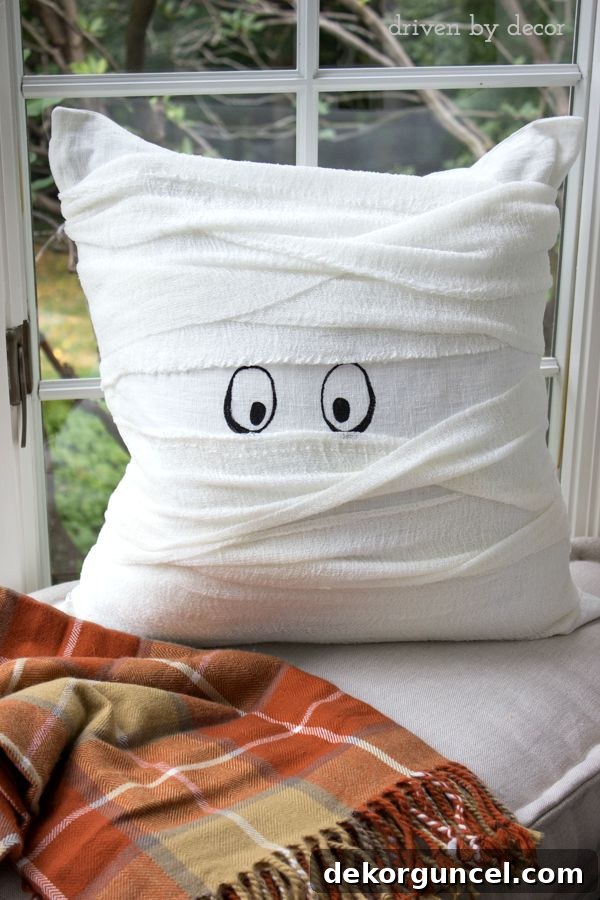
DIY Halloween Mummy Pillow: Spooky, Simple & Kid-Friendly Home Decor
As the air grows crisp and the leaves begin to turn, there’s an undeniable excitement that fills our homes, signaling the approach of Halloween! This magical time of year calls for cozy nights, spooky stories, and, of course, enchanting decorations. While store shelves are brimming with fantastic Halloween finds, there’s a unique joy and satisfaction in crafting your own seasonal accents. Inspired by the charming, yet often pricey, decor found in high-end stores like Pottery Barn, we’re thrilled to share a super simple, budget-friendly DIY project that will add a touch of playful spookiness to your home: a delightful mummy pillow!
This project is not only incredibly easy, requiring minimal supplies and skill, but it’s also a fantastic activity to enjoy with children. Imagine their delight in helping create a unique Halloween decoration that everyone can admire. It’s a wonderful way to foster creativity and spend quality time together, all while adding a handmade touch to your seasonal setup. Get ready to transform a simple pillow cover into an adorable, ghostly ghoul in just a few straightforward steps!
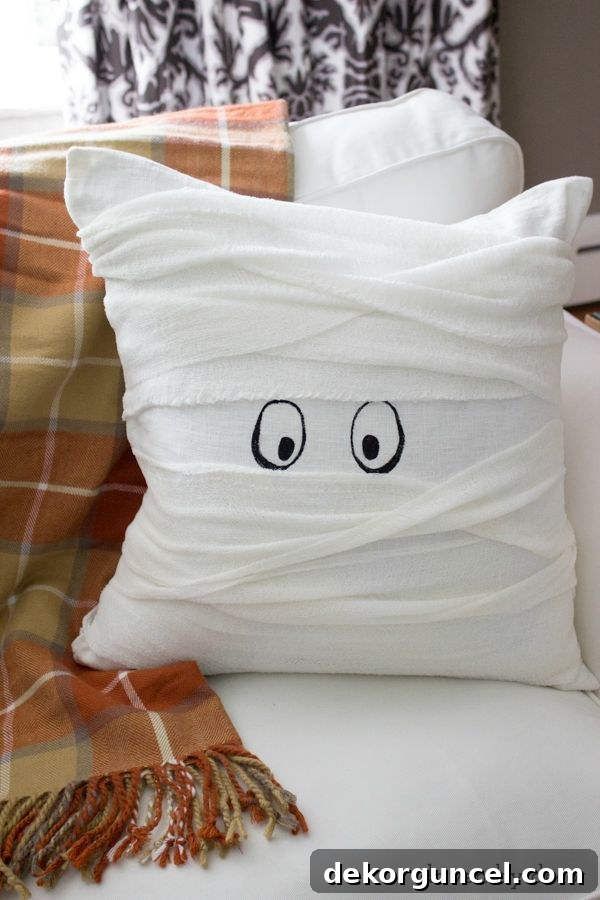
Why Choose a DIY Mummy Pillow for Your Halloween Decor?
In a world full of mass-produced decorations, a DIY mummy pillow stands out. It’s more than just a piece of decor; it’s a conversation starter, a testament to your creativity, and a personalized touch that store-bought items simply can’t replicate. Here’s why this project is a must-try for your Halloween festivities:
- Budget-Friendly: Recreate a high-end look without the hefty price tag. Most supplies are inexpensive and readily available, making this an ideal budget Halloween decoration.
- Customizable: While we’re going for a classic mummy look, you can easily adapt this project with different colored gauze or paint if you wish to personalize it further, making your spooky home accents truly unique.
- Kid-Friendly Fun: The simplicity of painting eyes and wrapping makes it an ideal craft for kids of all ages. It’s a great way to engage them in holiday preparations and enjoy a fun kid-friendly Halloween DIY.
- Quick & Easy: This project comes together in under an hour, making it perfect for busy schedules or last-minute easy Halloween decor ideas. It’s a no-sew mummy pillow, which simplifies the process even more!
- Charming & Spooky: The finished product is irresistibly cute and perfectly captures the playful spirit of Halloween without being too frightening, adding character to your Halloween throw pillow collection.
Gather Your Essential Supplies: What You’ll Need for Your Mummy Pillow Tutorial
One of the best aspects of this DIY mummy pillow is the short and accessible supply list. You likely have some of these items already, or they can be easily found at your local craft store or pharmacy. Here’s a detailed breakdown of everything you’ll need to get started on this simple Halloween craft:
- A White Pillow Cover: We highly recommend the VIGDIS pillow cover from IKEA. At just $7, it’s an absolute steal and provides the perfect blank canvas. Its durable cotton material is excellent for painting and wrapping. If an IKEA store isn’t accessible, any plain white cotton pillow cover of similar size will work wonderfully. The key is a clean, light-colored base that will allow the mummy wrap to stand out, creating an excellent foundation for your handmade Halloween decor.
- Black Craft Paint: A small bottle of acrylic craft paint in black is all you need. Look for paints that are fast-drying and formulated for fabric, if possible, although standard acrylics work fine since the pillow won’t be heavily washed. This will be used to create the mummy’s iconic eyes.
- A Fine Paint Brush: Essential for detailing the eyes. A small, pointed brush will give you the control needed for creating the desired eye shape, ensuring precision while allowing for charming imperfections.
- Two 3-Yard Rolls of Cotton Gauze: This is the “mummy wrap”! Medical-grade cotton gauze from a pharmacy or general-purpose cotton gauze from a craft store will work. We used rolls that were approximately 4.5 inches wide, which provides good coverage. Having two rolls ensures you have enough material to wrap the entire pillow generously, creating that authentic textured mummy look crucial for your Pottery Barn inspired DIY.
- White Medical Tape: This tape is crucial for securing the gauze to the pillow. White tape blends seamlessly with the gauze, making it virtually invisible and maintaining the clean aesthetic of your mummy. It also offers good adhesion without damaging the fabric, making it a key component for a secure Halloween pillow design.
- A Piece of Cardboard: This is a simple but vital tool! Placing a piece of cardboard inside the pillow cover before painting will prevent any paint from bleeding through to the other side of the fabric, protecting your pillow.
Gathering your materials is the first exciting step towards bringing your mummy pillow to life. Once you have everything laid out, the real fun begins!
Step-by-Step Guide: Crafting Your Spooky Mummy Pillow
Now that you have all your supplies ready, let’s dive into the simple steps to create your adorable Halloween mummy pillow. You’ll be amazed at how quickly this project comes together!
Step 1: Painting the Mummy’s Gaze
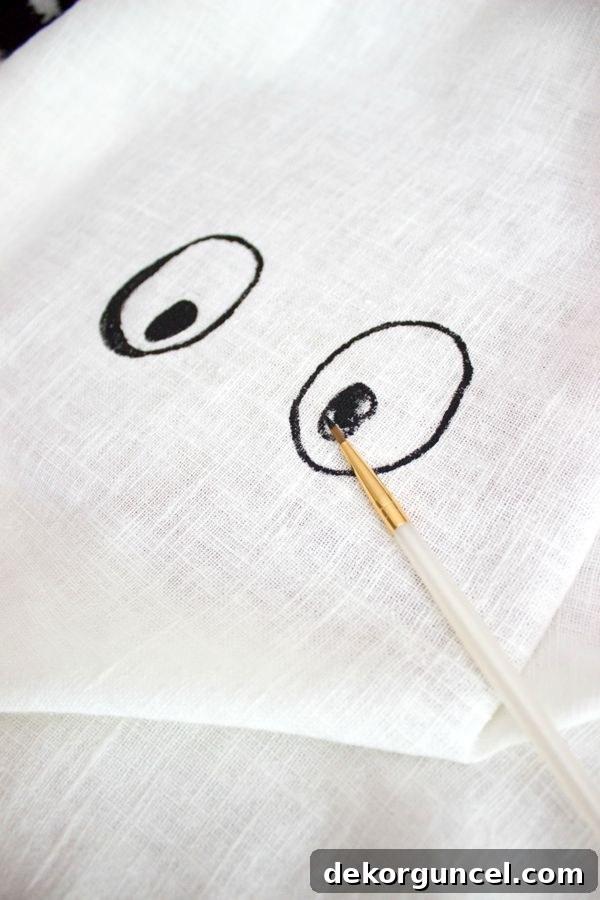
The eyes are the window to the mummy’s soul – or at least, the most defining feature of your pillow! Begin by carefully inserting a piece of cardboard inside your white pillow cover. This acts as a barrier, ensuring that the black craft paint you’re about to use doesn’t seep through to the back of the pillow. Once the cardboard is in place, dip your fine brush into the black craft paint. On one side of the pillow, paint two simple, oval-like shapes for the eyes. Don’t worry about making them perfectly symmetrical or flawless. In fact, a slightly lopsided or uneven appearance will only add to the charmingly eerie character of your mummy! Imperfection often lends itself beautifully to handmade items, giving them a unique personality. Once painted, allow the eyes to dry completely. Thankfully, craft paint usually dries quite quickly, so you won’t be waiting long!
Step 2: Preparing the Gauze Wrap
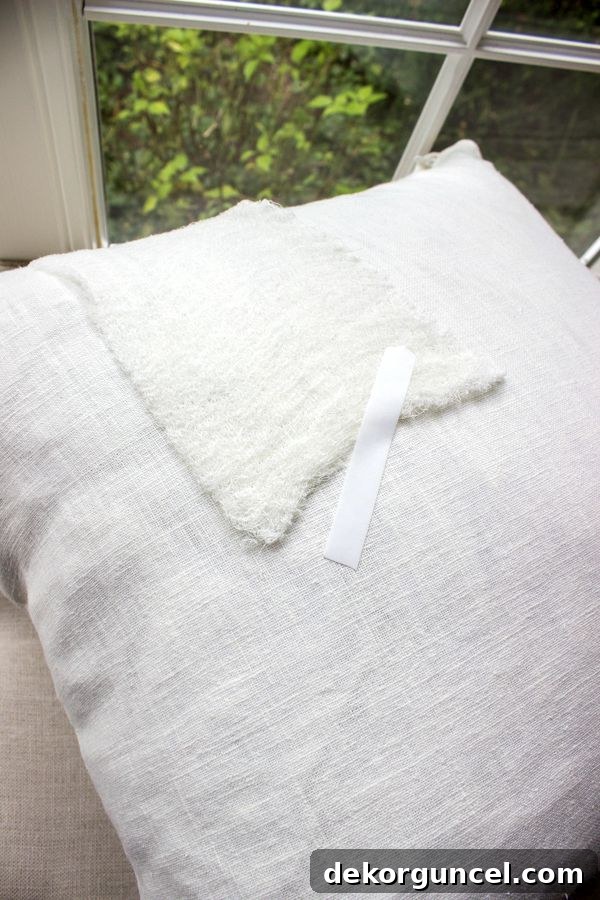
With your mummy’s eyes staring back at you, it’s time to start the wrapping process! Once the painted eyes are fully dry to the touch, take your first 3-yard roll of cotton gauze. Locate an inconspicuous spot on the back of the pillow cover – typically in the middle or near an edge. Take the end of your gauze roll and secure it firmly to the pillow cover using a piece of your white medical tape. The white tape is ideal because it blends seamlessly with the white pillow cover and gauze, ensuring a clean and professional finish that won’t detract from your mummy’s aesthetic.
Step 3: Artfully Wrapping Your Mummy Pillow
Now for the fun part – transforming your pillow into a true mummy! Begin by taking the first roll of gauze, which is now taped to the back of the pillow. Start wrapping it around the top half of the pillow, making sure to cover the painted eyes, leaving just glimpses of them peeking through. As you wrap, don’t be afraid to give the gauze a gentle twist here and there. These twists create texture and depth, mimicking the aged and worn look of ancient mummy bandages. Wrap the gauze several times, overlapping slightly to build up the “mummified” effect. Once you’ve used most of the first roll on the top half, secure the end. You can either tape it to the back of the pillow with another piece of white medical tape, or you can carefully tuck the end into one of the existing loops of rolled gauze for a seamless finish. Whichever method you choose, ensure it’s secure.
Next, grab your second 3-yard roll of cotton gauze. Repeat the exact same wrapping process for the bottom half of the pillow. Start by taping the end of the second roll to the back of the pillow, just as you did with the first. Then, wrap it around the lower section, again incorporating those gentle twists and overlaps to create a cohesive, bandaged appearance. Continue wrapping until you’ve achieved your desired level of mummy-ness, and then secure the end of the gauze roll using tape or by tucking it in. Step back and admire your handiwork! Your adorable, spooky mummy pillow is now complete and ready to bring some festive cheer to your home.
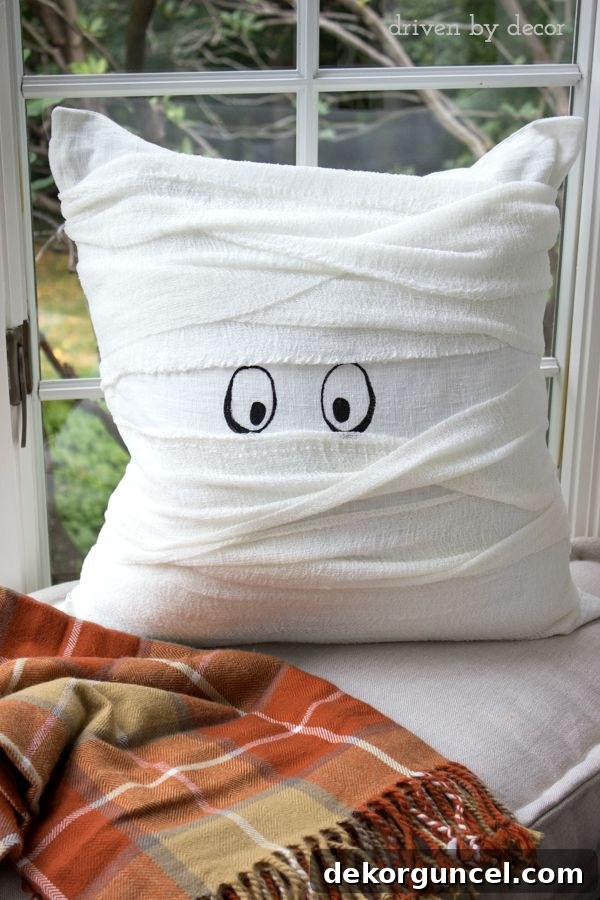
Displaying Your Mummy Masterpiece
Once your charming mummy pillow is complete, the next exciting step is finding the perfect spot to showcase your new Halloween decor! This versatile pillow can instantly elevate any space. Imagine it nestled among a collection of autumnal throw pillows on your living room couch, adding a playful yet sophisticated touch to your fall and Halloween theme. It would look equally delightful propped up on an armchair, greeting guests from an entryway bench, or even adding a touch of festive fun to a child’s bedroom.
Currently, my own living room is undergoing a bit of a transformation, as renovations often entail. My contractor recently demolished our fireplace, and the room is temporarily sectioned off with plastic walls to contain the dust – a necessary evil before it all gets better, right?! This means my poor mummy pillow is currently just propped up on a simple plaid throw. However, this perfectly illustrates how even in the midst of renovation chaos, a little DIY decor can bring a smile and a sense of progress. Patience is a virtue during home projects, and I’m eagerly anticipating the completion of our new fireplace, believing it will be well worth the wait and provide an even more beautiful backdrop for all our future decor endeavors, including this charming mummy!
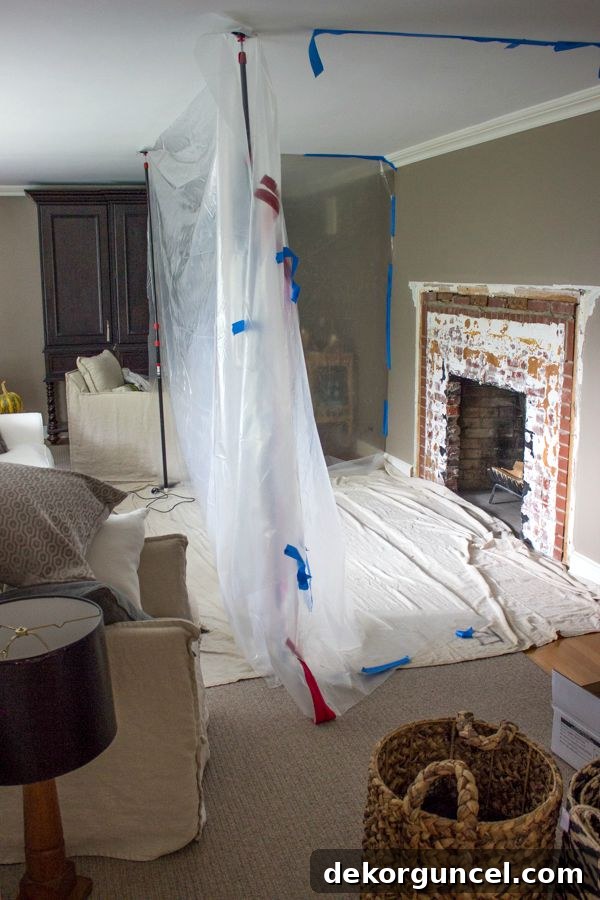
Beyond the Pillow: Expanding Your Halloween Craft Ideas
If you’ve enjoyed crafting this mummy pillow, why stop there? The world of DIY Halloween decor is vast and full of exciting possibilities! Consider expanding your spooky setup with other easy projects that complement your new pillow. You could create ghostly garlands, craft faux potion bottles for a mantel display, or even decorate pumpkins with unique paint designs instead of traditional carving. Mixing and matching handmade elements with store-bought pieces creates a truly personalized and inviting Halloween atmosphere. Remember, the goal is to have fun and infuse your home with your unique festive spirit!
The Joy of DIY: Personal Touches and Family Fun
There’s an unparalleled sense of accomplishment that comes with creating something with your own hands, especially when it comes to decorating your home for the holidays. This DIY mummy pillow project embodies that joy perfectly. It’s a reminder that beautiful, inspiring decor doesn’t always have to come from a high-end store; often, the most cherished pieces are those made with a little creativity and love. Whether you’re a seasoned crafter or just starting, this simple project offers a rewarding experience and a unique addition to your Halloween collection. Embrace the imperfections, enjoy the process, and take pride in your handmade masterpiece!
We hope this tutorial inspires you to add a touch of handmade charm to your Halloween celebrations this year. Enjoy your day, and we’ll see you back here later in the week for more creative ideas!
