
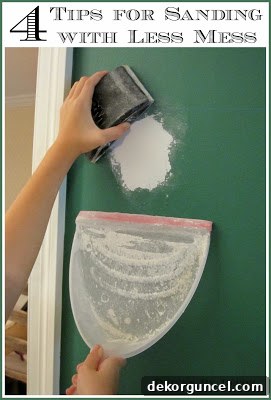
Tired of the pervasive mess? Discover expert techniques for sanding drywall without dust, ensuring a cleaner, healthier home improvement project.
The mere mention of drywall sanding often conjures images of a fine, white powder clinging to every surface, infiltrating every nook and cranny of your home. It’s a notorious byproduct of many renovation and repair projects, transforming a clean space into a dusty landscape in minutes. Whether you’re patching a few nail holes, smoothing out newly skim-coated walls, or tackling a full-room remodel, the challenge remains the same: how to achieve perfectly smooth walls without the accompanying dust disaster.
Having navigated countless sanding sessions myself – from meticulously refining spackled nail holes in a bustling kitchen to painstakingly preparing textured dining room walls for a fresh finish – I can attest to the often-dreaded duo of tedium and mess. The endless back-and-forth motion, combined with the airborne particulate matter, makes drywall sanding one of the least favorite tasks for many DIY enthusiasts and professionals alike. However, the good news is that with the right strategies and tools, you can significantly reduce, if not virtually eliminate, the dust created during this essential process.
This comprehensive guide is designed to empower you with proven tips and innovative techniques to make your next drywall sanding project a remarkably cleaner experience. We’ll delve into practical methods that range from simple household items to specialized equipment, all aimed at trapping dust before it has a chance to spread throughout your living space. Say goodbye to post-sanding cleanup nightmares and hello to more efficient, dust-controlled renovations. (This post may contain affiliate links, meaning I may earn a small commission at no extra cost to you if you make a purchase through my links; for full details, please see my disclosure statement {here})
Why Drywall Dust is a Major Concern
Before diving into the “how-to,” it’s crucial to understand “why” minimizing drywall dust is so important. Beyond the obvious aesthetic nuisance of a dusty home, drywall dust poses several significant challenges:
Health Risks Associated with Drywall Dust
Drywall dust primarily consists of gypsum, a non-toxic mineral, but it also contains silica, talc, mica, calcite, and sometimes even asbestos in older homes. When these fine particles become airborne, they can be easily inhaled. Short-term exposure can lead to respiratory irritation, coughing, and throat discomfort. For individuals with asthma or other respiratory conditions, it can trigger more severe reactions. Long-term or repeated exposure to high concentrations of crystalline silica, a component often found in joint compound, can lead to serious lung diseases like silicosis, a debilitating and irreversible lung disease, and even increase the risk of lung cancer. Protecting your lungs with appropriate personal protective equipment (PPE) like N95 respirators is paramount.
The Unwanted Spread and Cleanup Nightmare
Drywall dust is notoriously fine and lightweight, allowing it to travel astonishing distances. Even with careful room sealing, it seems to find its way into every crevice, settling on furniture, electronics, and within HVAC systems. This widespread dispersion not only makes cleanup an arduous, multi-day task but can also potentially damage sensitive equipment. Dusting, vacuuming, and wiping down every surface repeatedly becomes necessary, extending the project timeline and increasing overall frustration. Effective dust control at the source is the key to preventing this pervasive spread.
Tip #1: The Dustpan Trick – Simple Yet Effective for Small Repairs
For those quick touch-ups and minor repairs, such as filling a few nail holes or smoothing out a small patch, the humble dustpan becomes an unexpectedly powerful ally. This method is incredibly straightforward and requires minimal setup, making it ideal for localized sanding tasks where a full dust collection system might be overkill.
How to Implement the Dustpan Method
The technique is brilliantly simple: hold a dustpan at a slight angle directly beneath the area you are sanding. As you sand, the fine drywall dust, driven by gravity, will fall directly into the dustpan’s basin. This immediate capture prevents the dust from becoming airborne and settling on your floors or nearby furniture. For optimal results, consider using a dustpan equipped with a rubber edge. This flexible lip allows the dustpan to conform more closely to the wall’s surface, creating a tighter seal and minimizing the chances of dust escaping the collection area. A good example of such a tool is {this rubber-edged dustpan}, which excels at hugging the wall to catch virtually every particle.
Benefits and Best Practices
This method shines for its ease of use and instant gratification. Once your sanding is complete, simply carry the dustpan to a trash bin, empty the contents, and you’re done. No widespread mess, no extensive vacuuming afterward. It’s particularly effective for vertical surfaces and small, isolated areas. Ensure you hold the dustpan firmly and close to the wall to maximize dust capture. This low-tech solution proves that sometimes, the simplest tools are the most effective for targeted dust control.
Tip #2: Create a Dust Trap with Painter’s Tape
Another ingenious and equally simple method for controlling drywall dust, especially for small to medium-sized areas, involves utilizing painter’s tape. This technique transforms a common household item into an effective temporary dust collection system right where you need it most. It’s a fantastic solution when you don’t have a dustpan handy or are working on an area that’s harder to access with one.
Step-by-Step Guide to the Painter’s Tape Method
Start with a piece of high-quality, 2-inch wide painter’s tape, like {this versatile tape}. The length of the tape should be slightly longer than the width of the area you intend to sand. The magic happens in the fold:
- Prepare the Tape: Take your piece of painter’s tape and fold down about ½ inch along one of its long edges. Crucially, ensure the sticky side of this ½-inch fold is facing *outward* from the main body of the tape.
- Attach to the Wall: Carefully stick this ½-inch folded section to the wall, positioning it directly underneath the spot you’re about to sand. Press firmly to ensure good adhesion.
- Form the Ledge: Once attached, the remaining 1½ inches of the tape will naturally create a horizontal ledge. The key is that the sticky side of this ledge should be facing *upward*, ready to catch falling dust.
Now, as you begin to sand your targeted area, the drywall dust will descend and land directly onto this sticky tape ledge. The adhesive surface effectively traps the fine particles, preventing them from scattering across your floor or becoming airborne. This method is particularly effective for small to medium patches where precision dust control is desired.
Effortless Cleanup
Once your sanding is complete and the wall is smooth, the cleanup is remarkably simple. Gently and slowly pull the tape off the wall, ensuring the collected dust remains securely attached. Fold the tape onto itself, encasing the dust, and dispose of it in the trash. This technique offers a clean, contained solution for localized dust, dramatically reducing post-project vacuuming and dusting. It’s an excellent demonstration of how a little ingenuity can go a long way in managing the mess of drywall projects.
Tip #3: Harness the Power of a Shop-Vac for Active Dust Capture
When dealing with larger areas of sanding or if you prefer a more active approach to dust collection, a shop vacuum becomes an indispensable tool. Its powerful suction can capture dust particles the moment they are generated, preventing them from ever escaping into the room’s atmosphere. This method is a significant step up in dust control compared to passive collection methods, especially for more extensive drywall work.
Strategic Shop-Vac Usage
The core idea here is to position the nozzle of your shop-vac – such as {a reliable wet/dry shop-vac} – directly beneath or adjacent to the area you are sanding. As you move your sanding block or tool, the vacuum continuously sucks in the airborne dust particles, effectively trapping them within the shop-vac’s canister before they have a chance to disperse. Experimentation with different nozzle attachments is key to finding the most efficient setup. In my experience, a small brush attachment often works wonders. Its bristles help agitate the surface slightly, lifting dust for easier suction, while also preventing the nozzle from sticking to the wall, which can happen with a smooth, open hose.
Maximizing Efficiency with Your Shop-Vac
- Proximity is Key: Keep the nozzle as close as possible to your sanding area without interfering with your movement. The closer it is, the more dust it will capture.
- Optimal Nozzle Choice: While the small brush attachment is often ideal, flat nozzles can work well for wider areas, and crevice tools are great for corners. Test different attachments to see what works best for your specific task and sanding technique.
- Filter Maintenance: Shop-vacs are powerful, but their efficiency relies on a clean filter. Drywall dust is extremely fine and can quickly clog standard filters, reducing suction power. Consider using a HEPA-rated filter specifically designed for fine dust, and regularly clean or replace it. Many users also recommend using a drywall dust bag inside the canister to protect the filter and simplify dust disposal.
- Consider a Dust Separator: For extensive projects, an external dust separator or cyclone attachment (like a “Dust Deputy”) can be incredibly beneficial. These devices capture the majority of the dust before it reaches the shop-vac, extending the life of your filter and maintaining consistent suction power for longer periods.
Implementing a shop-vac into your drywall sanding routine dramatically enhances dust control, making the cleanup process significantly easier and promoting a healthier working environment. It’s a proactive measure that pays dividends in comfort and efficiency.
Tip #4: Invest in a Dedicated Dust-Free Drywall Sander System
For large-scale drywall projects, whether it’s an entire room of new drywall or extensive repairs, the most effective and professional solution for dust control is a dedicated dust-free drywall sander system. These specialized tools are engineered from the ground up to minimize airborne dust, often achieving a remarkable 90-95% dust capture rate, transforming an otherwise messy job into a considerably cleaner one.
How Dust-Free Drywall Sanders Work
A typical dust-free drywall hand sander kit, such as {this comprehensive kit}, consists of a sanding head with a porous screen or abrasive pad, a hose, and an attachment point for a wet/dry vacuum. The sanding head is designed with a series of holes or channels that, when connected to a vacuum, actively pull dust particles through the abrasive surface and into the hose as you sand. This creates an immediate negative pressure zone around the sanding area, preventing dust from escaping.
Key Features and Benefits
- Integrated Dust Extraction: The primary advantage is the built-in vacuum capability. As soon as dust is created by the sanding action, it’s sucked away, dramatically reducing airborne particles and surface accumulation.
- Washable Sanding Screens: Many systems utilize durable, washable sanding screens instead of traditional sandpaper. These screens are less prone to clogging with drywall dust, maintaining their abrasive effectiveness for longer and reducing material waste. They can often be rinsed clean for reuse.
- Ergonomic Design: Dust-free sanders are often designed for comfortable extended use, featuring lightweight construction and sometimes telescoping handles for reaching high ceilings without ladders.
- Cleaner Workspace, Healthier Environment: The significant reduction in dust translates directly into a cleaner work area, less post-project cleanup, and a much healthier environment for the user. This is particularly crucial for those sensitive to dust or undertaking long-duration projects.
Considerations and Limitations
While dust-free sanders are highly effective, it’s important to note their optimal applications. They generally receive rave reviews for sanding *new* drywall, where the goal is to smooth out large, consistent surfaces of joint compound. However, for sanding delicate spackle spots on already painted walls, traditional sandpaper (used with one of the other dust collection methods) might still offer a finer, smoother final finish. In my personal experience, drywall screens, while excellent for bulk material removal and dust control, sometimes don’t achieve the absolute glass-smooth finish that a very fine-grit sandpaper can provide on a precisely feathered patch. Nonetheless, for large-scale dust control and efficiency on new installations, these systems are unparalleled.
Essential Drywall Sanding Safety and Best Practices
Beyond specific dust control techniques, certain safety measures and preparation steps are universally critical for any drywall sanding project, ensuring your health and the cleanliness of your home.
Always Wear Appropriate Personal Protective Equipment (PPE)
Regardless of which dust control method you choose, some amount of fine dust will inevitably become airborne. Protecting your respiratory system is non-negotiable. Always wear an N95 or P100 rated dust mask or a respirator. These provide effective filtration against fine particulate matter, safeguarding your lungs from potential irritation and long-term damage. Eye protection (safety glasses or goggles) is also essential to prevent dust from irritating or damaging your eyes.
Prepare Your Workspace Diligently
- Isolate the Area: Before you begin sanding, seal off the work area from the rest of your home. Use plastic sheeting and painter’s tape to cover doorways and vents. This acts as a physical barrier, preventing dust migration to other rooms and into your HVAC system.
- Cover Surfaces: Remove as much furniture and decor from the room as possible. For items that cannot be moved, cover them completely with plastic drop cloths or old sheets. This minimizes the amount of dust that settles on them, simplifying cleanup.
- Ventilation is Key: While dust control methods capture dust at the source, good ventilation helps clear any escaping particles. Open windows and use box fans to create a cross-breeze, directing air (and dust) out of the room. Position one fan blowing out of a window and another blowing fresh air in from an opposite window or door.
Post-Sanding Cleanup Strategies
Even with the best dust control, a final cleanup is always necessary. Start by vacuuming all surfaces (walls, floors, ledges) with a shop-vac equipped with a fine-dust filter or a HEPA vacuum. Avoid using a household vacuum cleaner, as its filter may not be adequate for drywall dust and could simply blow the fine particles back into the air or damage the vacuum. After vacuuming, wipe down all surfaces with a damp cloth or a tack cloth to pick up any remaining residual dust. You may need to repeat this process several times to ensure all dust is gone, especially before priming and painting.
Conclusion: Embrace a Cleaner Sanding Experience
Drywall sanding doesn’t have to be synonymous with a colossal mess and an arduous cleanup. By integrating these four effective dust control tips – leveraging a simple dustpan, crafting a clever painter’s tape trap, actively using a powerful shop-vac, or investing in a specialized dust-free sanding system – you can dramatically minimize the spread of fine dust particles and transform your renovation experience. Each method offers a unique advantage, making it suitable for different scales and types of drywall work. From small patch jobs to entire room renovations, there’s a strategy here to keep your home cleaner and your lungs happier.
Remember, diligent preparation, including proper room sealing and wearing appropriate personal protective equipment, complements these dust-reduction techniques, creating a holistic approach to a safer and more efficient project. With these insights, you’re well-equipped to tackle your next drywall project with confidence, knowing that you can achieve smooth, paint-ready walls without the overwhelming burden of pervasive dust. Enjoy the satisfaction of a job well done, with a fraction of the mess!
Once your walls are perfectly smooth and dust-free, you’ll be ready for the exciting next step: painting! For a flawless finish, be sure to check out my comprehensive guide on how to paint a room, detailing ten simple steps for a perfect paint job. Plus, discover a wealth of time-saving secrets and pro strategies in my dedicated post on interior painting tips. Happy renovating and enjoy your beautifully finished space!
